 |
Language:
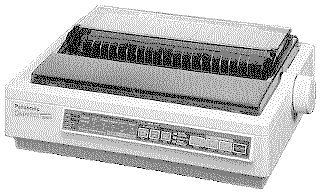
IBM Proprinter X-24E, Epson LQ-860 Speed: Font Draft LQ Graphics: 60, 180, 360 DPI No. of Pins: 24 |
Internal Fonts
| Typeface | Quality | Pitches | Highlight |
| Pica | Draft | 10 | Double High |
| Elite | Draft | 10 | Double High |
| Micron | Draft | 10 | Double High |
| Courier | LQ | 12 | Double wide |
| Prestige | LQ | 15 | Double Strike |
| Bold PS | LQ | 17 | Emphasized (Bold) |
| Script | LQ | 20 | Underline |
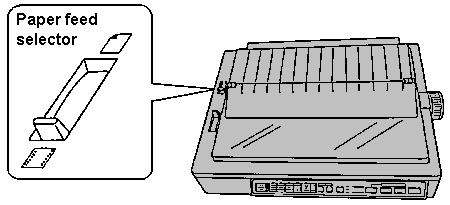
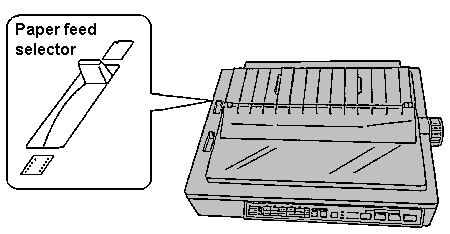
Tractor Feed method: Bottom feed and front feed, tractor and friction
Optional Feeders: Cut sheet feeder
Continuous Feeding
Loading fanfold paper (rear push feed)

Loading fanfold paper (bottom pull feeding)

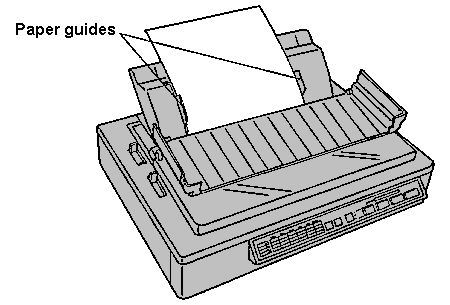
Manual Feeding
Feeding single sheets and envelopes using friction feed


Note:


Initial Setup Mode
The printer allows you to select 24 Initial Setup mode conditions. The printer uses the control table to select them instead of the conventional dip switches.
To Enter the Initial Setup Mode
Turn on the power switch while pressing the FUNCTION switch to enter the Initial Setup mode. The ON LINE/FUNCTION indicator light should be blinking and all row indicator lights should be lit.
When setting the Initial Setup, keep in mind that there are two types:
Individual The setting is either on or off
Group The setting has a number of selections to choose from
Setting the Initial Setup Mode
| ROW Indicator | COLUMN Indicator (LED is lit or flashing) | |||||||
| SUPER QUIET | TEAR OFF | LOAD PARK | ON LINE | FF | LF | |||
| R1 | R2 | R3 | R4 | C1 | C2 | C3 | C4 | C5 |
| ON | ON | ON | ON | Print current Initial Setup condition | Factory Read | |||
| ON | OFF | OFF | OFF | Epson | IBM | |||
| OFF | ON | OFF | OFF | Italic | G1 | G2 | ||
| ON | ON | OFF | OFF | USA | MULTI-LINGUAL | PORTUGAL | CANADA | NORWAY |
| OFF | OFF | ON | OFF | USA | FRANCE | GERMANY | ENGLAND | DENMARK 1 |
| ON | OFF | ON | OFF | SWEDEN | ITALY | SPAIN 1 | JAPAN | NORWAY |
| OFF | ON | ON | OFF | DENMARK 2 | SPAIN 2 | LATIN AMERICA | KOREA | LEGAL |
| ON | ON | ON | OFF | Standard zero | Slashed zero | Dotted zero | ||
| OFF | OFF | OFF | ON | Download buffer | C.S.F. | P.O. Detector | Buzzer | AGM |
| ON | OFF | OFF | ON | Auto LF | Auto CR | Skip Perf. | G. Direction | Auto Tear Off |
| OFF | ON | OFF | ON | Interface | Data Length | Auto Loading | ||
| ON | ON | OFF | ON | 150 | 300 | 600 | 1200 | 2400 |
| OFF | OFF | ON | ON | 4800 | 9600 | |||
| ON | OFF | ON | ON | No Parity | Ignore Parity | Odd Parity | Even Parity | |
| OFF | ON | ON | ON | Protocol | S.D.T. | R.D.T. | Signal Polarity |
Details of all items in the Initial Setup mode
* marks factory setting
Printer Emulation (Group)
Epson* Epson LQ-860 emulation
IBM IBM Proprinter X24E emulation
Character Set (Group)
Italic* Italic character set
G1 Graphic character set 1
G2 Graphic character set 2
Code Page (Group)
Selects one of 5 code pages - USA*, Multilingual, Portugal,
Canada, Norway
International Character Set
(Group)
Selects one of the international, Legal character sets - USA*,
France, Germany, England, Denmark 1, Sweden, Italy, Spain 1,
Japan, Norway, Denmark 2, Spain 2, Latin America, Korea, and
Legal.
Zero Font (Group)
Selects one of the zero fonts - standard*, slashed or dotted.
Download Buffer Control
(Individual)
ON Download in enabled
OFF* Download is disabled
Note: This setting is effective only when the 32K buffer option
(KX-P43) is installed.
Cut Sheet Feeder
(Individual)
ON C.S.F is installed
OFF* C.S.F is not installed
Note: This setting is effective only when the paper feed selector
is in the single position and the cut sheet feeder option
(KX-PT10) is installed.
Paper Out Detector
(Individual)
ON* Detector is active
OFF Detector is ignored
Buzzer Sound Control
(Individual)
ON* Buzzer sounds
OFF Buzzer does not sound
Alternate Graphic (AGM)
(Individual)
ON Alternate graphic mode ON
OFF* Alternate graphic mode OFF
Note: This setting is effective only in the IBM Proprinter X24E
mode.
Automatic Line Feed
(Individual)
ON CR+LF
OFF* CR Only
Note: This condition can also be changed through software
commands.
Automatic CR (Individual)
ON Causes automatic CR on
LF, VT, ESC+”J”
OFF* Prevents automatic CR
Note: This setting is effective only in the IBM Proprinter X24E
mode.
Skip Perforation
(Individual)
ON Skip perforation 1 inch
OFF* No skip
Note: This condition can also be changed through software
commands.
Graphics Print Direction
(Individual)
ON* Unidirectional Printing
OFF Bi-directional Printing
Auto Tear Off (Individual)
ON Serial interface (RS-232C)
OFF* Parallel interface
Note: This setting is effective only when KX-PS11 is installed.
Data Length (Individual)
ON 7 bit data length
OFF* 8 bit data length
Automatic Loading
(Individual)
ON* Automatic paper loading is available
OFF Automatic paper loading is not available
The following modes are available only when used with KX-PS11, RS-232C Serial interface board:
Baud Rate (Group)
Selects one of 7 printer baud rates 150, 300, 600, 1200, 2400,
4800 or 9600*
Parity Control (Group)
Selects one of 4 parity controls
No parity*, Ignore parity, Odd parity or Even parity
Protocol Select (Individual)
ON X/ON-X/OFF Protocol
OFF* DTR Protocol
Remaining Buffer Capacity to
Suspend Data Transfer (S.D.T.) (X/OFF) (Individual)
ON* 128 byte
OFF 512 byte
Remaining Buffer Capacity to
Resume Data Transfer (R.D.T.) (X/ON) (Individual)
- When the Suspend Data Transfer (S.D.T) (X/OFF) is set to ON
ON* 256 byte
OFF 384 byte
- When the S.D.T. is set to OFF
ON* 640 byte
OFF 768 byte
Designation of Signal
Polarity for DTR Protocol mode (Individual)
ON When the signal is “space”, the printer tells the
computer that it cannot accept transferring data.
OFF* When the signal is “mark”, the printer tells the
computer that it cannot accept transferring data.
To Reset All Initial Setup Mode Settings to the FACTORY Default Setting
After turning the power switch on while pressing the FUNCTION switch, follow the instructions:
The interface connector is located on the back of the printer towards the left side.
Parallel
Availability: Standard
Connection: Centronics
Activation: Default
erial
Availability: Optional (Part No. KX-PS11)
Connection: RS-232C Interface
Activation: See manual for option serial interface