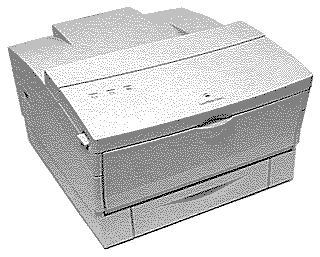
 LaserWriter Select 360
LaserWriter Select 360
LaserWriter Select 360
 |
Language:
PostScript, HP PCL Speed: 10ppm Memory: 7MB Standard, 16MB Maximum Graphics: 300, 600 dpi HP LJ Mode.: 300 dpi Autorotate: Yes Duplex: Not Available RET: Not Available |


Internal PostScript Fonts
| Typeface | Size | Variation | Symbol Set |
| ITC Avant Garde® | Scalable | plain, italic, bold, and bold-italic | Adobe PS |
| ITC Bookman® | Scalable | plain, italic, bold, and bold-italic | Adobe PS |
| Courier | Scalable | plain, italic, bold, and bold-italic | Adobe PS |
| Helvetica® | Scalable | plain, italic, bold, and bold-italic | Adobe PS |
| Helvetica Narrow | Scalable | plain, italic, bold, and bold-italic | Adobe PS |
| New Century Schoolbook | Scalable | plain, italic, bold, and bold-italic | Adobe PS |
| Palatino® | Scalable | plain, italic, bold, and bold-italic | Adobe PS |
| Symbol | Scalable | plain | Symbol |
| Times® | Scalable | plain, italic, bold, and bold-italic | Adobe PS |
| ITC Zapf Chancery® | Scalable | plain | Zapf Chancery |
| ITC Zapf Dingbats® | Scalable | plain | Dingbats |
TrueType Fonts Included with Printer
| ITC Garamond® Narrow | Scalable | plain, italic, bold, and bold-italic | Adobe PS |
| Helvetica Compressed | Scalable | plain and italic | Adobe PS |
| Helvetica® Black | Scalable | plain and italic | Adobe PS |
| Chicago | Scalable | plain | Chicago |
| Delphian | Scalable | plain | Adobe PS |
| Geneva | Scalable | plain | Adobe PS |
| ITC Lubalin Graph® | Scalable | plain, italic, bold, and bold-italic | Adobe PS |
| Lucida Bright | Scalable | plain, italic, bold, and bold-italic | Adobe PS |
| ITC Machine® | Scalable | plain | Adobe PS |
| Monaco | Scalable | plain | Adobe PS |
| Nadianne | Scalable | plain and bold | Adobe PS |
| New York | Scalable | plain | Adobe PS |
| Old English Text | Scalable | plain | Old English Text |
| Onyx | Scalable | plain | Adobe PS |
| Oxford® | Scalable | plain | Adobe PS |
| Swing | Scalable | plain | Adobe PS |
| Zeal | Scalable | plain | Zeal |
Unprintable Region
| Letter:
Left: .18 in. Top: .18 in. Right: .18 in. Bottom: .18 in. Legal: Left: .18 in. Top: .18 in. Right: .18 in. Bottom: .18 in. |
 |
Note: Actual imageable area may vary depending on the application program and/or printer driver.
Continuous Feeding
| Standard Tray: | Automatic 50-sheet paper
feeder 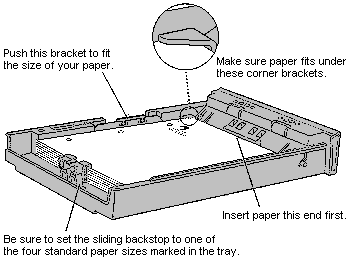 |
|
| Optional Trays | Item | Part Number |
 |
||
| Sheet feeder with 250-sheet universal-size cassette (accepts the same paper size as the printer's standard cassette) | M2041G/A | |
| Sheet feeder with 500-sheet U.S. Letter cassette | M2042G/A | |
| Sheet feeder with 500-sheet A4 cassette | M2043G/A | |
| 250-sheet U.S. Legal cassette (fits the standard or optional 250-sheet feeder) | M2032G/A | |
| 250-sheet A4/letter cassette | M2034G/A | |
| Envelope cassette that feeds
up to 30 envelopes (fits the standard or optional
250-sheet feeder)
|
M2031G/A | |
| Multipurpose tray, which automatically feeds up to 50 sheets of variable paper sizes | M2037G/A | |
Installing the multipurpose tray
You can use the multipurpose tray to automatically feed envelopes and various sizes of paper into the printer. You don't have to install the tray if you don't want to use it. If you don't want to install it, you can feed individual sheets of paper with the manual feed tray.
The tray fits into the
manual feed opening and feeds up to 50 sheets or 5 envelopes. To
get ready to install the multipurpose tray, open the printer as
show here.
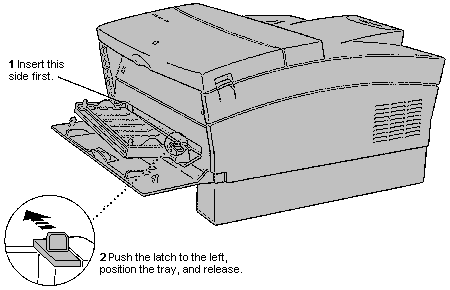
1. Holding the tray folded, insert the left side first as shown.
2. Push the black latch and
snap the tray into position.
You can remove the multipurpose tray by pushing the latch to the
left and gently pulling it out.
Loading the paper cassette
The cassette supplied with your printer holds up to 250 sheets of copier-weight bond paper. The cassette can accept U.S. Letter, A4 or B5 (JIS) paper.
1. Remove the cassette from the printer by grasping it and firmly pulling straight out.
2. Insert a stack of
paper as shown. Load the letterhead and three-hole punched paper
as shown.
Important Make sure the sliding backstop clicks into the
appropriate notch. Setting the backstop between notches or to an
unmarked notch may result in a printing error.
3. Slide the cassette into the printer.
Loading the multipurpose tray.
The multipurpose tray can accept U.S. Legal, A4, U.S. Letter, B5 (JIS), and Executive paper.
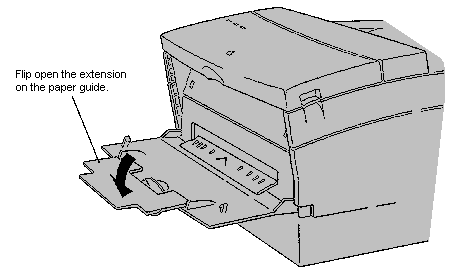
1. Open the flap, then
pull out the extension as shown.
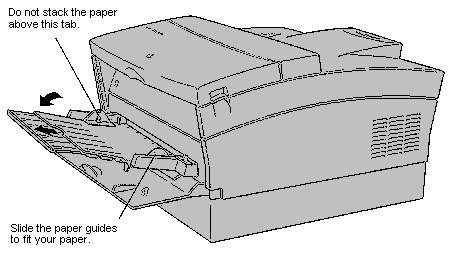
2. Stack the paper on the tray and adjust the paper guides so they just touch the paper, but still allow it to lie flat.
Loading and using the envelope cassette
The optional envelope cassette automatically feeds up to 30 standard-weight envelope. The cassette takes Com-10, Monarch, DL and C5 envelopes.
To load the envelope cassette:
1. Stack the envelopes as
shown, face up (with the flap down), with the top edge against
the side of the cassette that's on the left when you face the
printer.
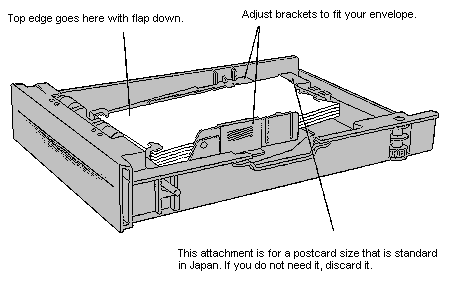
2. If the side brackets need adjustment, slide them to fit against the stack of envelopes.
3. If the rear bracket needs adjustment, squeeze both sides and slide it until the top lip fits over the stack of envelopes. Be sure the bracket stops at one of the preset sizes marked inside the cassette.
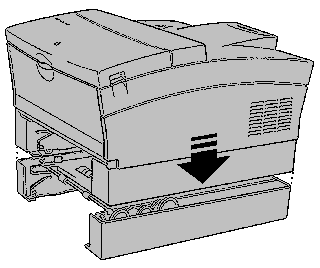
Installing and using the optional sheet feeder and cassette
The optional sheet feeder looks and works exactly like the built-in feeder that forms the lower portion of your printer.
The illustrations here
depict the 250-sheet feeder, but apply also to the 500-sheet
size.
1. Turn off the printer and unplug the power cord.
2. Remove and set aside the paper cassettes from both the printer and the sheet feeder.
3. Set the sheet feeder on a flat, stable surface and lower the printer over it so the sides are exactly aligned.
4. Snap each of the four plastic retainer clips into its slots to lock the upper and lower feeders together.
5. Replace the paper cassettes into the feeders, plug in the power cord, and turn on the printer.
Manual Feeding
Printing paper or envelopes with the manual feed tray
If you want to use paper that is different from the paper in the cassette, you can use the manual feed tray to insert sheets one at a time as the document is printed. You can also use this tray to print on envelopes and other nonstandard paper sizes.
1. Open the manual feed
tray.
2. Open the document you want or select its icon in the Macintosh Finder.
3. Choose Print from the File menu.
4. In the Print dialog box, choose Manual Feed from the Paper Source pop-up menu.
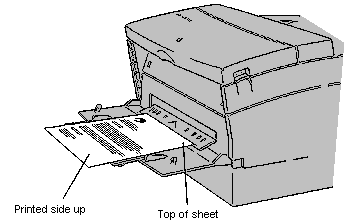
5. Insert a sheet of
paper or envelope as shown.
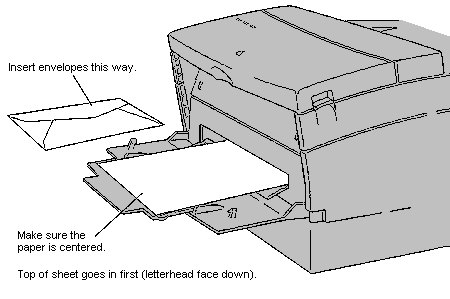
Align the paper with the guides and keep it straight so it feeds
correctly. Make sure the envelope is centered and insert it
firmly until you hear a click.
6. Click Print.
If Background Printing is turned on in the Macintosh Chooser, a
message on your screen asks you to insert a sheet. Click OK if
the paper is ready. If the document has additional pages, the
Paper Out status light flashes each time a sheet is needed.
If Background Printing is turned off, there is no alert message
on your screen. Only the flashing Paper Out Light indicates when
a sheet is needed.
Printing on both sides of a page
Follow these steps to print a document using both sides of the paper.
1. Print the first side of the page using manual feed or the paper cassette.
2. Take out the printed
sheet, turn it over, and print the second side using manual feed,
inserting the sheet as shown here.
Always use manual feed for printing the second side. To avoid
jams, don't load already printed pages into the paper cassette.
The lights indicate a
problem

Always check the status lights first when a printing problem occurs. These often tell you the cause of the problem.
· The Ready/In Use light should glow steadily whenever the printer is on, and blink when it is printing.
· The Paper Out light is on only when there is no paper in the cassette, or the printer is waiting for manual feed.
· The Paper Jam light is on when any obstruction occurs in the paper path.
Parallel
Availability: Standard
Connection: Centronics Female (36-pin)
Activation: Automatic
Serial
Availability: Standard
Connection: DB-25 connector; RS-232
Activation: Automatic
AppleTalk
Availability: Standard
Connection: 9 pin AppleTalk/LocalTalk
Activation: Automatic