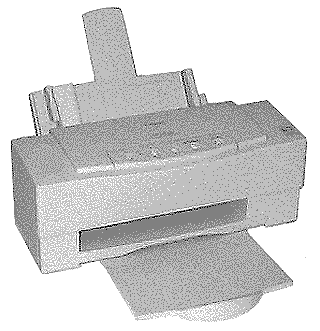
 |
Language:
IBM Proprinter, Epson ESC/P Speed: 170 CPS - Letter, 240 CPS - Draft Graphics: 720 x 360 DPI Color: Yes |
Internal Fonts
| Typeface | Pitches (BJC-10/IBM mode) | Pitches (Epson LQ mode) |
| Prestige | 12 cpi in high quality mode only | 10, 12, 15, 17, 20, proportional |
| Courier | 10, 12, 17, proportional | 10, 12, 15, 17, 20, proportional |
| San Serif | Not Available | 10, 12, 15, 17, 20, proportional |
| Draft | Not Available | 10, 12, 15, 17, 20, proportional |
| Roman | Not Available | 10, 12, 15, 17, 20, proportional |
| Script | Not Available | 10, 12, 15, 17, 20, proportional |
Unprintable Regions
Left: .25 inch
Right: .25 inch
Top: .50 inch
Bottom: .60 inch
Continuous Feeding
Standard Feeders: One Paper Tray [capacity: 100 sheets or 15 envelopes
Envelope Feeding
1. Make sure the printer is turned on and on-line.
2. If you are using the
Canon BJC-600E Windows driver, skip this step. Otherwise, turn on
the envelope mode. Press the on-line button to set the printer
off line. Press the Paper Select button until both the envelope
light and the thick light are one. Press on-line to set the
printer back on-line

3. Make sure the green paper
thickness lever on the inside of the printer is set to the up
position.
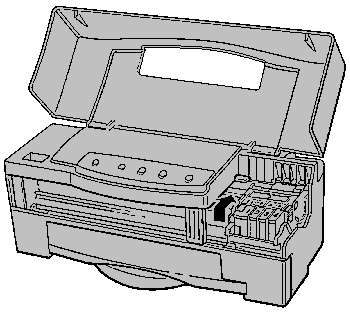
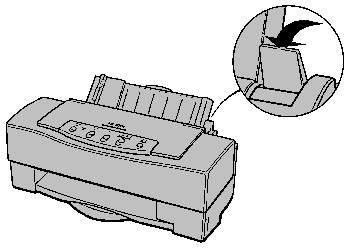
4. Set the paper selection
lever to the forward position and move the paper guide to the
left to match the width of the envelopes.
5. Arrange the stack of envelopes on a firm surface and press down firmly on the edges to make the folds crisp. Press all the way around the envelopes to remove any curls and expel air from inside the envelopes.
6. Align the stack of
envelopes with the right edge of the sheet feeder, and slide in
the stack until it stops.
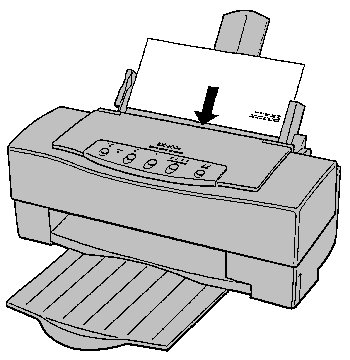
7. Adjust the paper guide to the stack of envelopes.
8. Print from your application.
After printing on envelopes, follow these steps before printing on normal paper again:
1. Set the paper selection lever (on the right side of the sheet feeder) to the back position.
2. Set the green paper thickness lever (inside the printer) to the down position.
3. If you enabled the envelope mode, disable it now. Make sure the printer is off-line; then press the Paper Select button until the envelope light goes out. Press the on line button to set the printer back on line.

| Keypad Display | Cause | Solution |
| ERROR light is on | The printer may be out of paper. | Check the sheet feeder. If the printer is out of paper, load paper into the sheet feeder and press the ON LINE button to continue printing. |
| Paper may be jammed in the printer. | Check the printer for paper jam. If a paper jam has occurred, clear it as described in the manual (page 159.) | |
| An ink cartridge may be empty. | Check the PRINT MODE lights. If any of these lights are flashing, an ink cartridge has run out of ink. Replace the ink cartridge that corresponds to the flashing PRINT MODE light. | |
| If the indicated ink cartridge is not empty, perform the single-head cleaning procedure for that ink cartridge. | ||
| The waste ink container is almost full. | If the PAPER SELECT light is blinking, the waste ink container is almost full. Press the ON LINE button to continue printing. Shortly, the waste ink container becomes full and you cannot continue. Have the printer serviced. | |
| ERROR light is flashing | A system error may have occurred. | Check that the ERROR light is orange. Make sure you are not seeing the green light from the POWER indicator. If the orange ERROR light is flashing, call the Canon help desk. |
| The waste ink container may be full. | If the Bk+ light is on, the waste ink container is full. Have the printer serviced. | |
| ERROR light is on, envelope and thick lights are flashing and the printer beeps three times | If this error occurs within ten seconds after powering on the printer, the print head unit is not installed correctly; the contacts on the compartment cover are not touching the terminals on the print head unit. | Open
the compartment cover and close it again full. Press
firmly on the white dots until you hear two distinct
clicks. Unplug the printer and plug it back in. Turn on
the printer. You may need to do this procedure several
times. If the problem persists, call the Canon help desk. |
| Print head unit is faulty or damaged. | If this error occurs more than ten seconds after turning on the printer, the print head unit may need to be replaced. Call the Canon help desk. | |
| ERROR light is flashing, PRINT MODE light may be on, Envelope or thick light is on | Some type of printer error has occurred. | Turn
the printer off, wait four seconds, and turn it back on. If the problem still exists, write down the status of each light and call the Canon help desk. |
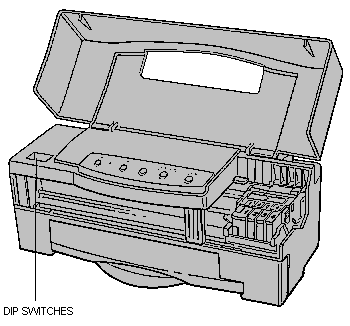
The printer functions defined by the DIP switches are determined by the printer control mode. DIP switch 11 selects the printer control mode. When DIP switch 11 is OFF, the printer is in BJC-10 mode; when DIP switch 11 is on, the printer is in Epson LQ mode.
In Canon Extended mode, used by the Canon BJC-600e Windows printer driver, the printer overrides the DIP switch settings. Thus, if you are using this driver in Windows, you can ignore the DIP switch settings.
DIP switch 12 is not used in either mode.
Epson LQ Mode
Horizontal Print Position Letter
or envelope ![]()
![]()
![]()
![]()
![]()
![]()
![]()
![]()
![]()
![]()
![]()
![]()
![]()
A4 ![]()
![]()
![]()
![]()
![]()
![]()
![]()
![]()
![]()
![]()
![]()
![]()
![]()
Text Scale Mode Disabled
![]()
![]()
![]()
![]()
![]()
![]()
![]()
![]()
![]()
![]()
![]()
![]()
![]()
Enabled ![]()
![]()
![]()
![]()
![]()
![]()
![]()
![]()
![]()
![]()
![]()
![]()
![]()
Character Set Italics ![]()
![]()
![]()
![]()
![]()
![]()
![]()
![]()
![]()
![]()
![]()
![]()
![]()
Graphics ![]()
![]()
![]()
![]()
![]()
![]()
![]()
![]()
![]()
![]()
![]()
![]()
![]()
International Character Set USA
![]()
![]()
![]()
![]()
![]()
![]()
![]()
![]()
![]()
![]()
![]()
![]()
![]()
United Kingdom ![]()
![]()
![]()
![]()
![]()
![]()
![]()
![]()
![]()
![]()
![]()
![]()
![]()
Germany ![]()
![]()
![]()
![]()
![]()
![]()
![]()
![]()
![]()
![]()
![]()
![]()
![]()
France ![]()
![]()
![]()
![]()
![]()
![]()
![]()
![]()
![]()
![]()
![]()
![]()
![]()
Denmark ![]()
![]()
![]()
![]()
![]()
![]()
![]()
![]()
![]()
![]()
![]()
![]()
![]()
Sweden ![]()
![]()
![]()
![]()
![]()
![]()
![]()
![]()
![]()
![]()
![]()
![]()
![]()
Italy ![]()
![]()
![]()
![]()
![]()
![]()
![]()
![]()
![]()
![]()
![]()
![]()
![]()
Spain ![]()
![]()
![]()
![]()
![]()
![]()
![]()
![]()
![]()
![]()
![]()
![]()
![]()
Typeface Roman ![]()
![]()
![]()
![]()
![]()
![]()
![]()
![]()
![]()
![]()
![]()
![]()
![]()
-or- ![]()
![]()
![]()
![]()
![]()
![]()
![]()
![]()
![]()
![]()
![]()
![]()
![]()
-or- ![]()
![]()
![]()
![]()
![]()
![]()
![]()
![]()
![]()
![]()
![]()
![]()
![]()
Sans serif ![]()
![]()
![]()
![]()
![]()
![]()
![]()
![]()
![]()
![]()
![]()
![]()
![]()
Draft ![]()
![]()
![]()
![]()
![]()
![]()
![]()
![]()
![]()
![]()
![]()
![]()
![]()
Courier ![]()
![]()
![]()
![]()
![]()
![]()
![]()
![]()
![]()
![]()
![]()
![]()
![]()
Prestige ![]()
![]()
![]()
![]()
![]()
![]()
![]()
![]()
![]()
![]()
![]()
![]()
![]()
Script ![]()
![]()
![]()
![]()
![]()
![]()
![]()
![]()
![]()
![]()
![]()
![]()
![]()
BJC-10 Mode
Horizontal print position Letter
or envelope ![]()
![]()
![]()
![]()
![]()
![]()
![]()
![]()
![]()
![]()
![]()
![]()
![]()
A4 ![]()
![]()
![]()
![]()
![]()
![]()
![]()
![]()
![]()
![]()
![]()
![]()
![]()
Text Scale Mode Disabled
![]()
![]()
![]()
![]()
![]()
![]()
![]()
![]()
![]()
![]()
![]()
![]()
![]()
Enabled ![]()
![]()
![]()
![]()
![]()
![]()
![]()
![]()
![]()
![]()
![]()
![]()
![]()
Character Set Set 1 ![]()
![]()
![]()
![]()
![]()
![]()
![]()
![]()
![]()
![]()
![]()
![]()
![]()
Set 2 ![]()
![]()
![]()
![]()
![]()
![]()
![]()
![]()
![]()
![]()
![]()
![]()
![]()
Code Page 437 (USA) ![]()
![]()
![]()
![]()
![]()
![]()
![]()
![]()
![]()
![]()
![]()
![]()
![]()
850 (multilingual) ![]()
![]()
![]()
![]()
![]()
![]()
![]()
![]()
![]()
![]()
![]()
![]()
![]()
-or- ![]()
![]()
![]()
![]()
![]()
![]()
![]()
![]()
![]()
![]()
![]()
![]()
![]()
-or- ![]()
![]()
![]()
![]()
![]()
![]()
![]()
![]()
![]()
![]()
![]()
![]()
![]()
-or- ![]()
![]()
![]()
![]()
![]()
![]()
![]()
![]()
![]()
![]()
![]()
![]()
![]()
860 (Portuguese) ![]()
![]()
![]()
![]()
![]()
![]()
![]()
![]()
![]()
![]()
![]()
![]()
![]()
863 (French Canadian) ![]()
![]()
![]()
![]()
![]()
![]()
![]()
![]()
![]()
![]()
![]()
![]()
![]()
865 (Norwegian) ![]()
![]()
![]()
![]()
![]()
![]()
![]()
![]()
![]()
![]()
![]()
![]()
![]()
Page Length 11 inches
![]()
![]()
![]()
![]()
![]()
![]()
![]()
![]()
![]()
![]()
![]()
![]()
![]()
12 inches ![]()
![]()
![]()
![]()
![]()
![]()
![]()
![]()
![]()
![]()
![]()
![]()
![]()
Alternate Graphics Mode Disabled
![]()
![]()
![]()
![]()
![]()
![]()
![]()
![]()
![]()
![]()
![]()
![]()
![]()
Enabled ![]()
![]()
![]()
![]()
![]()
![]()
![]()
![]()
![]()
![]()
![]()
![]()
![]()
Automatic carriage return LF
only ![]()
![]()
![]()
![]()
![]()
![]()
![]()
![]()
![]()
![]()
![]()
![]()
![]()
LF with CR ![]()
![]()
![]()
![]()
![]()
![]()
![]()
![]()
![]()
![]()
![]()
![]()
![]()
Automatic Line Feed CR
only ![]()
![]()
![]()
![]()
![]()
![]()
![]()
![]()
![]()
![]()
![]()
![]()
![]()
CR with LF ![]()
![]()
![]()
![]()
![]()
![]()
![]()
![]()
![]()
![]()
![]()
![]()
![]()
The interface connection is
located on the back of the printer.
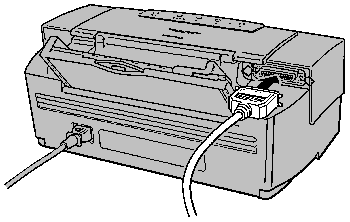
Parallel
Availability: Standard
Connection: Centronics Female
Activation: Automatic