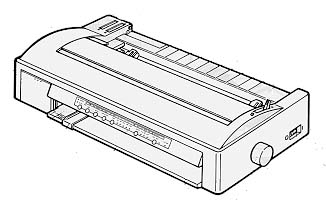
 BJ-300 / BJ-330
 |
Languages: 300: IBM
Proprinter X24E, Epson LQ-850; 330: IBM Proprinter XL24E,
Epson LQ-1050 Technology:
Monochrome Inkjet
Speed: 150
characters per second LQ; 300 characters per second Draft
Graphics: 360 DPI
|


Internal Typefaces: Courier,
Prestige, Gothic
Each typeface is available
in 10, 12, 15, 17, and 20 characters per inch and proportional
pitch and condensed proportional pitch.
Standard Feeders: Fan fold
up to 10" wide for BJ-300, up to 16" for BJ-330, manual
feed front slot
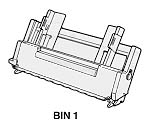
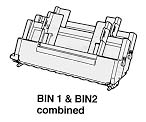
Optional Feeders: Automatic
sheet feeder (1 bin), additional bin can be added to Automatic
sheet feeder for 2 bins
Manual Feed
Cut sheet paper and
envelopes can be fed through the front opening of the printer.
The acceptable width for cut sheet paper for the BJ-300 is
3.5" to 11.7" and 3.5" to 17" for the BJ-330.
Acceptable paper length is 3.5" to 17" for the BJ-300
and 3.5" to 23.4" for the BJ-330.
- Make sure that the
power is off.
- Set the paper selector
to single sheet.
- Turn the power on.
- The cut sheet paper
guide on the printer is adjustable, allowing you to vary
the left margin. Match the cut sheet paper guide with the
paper size scales.
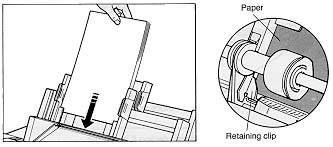
- As you slide the sheet
of paper or envelope into the front opening, align the
left edge of the paper with the cut sheet paper guide.
Slide the paper in until it stops. NOTE: Unless you keep
the paper against the cut sheet paper guide, the paper
width sensor can not sense the paper.
- Since several control
panel keys perform similar functions, there is more than
one way to laod paper and set the position of the top of
the sheet. Choose one of the following procedures
depending on which method suits you best:
- Generally, the easiest paper loading method uses the ON
LINE key. With this method, the number of keys that must
be pressed is reduced. Remember that this key can be used
to load paper from the front opening only. When there is
no paper loaded and the printer is off line, insert a
sheet of paper in the front opening (as described above),
then press the ON LINE key. The sheet will be loaded to
the printing position.
After the sheet is loaded, the SHIFT light begins
blinking to indicate Micro Adjust Mode. Use the MICRO UP
and MICRO DOWN keys to adjust the position of the first
line slightly. The printer memorizes this position, and
loads all successive sheets to the same position. When
data is transmitted from the host computer, these keys
will cease to function. If you want to adjust the
starting point position by more than 1", set the
printer off line and follow the instructions below.
- You can also use the LOAD/EJECT key (or LF/FF key) to
load the paper and set the position of the first line of
print. When the printer is in <BASE> mode (Shift
has not been pressed) and no paper is loaded, insert a
cut sheet in the front opening as described above, then
press the LOAD/EJECT key (or the LF/FF key). The sheet
will be loaded to the default printing position.
If you want to adjust the paper position more than one
inch, press the LF/FF key as many times as necessary to
move the paper to approximately the desired position.
Then you can press the SHIFT key, and use the MICRO UP
and MICRO DOWN keys to adjust the paper position
precisely. This position will not be remembered by the
printer. The next sheet of paper will be loaded to the
default printing position.
- Make sure that the
printer is On Line and start your print job.
Fan Fold Paper
- Make sure that the
power is off.
- Set the Paper Selector
Lever to the fanfold position.
- Turn the power on and
set the printer off line.
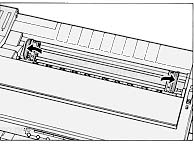
- Set the left pinfeed
wheel-locking lever toward the front of the printer and
adjust the position of the left pinfeed wheel. If the
paper width is less than 16", move the pinfeed wheel
to the right until it stops. In this position, the left
margin will be 16mm wide. If the paper width is 16",
move the pinfeed wheel further to the left. Lock the left
pinfeed wheel in place by setting the locking lever
toward the rear of the printer.
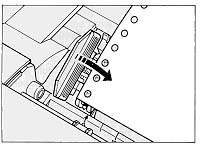
- Loosen the right
pinfeed wheel by setting the pinfeed wheel-locking lever
toward the front of the printer. The loose pinfeed wheel
allows you to adjust the alignment.
- Lift the fan fold paper
holders.
- Load the paper and
align the first three holes in the form with the pinfeed
wheels, adjusting the right pinfeed wheel to the proper
position. The pins must be at the center of the paper
holes.
- Lower the fan fold
paper holders to hold the paper in place.
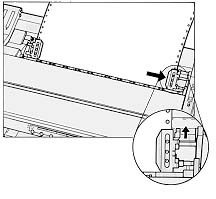
- Pull the right pinfeed
wheel to the right making sure that the paper is tight,
then lock the right pinfeed wheel in place by setting the
locking lever toward the rear of the printer.
- Use the LOAD/EJECT key
and/or the LF/FF key to set the position fo the first
line of print. After you insert the paper, press the
LOAD/EJECT key (or press and hold the LF/FF key). This
moves the paper into the printing position. If you want
to adjust the position of the first line, press the ON
LINE key to set the rpinter on line (The SHIFT light
blinks to indicate Micro Adjust Mode). Then press the
MICRO UP or MICRO DOWN key to adjust the position
precisely.
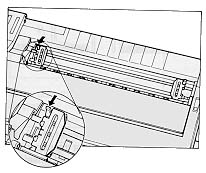
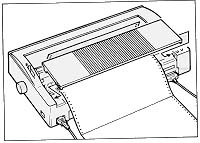
- To prevent paper jams,
install the paper separator. Fit the hook on one side of
the separator into the corresponding projection on the
feed area at the rear of the printer. Then bend the
separator slightly to fit the hook on the the other side
under the projection in the printer. The separator will
snap into place.
- Make sure that the
printer is On Line and start the print job.
Using the Automatic Sheet
Feeder
- Make sure that the
power is off.
- Set the Paper Selector
Lever to the cut sheet position.
- Turn the power on and
set the printer off line.
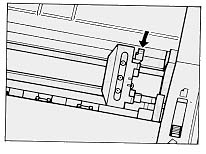
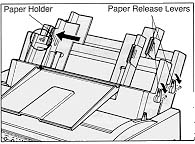
- Set the paper release
lever of the bin to the rear. The paper holders on the
automatic sheet feeder are adjustable, allowing you to
vary the left margin to hold different sizes of paper.
Squeeze the tabs of the paper holder together to release
it, then align the edge of the left paper holder with the
paper size scales.
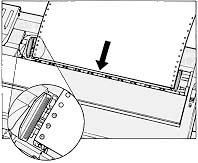
- As you lside sheets or
envelopes into the auto sheet feeder, align the left edge
of the paper with the left paper holder and then adjust
the right paper holder to match the paper.
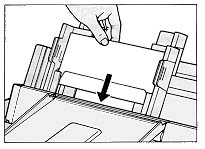
Cut sheet paper - Slide the paper into BIN 1 (or BIN 2)
until it stops, making sure the left edge of the paper
stack is under the left retaining clip inside the bin,
and the right edge of the paper stack is under the right
retaining clip.
Envelopes - Raise the envelope holders on both sides, and
slide the envelopes into BIN 1 (do not load envelopes
into BIN 2) until they stop.
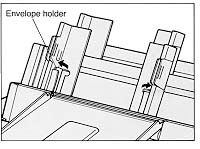
Be sure to adjust the right paper holder so that it
presses against the right edge of the envelopes,
otherwise, a double feed or a paper jam may occur.
- Set the paper release
lever toward the front of the printer and lift the paper
delivery tray.
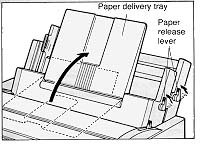
- Press the PAPER key to
select BIN 1 or BIN 2 as the paper feed source.
- Press the LOAD/EJECT
key, to load the first sheet to the printing position. To
adjust the paper position slightly, set the printer On
Line (the SHIFT light blinks to indicate the Micro Adjust
Mode), and press the MICRO UP or MICRO DOWN key to adjust
the paper precisely.
- Make sure that the
printer is On Line and start your print job.
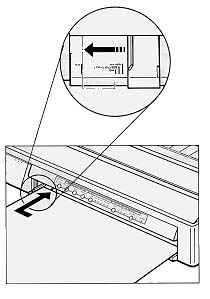
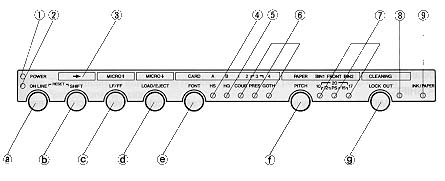
Dip Switch Settings
Make sure the printer is
turned off. Open the DIP switch cover on the rear of the printer.
Set the DIP switch selectors by gently pressing down with a
pointed (but not sharp) object such as a ballpoint pin.
SW1 (left bank) settings:
| Switches |
Settings |
Selection |
|
1-1
1-2 |
ON
ON |
IBM Proprinter
X24E/XL24E emulation mode |
         |
| |
ON
OFF |
Epson LQ-850 /
LQ-1050 emulation mode |
 |
| 1-3 |
OFF |
Parallel Interface |
   |
| |
ON |
Serial Interface |
 |
| 1-4 |
OFF |
Image Density High |
 |
| |
ON |
Image Density
Normal |
 |
| 1-5 |
OFF |
Short Tear-off
Inactive |
 |
| |
ON |
Short Tear-off
Active |
 |
| 1-6 |
OFF |
Auto Line Feed Off |
 |
| |
ON |
Auto Line Feed On |
 |
| 1-7 |
OFF |
Auto Sheet Feeder
Installed |
 |
| |
ON |
Auto Sheet Feeder
Not Installed |
 |
| 1-8 |
OFF |
Text Scale Mode
Inactive |
 |
| |
ON |
Text Scale Mode
Active |
 |
SW2 (right bank) IBM
Proprinter X24E / XL24E settings:
| Switches |
Settings |
Selection |
|
2-1
2-2
2-3 |
OFF
OFF
OFF |
Code Page 437 |
   |
| |
ON
OFF
OFF |
Code Page 850 |
|
2-4
2-5 |
OFF
OFF |
Form Length:
11" (Letter) |
|
| |
OFF
ON |
Form Length:
11.69" (A4) |
|
| |
ON
OFF |
Form Length:
12" |
|
| |
ON
ON |
Form Length:
14" (Legal) |
|
| 2-6 |
OFF |
6 Lines per Inch |
|
| |
ON |
8 Lines per Inch |
|
| 2-7 |
OFF |
Letter Quality |
|
| |
ON |
Draft |
|
| 2-8 |
OFF |
Skip Perforation
Off |
|
| |
ON |
Skip Perforation On |
|
| 2-9 |
OFF |
Paper Width Sensor
On |
 |
| |
ON |
Paper Width Sensor
Off |
 |
| 2-10 |
UNUSED |
UNUSED |
|
SW2 (right bank) Epson
LQ-850 / LQ-1050 Settings
| Switches |
Settings |
Selection |
|
2-1
2-2
2-3 |
ON
ON
ON |
USA |
|
| |
ON
ON
OFF |
France |
|
| |
ON
OFF
ON |
Germany |
|
| |
ON
OFF
OFF |
UK |
|
| |
OFF
ON
ON |
Denmark 1 |
|
| |
OFF
ON
OFF |
Sweden |
|
| |
OFF
OFF
ON |
Italy |
|
| |
OFF
OFF
OFF |
Spain 1 |
|
| 2-4 |
ON |
Page Length:
12" |
|
| |
OFF |
Page Length:
11" (Letter) |
|
| 2-5 |
ON |
Epson Extended
Graphics Characters |
|
| |
OFF |
Epson Italic
Characters |
|
| 2-6 |
UNUSED |
UNUSED |
|
| 2-7 |
UNUSED |
UNUSED |
|
| 2-8 |
ON |
Skip Perforation On |
|
| |
OFF |
Skip Perforation
Off |
|
| 2-9 |
OFF |
Paper Width Sensor
On |
|
| |
ON |
Paper Width Sensor
Off |
|
| 2-10 |
UNUSED |
UNUSED |
|
| Lights |
Buzzer |
What to do |
| All lights off |
No sound |
Make sure that the
power cable is properly connected and / or the power
switch is turned on. |
| Power and Ink/Paper
lights on |
Sounds 3 times |
Check to see if the
printer is out of paper or look for a paper jam. Load new
paper or clear the jam, then press the Load/Eject key to
load a new sheet of paper. Press the On Line key to
continue printing. |
| Power light on and
Ink/Paper light blinks |
Sounds 3 times |
Check whether the
printer is out of ink or the ink cartridge is not
properly installed. If the printer is out of ink, replace
the ink cartridge. If the ink cartridge is not properly
installed, install it properly. |
| Power light on and
HS/CARD A and HQ/CARD B lights blink |
Sounds 6 times |
The print head is
not in the proper home position. Turn the power off, wait
4 seconds, then turn the printer back on. |
| Power light on and
HS/CARD A, HQ/CARD B, Courier, Prestige and Gothic lights
blink |
Sounds 6 times |
An error has
occurred in internal ROM or RAM. Turn the power off, wait
4 seconds, then turn the printer back on. |
| Power light on and
HQ/CARD B light blinks |
No sound |
The battery in the
optional expansion RAM card is low. Leave the RAM card
installed in the printer with power on until the battery
can be replaced. |
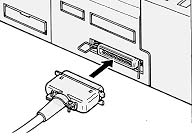
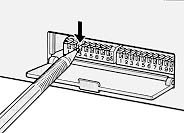
Parallel
Availability: Standard
Connection: Centronix Parallel
Activation: DIP Switch
Serial
Availability: Optional interface card
Connection: RS-232
Activation: DIP Switch (DIP switches on the board itself set the
baud rate and protocol settings)