 |
Language:
IBM Proprinter, Epson ESC/P Speed: Draft 10 CPI - 160 CPS, LQ 10 CPI - 60 CPS Graphics: 120, 180, 360 DPI No. of Pins: 24 |


Internal Fonts
| Typeface | Quality | Pitches | CPI |
| Roman | LQ | 6,7,8,10,12,14,20,24,48 | 20,17,15,12,10,8.5,6,5,2.5 |
| Sans Serif | LQ | 6,7,8,10,12,14,20,24,48 | 20,17,15,12,10,8.5,6,5,2.5 |
| Courier | LQ | 6,7,8,10,12,14,20,24,48 | 20,17,15,12,10,8.5,6,5,2.5 |
| Prestige | LQ | 6,7,8,10,12,14,20,24,48 | 20,17,15,12,10,8.5,6,5,2.5 |
| Draft | Draft | 6,7,8,10,12,14,20,24,48 | 20,17,15,12,10,8.5,6,5,2.5 |
Standard Feeders: Push tractor feed, Pull tractor feed, Friction feed.
Optional Feeders:
Automatic Sheet Feeder: Permits continuous printing on cut
sheets.
Manual Sheet Feeder: Permits stacking multiple cut sheets.
Continuous Feeding
Loading fanfold paper (push feed)
1. Place your fanfold paper stack below or behind your printer so that the paper may feed in from the rear of the printer.
2. Unlock the tractor feeders by pulling the lock levers forward. slide them left and right to the approximate paper width. Lock the left one in place.
3. Flip open both tractor
feeder covers and position the paper's left sprocket holes over
the tractor pins on the left tractor feeder. Snap it closed.
Position the paper's right sprocket holes over the tractor pins
on the right tractor feeder and snap it closed. Move the right
tractor feeder gently until the paper is just taut between the
two feeders. Re-lock the lock lever.

Look at the paper's edge and be sure it is straight. Paper which enters the printer crooked or off-center can cause a paper jam.
4. Set the paper select lever to the forward position, where the icon shows a stack of paper.
5. Install the paper guide/sheet separator in the sheet separator position. Do this by engaging the small extensions on the lower left and right corners of the paper guide onto the small posts pointing into the printer. Be sure you are using the higher of the two posts on each side.
Recline the paper guide backward. Simultaneously the front end of the paper guide will slide forward slightly. The small extensions will rest on top of the second set f posts which point into the printer. Correctly install, the paper guide will incline about 15 degrees.
6. Move the paper holders from the sides into the middle of the paper guide. This prevents your printed output from becoming accidentally jammed in the paper guide on it way out of the printer.
7. Turn on the printer.
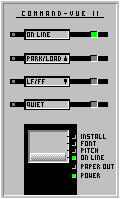
8. Make sure the Command-Vue II slide switch is in the ON LINE position (all the way to the bottom).
9. Push the [PARK LOAD] key. This will advance the paper to the starting print position.
10. Press the [ON LINE] key.
Loading fanfold paper (bottom pull feed)
Use this feed for continuous forms such as multi-part forms and card stock.
1. Be sure the tractor is in the "pull" position.
2. Turn off the printer before loading the forms in from the bottom.
3. Remove the top cover.
4. Set the printer on its rear side.
5. Insert the forms through the slot in the bottom of the printer. Pull the forms through so that 4 or 5 inches extend out of the printer.
6. Set the printer right-side up again.
7. Open the tractor feeder covers, position the forms on the sprockets and close the covers. Be sure the paper is straight. Adjust the distance between the tractor feeders, if necessary, by unlocking the lock levers and sliding the feeders until the paper is taut. Re-lock the levers.
8. Move the paper select lever to the forward (paper stack) position.
9. Turn the paper feed knob clockwise until the second sheet of the forms is at the correct starting print position. When printing with the tractor in the "pull" position, the first sheet of the forms is unusable.
10. Set the paper thickness lever to +1 for 2-part forms, +2 for 3 or 4-part forms.
11. Replace the top cover, pressing on the "push" locations. The transparent part of the cover will rest against the tractor unit.
12. Turn on the printer.
Manual Feeding
Automatically loading single sheets
1. Be sure the tractor is in the "push" position.
2. Change the paper select lever to the rear (single sheet) position.
3. Install the paper guide in the upright position used for inserting paper. To do this, hold the paper guide so that the two corner extensions point downward into the printer. Hook the extensions onto the upper guide pins pointing into the printer, then slide them down so that they engage the lower guide pins, also.
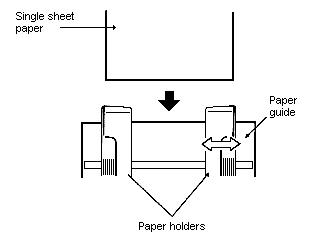
To use the paper guide, simply adjust the left paper holder, according to the size of paper you will be using. Insert a sheet of paper and adjust the right paper holder to the paper width.
4. Make sure the MENU slide switch on the control panel is in the ON LINE position (all the way down).
5. With the sheet of paper out of the printer, turn on the GSX-130. You will see the POWER and PAPER OUT lights.
6. Insert a piece of paper
head-in, face down, between the paper holders (as you would load
paper in a typewriter). Push the paper down gently to be sure it
is all the way in.
7. Wait a brief time (approximately half a second). The paper will automatically feed into the printer and stop when it reaches the correct position for the stating line of print. The PAPER OUT light will go off.
8. Prepare to print by press the [ON LINE] key; the ON LINE light will light.
Loading paper in the Manual Sheet Feeder (the Manual Sheet Feeder is optional)
1. Move the paper setting lever (the left lever) forward.
2. Adjust the left and right guides on the sheet feeder to the size of the paper you are going to use.
3. The paper must be well fanned before stacking into the sheet feeder. This keeps the paper from "sticking" so that only one sheet is fed at a time. Approximately 50 sheets can be loaded, depending on the paper thickness.
4. After fanning the paper stack, align its edges by tapping the sides and the bottom of the paper stack on a flat surface.
5. Place paper stack between
the paper guides. Make sure the guides fit snugly but do not bow
the paper stack. (When using letterhead paper, load the top edge
of the paper upside down with the printed side facing backwards
as you would when inserting letterhead in a typewriter.)
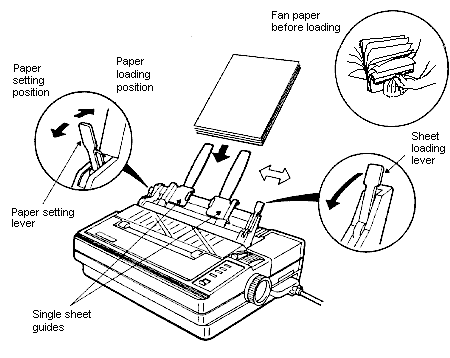
6. Move the paper setting lever to the rear position.
7. To load a sheet into the printer, move the sheet loading lever (the right lever) forward. This will advance the sheet halfway; then, the printer will automatically advance the sheet to the top-of-form (TOF) position.
The default switches are
located on the right side of the printer inside the serial
interface compartment. You'll have to remove the serial interface
cover to gain access to the default switches.
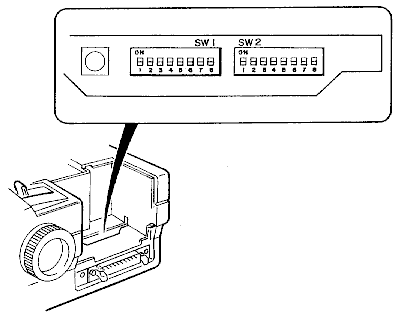
Defaults for all switches is off, or down. (See bold text in tables below)
Default switch settings are read only when the power is turned on. Therefore, you must 1) turn off the printer, 2) change the default switch setting(s) and 3) turn the printer on again. Otherwise, the new settings will not take effect.
Some default switches act differently depending on whether the Epson or IBM configuration is selected. When you change the default switch, be sure that the proper emulation is selected by default switch 1.1.
SW1
Emulation Mode Epson ![]()
![]()
![]()
![]()
![]()
![]()
![]()
![]()
![]()
IBM ![]()
![]()
![]()
![]()
![]()
![]()
![]()
![]()
![]()
Use the following table for the Epson emulation mode:
SW1
Character Set Italic ![]()
![]()
![]()
![]()
![]()
![]()
![]()
![]()
![]()
Graphics ![]()
![]()
![]()
![]()
![]()
![]()
![]()
![]()
![]()
Zero Unslashed ![]()
![]()
![]()
![]()
![]()
![]()
![]()
![]()
![]()
Slashed ![]()
![]()
![]()
![]()
![]()
![]()
![]()
![]()
![]()
Auto Line Feed (LF) Off
![]()
![]()
![]()
![]()
![]()
![]()
![]()
![]()
![]()
On ![]()
![]()
![]()
![]()
![]()
![]()
![]()
![]()
![]()
Skip Perforation Off ![]()
![]()
![]()
![]()
![]()
![]()
![]()
![]()
![]()
On ![]()
![]()
![]()
![]()
![]()
![]()
![]()
![]()
![]()
International Character Set U.S.A.
![]()
![]()
![]()
![]()
![]()
![]()
![]()
![]()
![]()
France ![]()
![]()
![]()
![]()
![]()
![]()
![]()
![]()
![]()
Germany ![]()
![]()
![]()
![]()
![]()
![]()
![]()
![]()
![]()
England ![]()
![]()
![]()
![]()
![]()
![]()
![]()
![]()
![]()
Denmark I ![]()
![]()
![]()
![]()
![]()
![]()
![]()
![]()
![]()
Sweden ![]()
![]()
![]()
![]()
![]()
![]()
![]()
![]()
![]()
Italy ![]()
![]()
![]()
![]()
![]()
![]()
![]()
![]()
![]()
Spain ![]()
![]()
![]()
![]()
![]()
![]()
![]()
![]()
![]()
Use the following table for the IBM emulation mode:
SW1
Character Set Set 1 ![]()
![]()
![]()
![]()
![]()
![]()
![]()
![]()
![]()
Set 2 ![]()
![]()
![]()
![]()
![]()
![]()
![]()
![]()
![]()
Alternate Graphic Mode Off
![]()
![]()
![]()
![]()
![]()
![]()
![]()
![]()
![]()
On ![]()
![]()
![]()
![]()
![]()
![]()
![]()
![]()
![]()
Auto Line Feed (LF) Off
![]()
![]()
![]()
![]()
![]()
![]()
![]()
![]()
![]()
On ![]()
![]()
![]()
![]()
![]()
![]()
![]()
![]()
![]()
Auto CR after LF, VT, ESC J,
Disabled ![]()
![]()
![]()
![]()
![]()
![]()
![]()
![]()
![]()
and ESC j Enabled ![]()
![]()
![]()
![]()
![]()
![]()
![]()
![]()
![]()
Code Page U.S. (437) ![]()
![]()
![]()
![]()
![]()
![]()
![]()
![]()
![]()
Multilingual (850) ![]()
![]()
![]()
![]()
![]()
![]()
![]()
![]()
![]()
Portuguese (860) ![]()
![]()
![]()
![]()
![]()
![]()
![]()
![]()
![]()
Canadian-French (863) ![]()
![]()
![]()
![]()
![]()
![]()
![]()
![]()
![]()
Norwegian (865) ![]()
![]()
![]()
![]()
![]()
![]()
![]()
![]()
![]()
Scandinavian (Citizen) ![]()
![]()
![]()
![]()
![]()
![]()
![]()
![]()
![]()
Use the following table for either emulation mode:
SW2
Default Font Roman ![]()
![]()
![]()
![]()
![]()
![]()
![]()
![]()
![]()
Sans Serif ![]()
![]()
![]()
![]()
![]()
![]()
![]()
![]()
![]()
Courier ![]()
![]()
![]()
![]()
![]()
![]()
![]()
![]()
![]()
Prestige ![]()
![]()
![]()
![]()
![]()
![]()
![]()
![]()
![]()
Form Length 11 inches
![]()
![]()
![]()
![]()
![]()
![]()
![]()
![]()
![]()
12 inches ![]()
![]()
![]()
![]()
![]()
![]()
![]()
![]()
![]()
14 inches ![]()
![]()
![]()
![]()
![]()
![]()
![]()
![]()
![]()
7 inches ![]()
![]()
![]()
![]()
![]()
![]()
![]()
![]()
![]()
Top of Form Position 7/16
inch ![]()
![]()
![]()
![]()
![]()
![]()
![]()
![]()
![]()
0 inches ![]()
![]()
![]()
![]()
![]()
![]()
![]()
![]()
![]()
Automatic Sheet Feeder Disabled
![]()
![]()
![]()
![]()
![]()
![]()
![]()
![]()
![]()
Enabled ![]()
![]()
![]()
![]()
![]()
![]()
![]()
![]()
![]()
Graphics and Text Printing Bi-directional
![]()
![]()
![]()
![]()
![]()
![]()
![]()
![]()
![]()
Unidirectional ![]()
![]()
![]()
![]()
![]()
![]()
![]()
![]()
![]()
Color Printing Disabled
![]()
![]()
![]()
![]()
![]()
![]()
![]()
![]()
![]()
Enabled ![]()
![]()
![]()
![]()
![]()
![]()
![]()
![]()
![]()
The interface connector is
located on the back of the printer toward the left side.
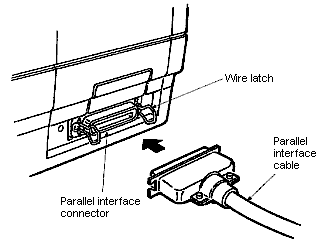
Parallel
Availability: Centronics-compatible, 7 or 8 bit.
Connection: 57-30360 Amphenol (cable not to exceed 10 feet)
Activation: Automatic. The interfaces work on a "first come, first served" basis; the interface that receives data first becomes the active interface and remains active until you turn the printer off and on again. When an interface is active, the other one is not used, even if data is sent while the active interface is not receiving data.
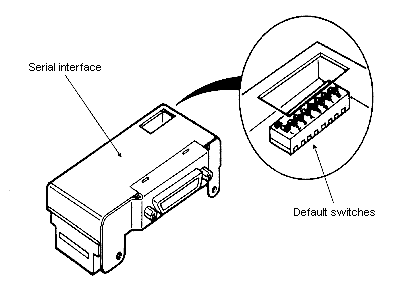
Serial
Availability: optional
Connection: RS-232C. You need to specify the communication mode by setting the default switches on the serial interface board to the proper settings.
Activation: Automatic. The interfaces work on a "first come, first served" basis; the interface that receives data first becomes the active interface and remains active until you turn the printer off and on again. When an interface is active, the other one is not used, even if data is sent while the active interface is not receiving data.
Default Switches for the Serial Interface
The default switches for the
serial interface are locating on the optional serial interface
board, visible through a hole on the top.
Baud Rate 9600 ![]()
![]()
![]()
![]()
![]()
![]()
![]()
![]()
![]()
4800 ![]()
![]()
![]()
![]()
![]()
![]()
![]()
![]()
![]()
2400 ![]()
![]()
![]()
![]()
![]()
![]()
![]()
![]()
![]()
1200 ![]()
![]()
![]()
![]()
![]()
![]()
![]()
![]()
![]()
600 ![]()
![]()
![]()
![]()
![]()
![]()
![]()
![]()
![]()
300 ![]()
![]()
![]()
![]()
![]()
![]()
![]()
![]()
![]()
110 ![]()
![]()
![]()
![]()
![]()
![]()
![]()
![]()
![]()
Handshaking Protocol XON/XOFF
![]()
![]()
![]()
![]()
![]()
![]()
![]()
![]()
![]()
DTR (Data Ready) ![]()
![]()
![]()
![]()
![]()
![]()
![]()
![]()
![]()
Data bits 8 bits ![]()
![]()
![]()
![]()
![]()
![]()
![]()
![]()
![]()
7 bits ![]()
![]()
![]()
![]()
![]()
![]()
![]()
![]()
![]()
Parity Check Off ![]()
![]()
![]()
![]()
![]()
![]()
![]()
![]()
![]()
On ![]()
![]()
![]()
![]()
![]()
![]()
![]()
![]()
![]()
Parity Even ![]()
![]()
![]()
![]()
![]()
![]()
![]()
![]()
![]()
Odd ![]()
![]()
![]()
![]()
![]()
![]()
![]()
![]()
![]()
Stop bits 1 ![]()
![]()
![]()
![]()
![]()
![]()
![]()
![]()
![]()
2 ![]()
![]()
![]()
![]()
![]()
![]()
![]()
![]()
![]()