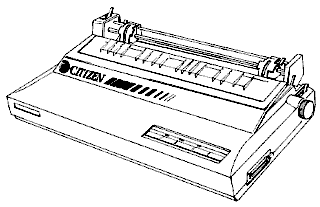
|
Language:
IBM Proprinter, Epson ESC/P, IBM Graphics Graphics: 72, 120, 144, 240 DPI No. of Pins: 9 |
Internal Fonts
| Typeface | Quality | Sizes (in Points) | Pitches (in CPI) |
| Draft | Draft | 6,7,8,10,12,14,20,24,48 | 20,17,15,12,10,8.5,6,5,2.5 |
| High Speed Draft | Draft | 6,7,8,10,12,14,20,24,48 | 20,17,15,12,10,8.5,6,5,2.5 |
| Roman | NLQ | 6,7,8,10,12,14,20,24,48 | 20,17,15,12,10,8.5,6,5,2.5 |
| San Serif | NLQ | 6,7,8,10,12,14,20,24,48 | 20,17,15,12,10,8.5,6,5,2.5, PS |
Standard Feeders:
Push Tractor rear feed.
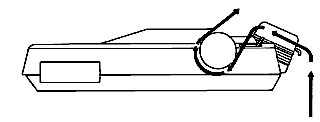
Pull Tractor rear feed.
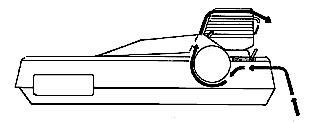
Pull Tractor bottom feed.
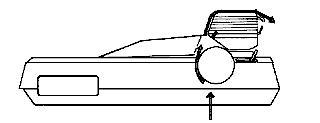
Optional Feeders:
Automatic Sheet Feeder: Permits continuous printing on cut sheets
(up to 100 sheets).
Manual Sheet Feeder: Permits stacking multiple cut sheets.
Continuous Feeding
Loading fanfold paper (push feed)
1. Set the paper select lever to PIN and the paper park lever back for continuous forms. Make sure the pressure release lever is in the up/unlocked position.
2. Install the paper supports on the tractor bars.
3. Flip the locking lever
forward and adjust the tractors to the approximate paper width.
With the paper behind the HSP, fit the holes over the tractor
pins and close the tractor covers.
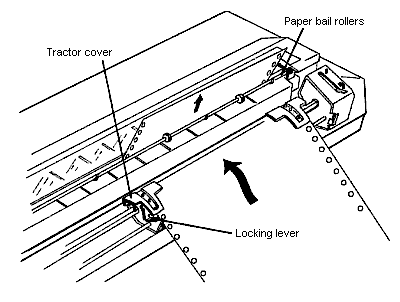
4. Attach the paper separator by inserting it into the rear paper feed-in area. Small posts protruding from the sides of the HSP fit into two cutouts on the back of the guide to stabilize it.
5. Confirm that default switch 1-3 is off and turn the HSP on.
6. Turn the paper feed knob or press [LF/FF] until the paper loads automatically. Press the [On Line] switch to set the HSP on-line.
If printing is too light or too dark, adjust the paper thickness lever located inside the HSP at the right end of the platen. In most cases you can use the third position from the rear.
Loading fanfold paper (pull feed)
1. Turn the power switch off and open or remove the top cover.
2. Push in and lock paper release lever. Push in the two release levers on the back of each end of the tractor mechanism and place the mounting feet into the slots on the top of the printer.
3. Secure the tractor unit on top of the printer and lot go of the release levers. The tractor will lock into place. Now you can turn the paper feed knob to make sure the fears are turning properly.
4. Install the paper supports on the tractor bars and space them evenly between the adjustable tractors.
5. Move the paper select lever to the FRIC position and open the tractor covers.
6. Flip the locking levers forwards and adjust the tractor to the approximate paper width. You can use the small arrow on the edge of the top cover as a guide for the left edge of the paper. Adjust the paper supports so that they are evenly spaced.
7. Place a stack of paper on
a lever surface behind the printer. Bring the top sheet of paper
forward and insert it into the slot just behind the platen.
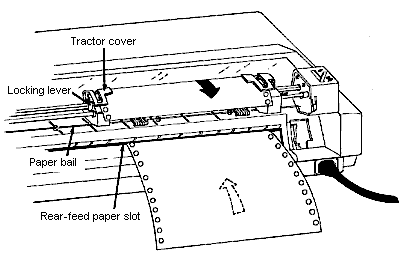
8. Turn the paper feed knob until the paper advances past the print head. Move the paper release lever to the PIN position.
9. Fir the punched holes of the paper over the sprocket pins, moving the tractors as needed to accommodate the paper width. Close the tractor covers.
10. Turn the paper feed knob again, lining up the top of the page (or the perforation line) with the top of the ribbon guide. This will assure that you always start printing at the same place on the page.
11. Adjust the paper left or right as needed by sliding the tractors. When the paper is positioned (usually with the left edge aligned with the print head), lock the tractors in place by flipping the locking levers toward the back.
12. Close or replace the top cover. When you close the cover, it will fit into the front of the tractor unit. Turn the power switch on if you're ready to start printing.
Loading fanfold paper (bottom feed)
Loading bottom-feed paper is very similar to loading paper into the rear of the printer. The tractor mechanism must be installed in the pull position.
To load bottom-feed paper, follow the steps described above for loading fanfold paper in the pull position, except load the paper into the bottom slot of the printer instead of through the rear of the printer.
Manual Feeding
Automatically loading single sheets
1. Confirm that default switch 1-3 is off; turn the printer on.
2. Move the paper select
lever to FRIC and the paper park lever forward. Make sure the
pressure release lever is in the up/unlocked position. Position
the paper separator you attached in the previous section in the
up position; this makes it a single sheet guide.
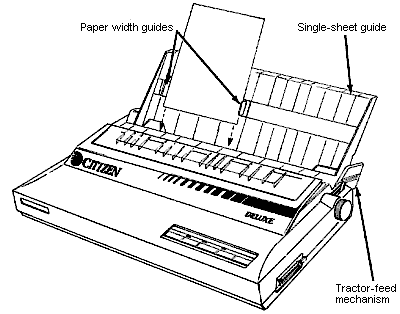
3. Insert a sheet of paper into the sheet guide behind the platen. The paper should be inserted about 1 inch. After about 1 second the paper will automatically be loaded into the printer.
4. Press the [On Line] switch to set the printer on-line.
The default switches are
located underneath the interface cable connector.
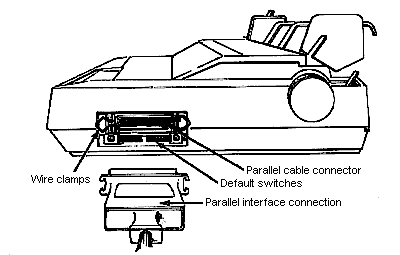
The off position is UP for these switches on the printer. The illustrations below show the switch with the off position DOWN.
Text in bold indicates factory default settings.
The following settings are for the standard configuration mode:
Switch 1
Skip Perforation Off ![]()
![]()
![]()
![]()
![]()
![]()
![]()
![]()
![]()
On ![]()
![]()
![]()
![]()
![]()
![]()
![]()
![]()
![]()
Automatic Sheet Feeder Disabled
![]()
![]()
![]()
![]()
![]()
![]()
![]()
![]()
![]()
Enabled ![]()
![]()
![]()
![]()
![]()
![]()
![]()
![]()
![]()
Automatic paper loading On
![]()
![]()
![]()
![]()
![]()
![]()
![]()
![]()
![]()
Off ![]()
![]()
![]()
![]()
![]()
![]()
![]()
![]()
![]()
SELECT IN signal Ignored
![]()
![]()
![]()
![]()
![]()
![]()
![]()
![]()
![]()
Effective ![]()
![]()
![]()
![]()
![]()
![]()
![]()
![]()
![]()
Automatic Line Feed (LF) Off
![]()
![]()
![]()
![]()
![]()
![]()
![]()
![]()
![]()
On ![]()
![]()
![]()
![]()
![]()
![]()
![]()
![]()
![]()
Graphics Unidirectional
![]()
![]()
![]()
![]()
![]()
![]()
![]()
![]()
![]()
Bi-directional ![]()
![]()
![]()
![]()
![]()
![]()
![]()
![]()
![]()
NLQ Printing Unidirectional ![]()
![]()
![]()
![]()
![]()
![]()
![]()
![]()
![]()
Bi-directional ![]()
![]()
![]()
![]()
![]()
![]()
![]()
![]()
![]()
International Characters Set
U.S.A. ![]()
![]()
![]()
![]()
![]()
![]()
![]()
![]()
![]()
![]()
![]()
![]()
![]()
![]()
![]()
![]()
![]()
![]()
(Default Switch 1 & 2)
France ![]()
![]()
![]()
![]()
![]()
![]()
![]()
![]()
![]()
![]()
![]()
![]()
![]()
![]()
![]()
![]()
![]()
![]()
Germany ![]()
![]()
![]()
![]()
![]()
![]()
![]()
![]()
![]()
![]()
![]()
![]()
![]()
![]()
![]()
![]()
![]()
![]()
England ![]()
![]()
![]()
![]()
![]()
![]()
![]()
![]()
![]()
![]()
![]()
![]()
![]()
![]()
![]()
![]()
![]()
![]()
Denmark I ![]()
![]()
![]()
![]()
![]()
![]()
![]()
![]()
![]()
![]()
![]()
![]()
![]()
![]()
![]()
![]()
![]()
![]()
Sweden ![]()
![]()
![]()
![]()
![]()
![]()
![]()
![]()
![]()
![]()
![]()
![]()
![]()
![]()
![]()
![]()
![]()
![]()
Italy ![]()
![]()
![]()
![]()
![]()
![]()
![]()
![]()
![]()
![]()
![]()
![]()
![]()
![]()
![]()
![]()
![]()
![]()
Spain ![]()
![]()
![]()
![]()
![]()
![]()
![]()
![]()
![]()
![]()
![]()
![]()
![]()
![]()
![]()
![]()
![]()
![]()
Japan ![]()
![]()
![]()
![]()
![]()
![]()
![]()
![]()
![]()
![]()
![]()
![]()
![]()
![]()
![]()
![]()
![]()
![]()
Norway ![]()
![]()
![]()
![]()
![]()
![]()
![]()
![]()
![]()
![]()
![]()
![]()
![]()
![]()
![]()
![]()
![]()
![]()
Denmark II ![]()
![]()
![]()
![]()
![]()
![]()
![]()
![]()
![]()
![]()
![]()
![]()
![]()
![]()
![]()
![]()
![]()
![]()
Spain II ![]()
![]()
![]()
![]()
![]()
![]()
![]()
![]()
![]()
![]()
![]()
![]()
![]()
![]()
![]()
![]()
![]()
![]()
Latin America ![]()
![]()
![]()
![]()
![]()
![]()
![]()
![]()
![]()
![]()
![]()
![]()
![]()
![]()
![]()
![]()
![]()
![]()
Switch 2
High bit mode High-bit
ctrl codes ![]()
![]()
![]()
![]()
![]()
![]()
![]()
![]()
![]()
Special characters ![]()
![]()
![]()
![]()
![]()
![]()
![]()
![]()
![]()
Configuration Standard
![]()
![]()
![]()
![]()
![]()
![]()
![]()
![]()
![]()
IBM ![]()
![]()
![]()
![]()
![]()
![]()
![]()
![]()
![]()
Pitch Normal (Pica) ![]()
![]()
![]()
![]()
![]()
![]()
![]()
![]()
![]()
Compressed ![]()
![]()
![]()
![]()
![]()
![]()
![]()
![]()
![]()
Page Length 11" ![]()
![]()
![]()
![]()
![]()
![]()
![]()
![]()
![]()
12" ![]()
![]()
![]()
![]()
![]()
![]()
![]()
![]()
![]()
Zero Unslashed ![]()
![]()
![]()
![]()
![]()
![]()
![]()
![]()
![]()
Slashed ![]()
![]()
![]()
![]()
![]()
![]()
![]()
![]()
![]()
The following settings are for the IBM configuration mode:
Switch 1
Skip Perforation Off ![]()
![]()
![]()
![]()
![]()
![]()
![]()
![]()
![]()
On ![]()
![]()
![]()
![]()
![]()
![]()
![]()
![]()
![]()
Automatic Sheet Feeder Disabled
![]()
![]()
![]()
![]()
![]()
![]()
![]()
![]()
![]()
Enabled ![]()
![]()
![]()
![]()
![]()
![]()
![]()
![]()
![]()
Automatic paper loading On
![]()
![]()
![]()
![]()
![]()
![]()
![]()
![]()
![]()
and parking Off ![]()
![]()
![]()
![]()
![]()
![]()
![]()
![]()
![]()
Automatic Line Feed (LF) Off
![]()
![]()
![]()
![]()
![]()
![]()
![]()
![]()
![]()
On ![]()
![]()
![]()
![]()
![]()
![]()
![]()
![]()
![]()
Graphics Unidirectional
![]()
![]()
![]()
![]()
![]()
![]()
![]()
![]()
![]()
Bi-directional ![]()
![]()
![]()
![]()
![]()
![]()
![]()
![]()
![]()
Auto CR after LF, VT, ESC J,
Disabled ![]()
![]()
![]()
![]()
![]()
![]()
![]()
![]()
![]()
and ESC j Enabled ![]()
![]()
![]()
![]()
![]()
![]()
![]()
![]()
![]()
NLQ Printing Unidirectional ![]()
![]()
![]()
![]()
![]()
![]()
![]()
![]()
![]()
Bi-directional ![]()
![]()
![]()
![]()
![]()
![]()
![]()
![]()
![]()
Switch 2
Character Set IBM Set 1
![]()
![]()
![]()
![]()
![]()
![]()
![]()
![]()
![]()
IBM Set 2 ![]()
![]()
![]()
![]()
![]()
![]()
![]()
![]()
![]()
CANCEL Code Valid ![]()
![]()
![]()
![]()
![]()
![]()
![]()
![]()
![]()
Invalid ![]()
![]()
![]()
![]()
![]()
![]()
![]()
![]()
![]()
Line Spacing 1/6"
![]()
![]()
![]()
![]()
![]()
![]()
![]()
![]()
![]()
1/8" ![]()
![]()
![]()
![]()
![]()
![]()
![]()
![]()
![]()
Full-Print Line &
Line Feed ![]()
![]()
![]()
![]()
![]()
![]()
![]()
![]()
![]()
Line Only ![]()
![]()
![]()
![]()
![]()
![]()
![]()
![]()
![]()
Configuration Standard
(Epson) ![]()
![]()
![]()
![]()
![]()
![]()
![]()
![]()
![]()
IBM Proprinter XL ![]()
![]()
![]()
![]()
![]()
![]()
![]()
![]()
![]()
Pitch Normal (Pica) ![]()
![]()
![]()
![]()
![]()
![]()
![]()
![]()
![]()
Compressed ![]()
![]()
![]()
![]()
![]()
![]()
![]()
![]()
![]()
Page Length 11" ![]()
![]()
![]()
![]()
![]()
![]()
![]()
![]()
![]()
12" ![]()
![]()
![]()
![]()
![]()
![]()
![]()
![]()
![]()
Zero Unslashed ![]()
![]()
![]()
![]()
![]()
![]()
![]()
![]()
![]()
Slashed ![]()
![]()
![]()
![]()
![]()
![]()
![]()
![]()
![]()
The interface connector is
located on the right side of the printer towards the front.
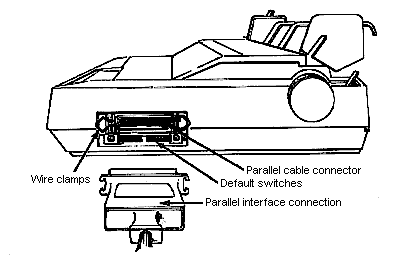
Parallel
Availability: Standard.
Connection: Centronics Female
Activation: Automatic. You can only run one interface or another. To run a different interface you have to remove the other.
Serial
Availability: Optional
Connection: The
serial interface board replaces the parallel board.
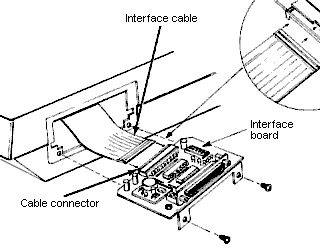
The default switches for the serial interface are located on the
serial board itself.
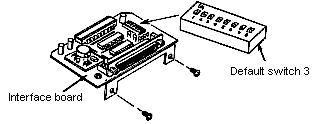
Activation: Automatic. You can only run one interface or another. To run a different interface you have to remove the other.
Serial Board Default Switch Settings:
Text in bold indicates factory default setting.
Baud Rate 9600 ![]()
![]()
![]()
![]()
![]()
![]()
![]()
![]()
![]()
4800 ![]()
![]()
![]()
![]()
![]()
![]()
![]()
![]()
![]()
2400 ![]()
![]()
![]()
![]()
![]()
![]()
![]()
![]()
![]()
1200 ![]()
![]()
![]()
![]()
![]()
![]()
![]()
![]()
![]()
600 ![]()
![]()
![]()
![]()
![]()
![]()
![]()
![]()
![]()
300 ![]()
![]()
![]()
![]()
![]()
![]()
![]()
![]()
![]()
110 ![]()
![]()
![]()
![]()
![]()
![]()
![]()
![]()
![]()
Protocol XON/XOFF ![]()
![]()
![]()
![]()
![]()
![]()
![]()
![]()
![]()
Data Ready (DTR) ![]()
![]()
![]()
![]()
![]()
![]()
![]()
![]()
![]()
Data Length 8 bits ![]()
![]()
![]()
![]()
![]()
![]()
![]()
![]()
![]()
7 bits ![]()
![]()
![]()
![]()
![]()
![]()
![]()
![]()
![]()
Parity Check Off ![]()
![]()
![]()
![]()
![]()
![]()
![]()
![]()
![]()
On ![]()
![]()
![]()
![]()
![]()
![]()
![]()
![]()
![]()
Parity Even ![]()
![]()
![]()
![]()
![]()
![]()
![]()
![]()
![]()
Odd ![]()
![]()
![]()
![]()
![]()
![]()
![]()
![]()
![]()