|
Language:
IBM Proprinter, Epson ESC/P Speed: 53cps Graphics: 60,180,360 DPI No. of Pins: 24 |
Internal Fonts
| Typeface | Quality | Pitches | CPI |
| Roman | LQ | 5,6,8.5,10,12,15,17,20,PS | 20,17,15,12,10,8.5,6,5,2.5 |
| Courier | LQ | 5,6,8.5,10,12,15,17,20,PS | 20,17,15,12,10,8.5,6,5,2.5 |
Standard Feeders: Friction Feed (single-sheet only)
Manual Feeding
Automatically loading a single sheet (bottom feed)
Note: Bottom feeding is the standard method for feeding paper.
1. Turn on the printer
2. Be sure the paper release lever is in the rear position.
3. Close the rear paper feed tray, if it is open.
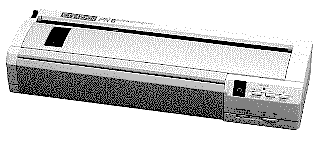
4. Set the PN48 on its back (the rear paper feed tray) so that you can see the paper feed slot in the bottom.
5. Line up the left edge of a sheet of paper with either the LTR or A4 mark. (Choose LTR if you're using 8½" x 11" paper.)
6. Guide the paper into the printer until it caches. You'll hear the printer motor as it pulls the paper up to the starting print position. The LED window changes to A. with the period flashing.
7. You can adjust the top of form position--the place where printing begins--using the micro adjustment feature. With A. in the window, press the up arrow (LF/FF) button repeatedly to advance the paper or press the down arrow (MENU) button to retract the paper.
8. When the paper is set to your satisfaction, press the [ON LINE] button to set the printer on-line.
Automatically loading a single sheet (rear feed)
1. Turn on the printer. (P will flash in the window.)
2. Be sure the paper release lever is in the rear position.
3. Open the rear paper feed tray, if it is closed.
4. Feed a sheet of paper between the adjustable paper guides. Insert it into the printer far enough, that it gets caught by the pick-up rollers. You'll hear the printer motor as it pulls the paper up to the starting print position. The LED window changes to A. with the period flashing.
5. You can adjust the top of form position--the place where printing begins--using the micro adjustment feature. With A. in the window, press the up arrow (LF/FF) button repeatedly to advance the paper or press the down arrow (MENU) button to retract the paper.
6. When the paper is set to your satisfaction, press the [ON LINE] button to set the printer on-line. The PN48 is ready to print.
Manually loading a single sheet (bottom or rear feed)
You can load paper manually into either the rear or bottom paper feed slot. To load paper by hand, follow these steps:
1. Set the paper release lever to the forward position.
2. Insert a sheet of paper into the bottom paper feed slot or the rear paper guide 2 or 3 inches, or until you can see it when you open the top cover.
3. Open the top cover and adjust the paper manually.
4. Set the paper release lever back to the rear position.
5. Close the top cover.
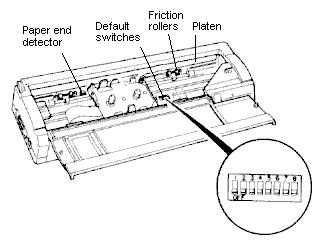
The default switches are
located on a small panel inside the printer. Open the top cover
and slide the print cartridge to the left.

Text in bold indicates factory settings.
Emulation Epson ![]()
![]()
![]()
![]()
![]()
![]()
![]()
![]()
![]()
IBM ![]()
![]()
![]()
![]()
![]()
![]()
![]()
![]()
![]()
Use the following table if the printer is in Epson emulation mode:
Character Set Italic ![]()
![]()
![]()
![]()
![]()
![]()
![]()
![]()
![]()
Graphics ![]()
![]()
![]()
![]()
![]()
![]()
![]()
![]()
![]()
Zero Unslashed ![]()
![]()
![]()
![]()
![]()
![]()
![]()
![]()
![]()
Slashed ![]()
![]()
![]()
![]()
![]()
![]()
![]()
![]()
![]()
International Character Set U.S.A.
![]()
![]()
![]()
![]()
![]()
![]()
![]()
![]()
![]()
France ![]()
![]()
![]()
![]()
![]()
![]()
![]()
![]()
![]()
Germany ![]()
![]()
![]()
![]()
![]()
![]()
![]()
![]()
![]()
England ![]()
![]()
![]()
![]()
![]()
![]()
![]()
![]()
![]()
Denmark ![]()
![]()
![]()
![]()
![]()
![]()
![]()
![]()
![]()
Sweden ![]()
![]()
![]()
![]()
![]()
![]()
![]()
![]()
![]()
Italy ![]()
![]()
![]()
![]()
![]()
![]()
![]()
![]()
![]()
Spain ![]()
![]()
![]()
![]()
![]()
![]()
![]()
![]()
![]()
Use the following table if the printer is in IBM emulation mode:
Character Set Set 1 ![]()
![]()
![]()
![]()
![]()
![]()
![]()
![]()
![]()
Set 2 ![]()
![]()
![]()
![]()
![]()
![]()
![]()
![]()
![]()
Zero Unslashed ![]()
![]()
![]()
![]()
![]()
![]()
![]()
![]()
![]()
Slashed ![]()
![]()
![]()
![]()
![]()
![]()
![]()
![]()
![]()
Code Page U.S.A. (437)
![]()
![]()
![]()
![]()
![]()
![]()
![]()
![]()
![]()
Multilingual (850) ![]()
![]()
![]()
![]()
![]()
![]()
![]()
![]()
![]()
Portuguese (860) ![]()
![]()
![]()
![]()
![]()
![]()
![]()
![]()
![]()
Canadian-French (863) ![]()
![]()
![]()
![]()
![]()
![]()
![]()
![]()
![]()
Norwegian (865) ![]()
![]()
![]()
![]()
![]()
![]()
![]()
![]()
![]()
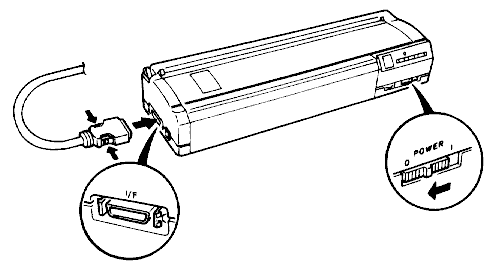
The interface connector is
locating on the left side of the printer.

Parallel
Availability: Centronics-compatible, 7 or 8 bit.
Connection: AMP 175925-4, 26-pin
Activation: Automatic