 |
Language:
IBM Proprinter, Epson ESC/P Speed: 105 characters per second Graphics: 60,180,360 DPI No. of Pins: 24 Color Capable Thermal Fusion |


Internal Fonts
| Typeface | Quality | Pitches | CPI |
| Roman | LQ | 5,6,8.5,10,12,15,17,20,PS | 20,17,15,12,10,8.5,6,5,2.5 |
| Courier | LQ | 5,6,8.5,10,12,15,17,20,PS | 20,17,15,12,10,8.5,6,5,2.5 |
| Sanserif | LQ | 5,6,8.5,10,12,15,17,20,PS | 20,17,15,12,10,8.5,6,5,2.5 |
| Script | LQ | 5,6,8.5,10,12,15,17,20,PS | 20,17,15,12,10,8.5,6,5,2.5 |
| Orator | LQ | 5,6,8.5,10,12,15,17,20,PS | 20,17,15,12,10,8.5,6,5,2.5 |
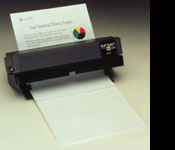
Standard Feeders: 5-sheet auto feeder, Manual Feeding Bottom Slot
Optional: 30-sheet auto sheet feeder
Using the built-in sheet feeder:
The built-in sheet feeder allows you to load up to 5 sheets of paper. The paper is automatically fed into the printer by using either the control panel or when you print your document.
NOTE: The Notebook Printer II does not show a paper-out condition when your first turn on the printer. However, after you have loaded paper and the last sheet has been printed, the PE indicator will flash to tell you you're out of paper. Load more paper, press either the ON Line button to place the printer back online, or the LF/EJECT button to load the next sheet of paper, and then press the ON Line button to put the printer back online.
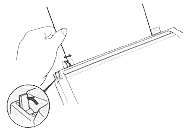
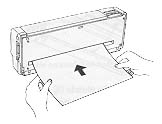
Using the Bottom Paper Feed Slot
You can load paper, labels, envelopes and transparencies manually into the bottom paper feed slot by following these steps:
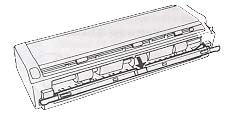
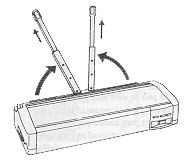
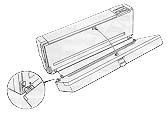
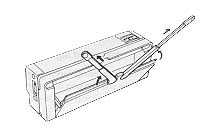
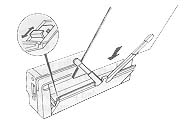
Using the Optional Automatic Sheet Feeder
The optional automatic sheet feeder holds up to 30 sheets of paper.
Attaching the sheet feeder:
Loading paper:
Printing Default Settings
The Notebook Printer II lets you print the current default settings. The menus are printed down the page. The items within each menu are printed across the page with the current default setting underlined.
To print the VuePrint default settings, press and hold the Charge button while turning on the printer.
| Menu Option | Description |
| LANGUAGE | Selects the language the printer uses to print instructions using the VuePrint menu, including English, French, German, Italian, Spanish, Portuguese and Dutch. |
| EMULATION | Selects Epson LQ-860 commands or IBM Proprinter X24E commands. |
| STYLEWRITER | Disables or enables the StyleWriter emulation. Disable this option when you are using the printer with your PC, enable it when printing with the Macintosh. |
| FONT | Selects Roman, Sanserif, Courier, Script or Roman. |
| PITCH | Selects 10 cpi, 12 cpi, 15 cpi or proportional. |
| FONT LOCK | Turns font lock on or off. When FONT LOCK is on, font-selection commands sent by your software are ignored; the printer uses the font you selected with the control panel. |
| COMPRESS | Turns quarter-page or landscape printing on or off. Quarter-page printing allows you to print two physical pages on a single sheet of paper by reducing all printing to one-fourth its normal size. Landscape printing prints two landscape pages vertically on the page. |
| LINESPACING | Selects 6 lines per inch (standard typewriter spacing) or 8 lines per inch. |
| FORM LENGTH | Selects among several standard form lengths. |
| PAGE SKIP (Epson emulation only) | Selects/cancels a bottom margin of one inch |
| SLASH ZERO | Selects/cancels printing a slash through zeros so they are easily distinguished from the letter O. |
| CHARACTER SET | Selects the character set. |
| INTERNATIONAL CHARACTER SET (Epson emulation only) | Selects the international character set. |
| CODE PAGE (IBM emulation only) | Selects code pages. |
| AUTO LF | Automatically advances the paper one line after each carriage return command. |
| SPACE SKIP | In order to
conserve ribbon use, space skip is determined as follows: If SPACE SKIP is disabled, the print cartridge is moved as follows: if the space length is less than four inches, the space is not skipped; if the space is greater than 4 inches, the space is skipped. If SPACE SKIP is enabled, the printer cartridge is moved as follows: if the space length is less than .5 inch the space is not skipped; if the space is greater than .5 inch then the space is skipped. |
| POWER OFF | Selects the amount of time before which the printer automatically turns off. Options include 3, 4, 5, 6 ot 8 minutes or disable which disables the power-off feature entirely. If the international power adapter is being used, the printer does not automatically turn off. |
The interface connector is
locating on the left side of the printer.
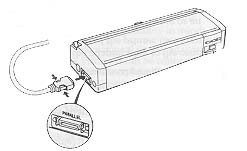
Parallel
Availability: Standard
Connection: Centronics
Activation: Automatic
Serial
Availability: standard
Connection: RS-422
Activation: Automatic