 |
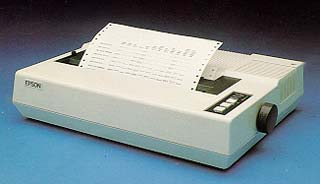
Language: ESC/P Technology: 9-pin dot-matrix monochrome Speed: 160 characters per second Graphics: 240 DPI |


The printer has one font: Courier available in 10 cpi, 12 cpi, 16.67 cpi, 20 cpi, expanded, bold, proportional, and italic.
Standard: built-in tractor for standard 9.5 x 11 (8.5 without perforations), friction feed
Optional: Tractor feed adjustable to smaller tractor sizes.
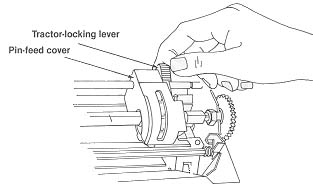
The pin-feed mechanism on
the FX-80 is a built-in tractor unit. The pin feeder accepts the
most common type of fanfold paper, 9.5 x 11 inch paper with
removable tractor holes. Proper adjustment of the pin feeder is
important for smooth paper flow, and the release latches allow
you to make slight adjustments in pin feeding.
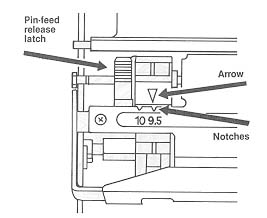
Note that for standard adjustments the arrows on the levers can
be lined up with the notches in the silver cover. Set both arrows
to 9.5 position.
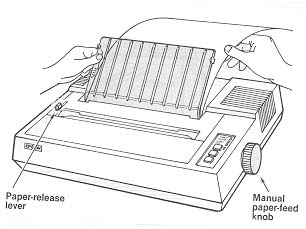
After adjusting the pin
feeder, pull the paper release lever toward the front of the
printer and (always with the printer turned off) push the
printhead to a center position. These two actions are important,
since they allow the paper to feed through easily. This puts the
pin feeders in charge of getting the paper through.
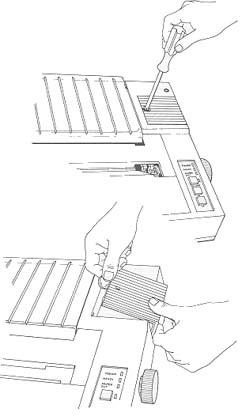
Set a stack of paper on a flat surface directly behind or under the printer. With the paper bail up, run the top sheet under the plastic guide and under the paper roller. Then use the manual-feed knob to run the paper through the rest of the way. The paper should flow over the plastic guide to form a second stack.
If you plan to use either 8.5 inch paper with permanent pin-feed holes or small labels with holes, you'll need to purchase a tractor-feed unit to accomodate the narrower paper.
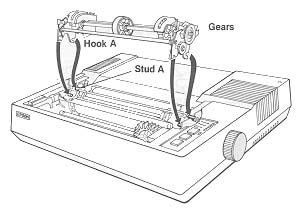
To install, insert hook A
into stud A, and rotate the unti toward the front fo the printer
(pressing down firmly) until it locks into place. Make sure that
the gears are on the right side of the printer (the side with the
buttons). You don't need to work any levers to insert the unit,
but you may need to adjust the pin feeders if they are in the way
of the tractor unit.
To adjust the width of the
tractor feeders, simply release the tractor's locking levers on
each side so that the units move freely. Now adjust the units to
match the size of your paper or labels. Lock the units back into
place. Pull the paper release lever toward the front of the
printer.
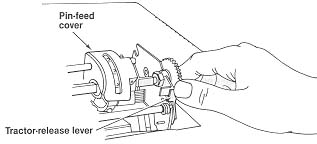
To remove the tractor unit,
use the pair of tractor-release levers. Press both levers forward
and rock the unit up and back toward the rear of the printer. The
entire tractor unit should come off easily - you should not have
to pull or tug on the unti to remove it.
If you are using single sheets or roll paper, you'll need to remove the tractor unit and use the friction-feed mechanism.
Simply adjust the pin-feed untis so that they are out of the way (as far apart as possible). Pull the paper bail toward the front of the printer, and then push the paper-release lever toward the rear of the printer to engage the friction feed. Use the manual feed knob t feed the paper through (as you would feed paper through a typewriter). And, finally, lower the paper bail onto the paper to hold it in place.
Bank 2 is on the left and bank 1 is on the right.
Bank 1 settings:
| Switch | Purpose | Position | Setting | |
| 1-8 | International Character | See table below | ||
| 1-7 | International Character | See table below | ||
| 1-6 | International Character | See table below | ||
| 1-5 | Print Mode | ON | Emphasized | |
| OFF | Normal | |||
| 1-4 | RAM memory usage | ON | 2K buffer | |
| OFF | User-defined characters | |||
| 1-3 | Paper Out Sensor | ON | Inactive | |
| OFF | Active | |||
| 1-2 | Zero Character | ON | Slashed | |
| OFF | Unslashed | |||
| 1-1 | Compressed Mode | ON | Compressed |
| 1-6 | 1-7 | 1-8 | International Character Set | |
| ON | ON | ON | USA | |
| ON | ON | OFF | France | |
| ON | OFF | ON | Germany | |
| ON | OFF | OFF | England | |
| OFF | ON | ON | Denmark | |
| OFF | ON | OFF | Sweden | |
| OFF | OFF | ON | Italy | |
| OFF | OFF | OFF | Spain |
Bank 2 Settings
| Switch | Purpose | Position | Setting | |
| 2-4 | Automatic Line Feed | ON | CR + LF | |
| OFF | CR Only | |||
| 2-3 | Skip over perforation | ON | Enabled | |
| OFF | Disabled | |||
| 2-2 | Bell | ON | Enabled | |
| OFF | Disabled | |||
| 2-1 | Printer Select | ON | Enabled | |
| OFF | Disabled |
Parallel
Availability: Standard
Connection: Centronics