 Stylus Pro / Pro XL
 |
Language: ESC/P2 Technology: Color Inkjet
Speed: 200 CPS
Graphics: 720 DPI
|


Standard Paper Sizes: Letter
(8.5 x 11 inches), A4, Legal (8.5 x 14 inches), Statement (8.5 x
5.5 inches), Executive (7.5 x 10), NO 10 envelope, DL envelope
In addition, the Pro XL
supports: US B (11 x 17 inches), Super A3/B (13 x 9 inches), A3
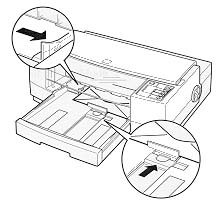
Loading standard
paper:
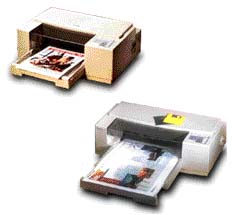
You can load up to 100
sheets of plain bond paper. Always load paper with the printable
surface down.
- Remove the output tray
from the top of the paper tray.
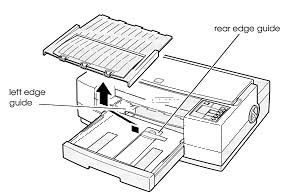
- Slide the left edge
guide inside the paper tray to the left as far as it will
go.
- Flip up the rear edge
guide and slide it toward you as far as it will go.
- Fan a stack of paper;
then tap it on a flat surface to even the edges.
- Load the stack of
paper, printable side down, so that its right edge rests
against the right side of the paper tray. Slide the stack
into the tray until you feel some resistance. Then slide
the left edge guide against the left edge of the paper.

You can load up to 100 sheets of plain bond paper, but do
not load paper above the arrow mark on the left edge
guide.
- Slide the rear edge
guide against the rear edge of the paper.
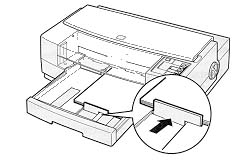
- Place the output tray
on top of the paper tray.
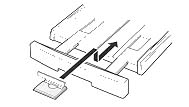
Loading Oversize Paper
If you are loading paper
that is larger than the paper tray, you need to pull out the
paper tray extension.
- Remove the output tray
and remove any paper in the paper tray.
- The paper tray
extension acts as the rear edge guide, so make sure the
built-in rear edge guide is folded down.
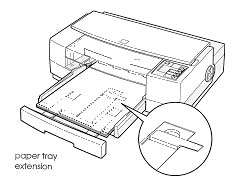
- Gently pull the
extension out using both hands - one to hold the paper
tray in position and the other to pull out the extension.
- Load the stack of paper
in the tray and then slide the extension until it meets
the edge of the paper stack.
- Replace the output tray
and fold out its extension.
Loading Envelopes and Heavy
Paper
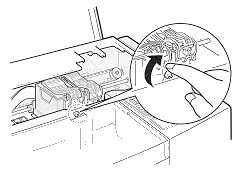
Adjusting the paper
thickness lever
When printing on envelopes
or heavy paper, you need to adjust the paper thickness lever to
compensate for the extra paper weight.
- Make sure the printer
is turned on. The press the PAUSE button and open the
cover.
- While holding down the
ALT button, press the FONT button, and then release both
buttons. The carriage moves to the lever-adjusting
position and the DATA light flashes. Paper loaded in the
printer is ejected when you adjust this lever.
- Rotate the paper
thickness lever clockwise as far as it will go.
- Press the ALT button.
Then press PAUSE.
- Close the printer
cover.
Loading the paper tray
After adjusting the paper
thickness lever:
- Remove the output tray
and remove any paper from the paper tray.
- If you are printing on
envelopes, pull back the paper tray extension. Then
remove the rear edge guide, turn it around, and reinstall
it.
- Insert the paper or
envelopes into the paper tray. It is best to load sheets
of heavy paper one at a time. If you're loading
envelopes, insert them face-down with the flap edge going
into the printer first.
- Adjust the rear and
left edge guides so the media feeds straight into the
paper path.
- Change your software
settings so they are appropriate for the media.
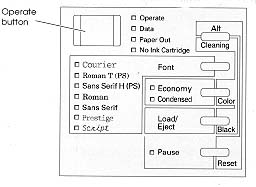
| Light(s) |
Problem |
Solution |
| Paper Out is on |
Printer is out of
paper. |
Load paper in the
paper tray and press the Load/Eject button to feed the
paper into the printer. |
| Paper Out is
flashing |
Paper jam. |
Clear the paper
jam. |
| No Ink Cartridge is
on |
Ink cartridge is
not installed correctly. |
Check ink
cartridges and make sure both are installed correctly. |
| Data and Pause are
flashing |
Carriage error. |
Turn the pritner
off, check for and clear any carriage obstructions
(paper, etc.) and turn the printer back on. If the error
persists, contact your dealer or an authorized service
provider. |
| All lights except
Operate are flashing |
Fatal error. |
Turn the printer
off and then on again. If this does not correct the
problem, you can reset the printer's factory defaults by
pressing the Alt and Pause buttons. If resetting the
printer does not fix the problem, contact your dealer or
authorized service provider. |
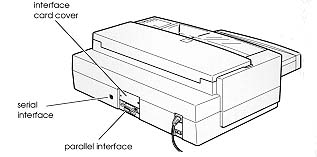
Parallel
Availability: Standard
Connection: Centronics parallel
Serial
Availability: Standard
Connection: RS-422 (Macintosh)
Optional Interface Cards:
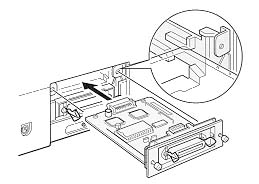
C823051/C823061 RS-232
Serial Interface Card
C823071/C823081 Serial Interface Card with 32KB buffer
C823101 Parallel Interface Card with 32KB buffer
C823151 Twinax Interface Card
C823141 Coax Interface Card
C823311 Ethernet Interface Card