 NX-1020 Rainbow
  NX-1020 Rainbow
 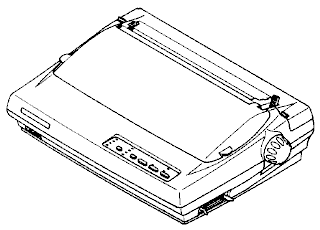 |
Language:
Epson, IBM Proprinter Speed: 200 cps hs-draft pica, 225 cps hs-draft elite, 150 cps draft pica, 180 cps draft elite, 37.5 cps NLQ pica, 45 cps NLQ elite Graphics: 60, 120, 240 DPI No. of Pins: 9 |
Internal Fonts
Typeface Quality Pitches
| Draft | Draft | 10,12,17,20 |
| SanSerif | LQ | 10,12,17,20 |
| Orator | LQ | 10,12,17,20 |
| Courier | LQ | 10,12,17,20 |
| Script | LQ | 10,12,17,20 |
Highlights include: Expanded, double high, double size, and quadruple size.
Standard Feeders: Friction and push/pull tractor
Optional Feeders: Automatic sheet feeder (SF-10DN)
Continuous Feeding
Loading fanfold paper (rear feed)
1. Place a stack of fanfold paper behind and at least one page-length below the printer.
2. Turn the printer's power OFF.
3. Push the release lever forward. This has the effect of releasing the paper from the platen roller, and engaging the tractor feed.
4. Remove the paper guide and put it aside for the moment.
5. Remove the rear cover using the two grips on either side, and push backwards.
6. Move the tractor downwards by gripping the positioning levers on both sides of the tractor unit.
7. With the tractor covers
open, mount the paper by aligning holes with the pins on the
tractor unit.
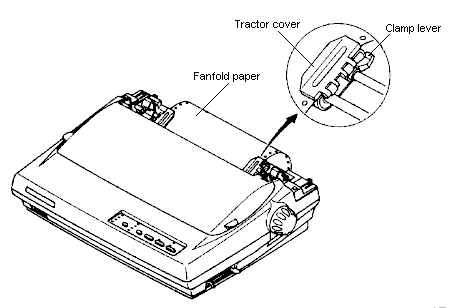
8. Adjust the spacing of the tractor units by sliding them along the bar, using the clamp lever at the back of each unit to release and lock them in position. When the clamp lever is up, the unit is released, and when it is down, the unit is locked.
9. Now close the tractor covers, again making sure that the paper holes are aligned with the pins on the tractor units. If they are not aligned properly, you will have problems with paper feeding, possibly resulting in tearing and jamming of the paper.
10. Turn on the power using the switch located at the front of the printer. The printer will beep, indicating that the paper is not yet fully loaded. The orange POWER indicator will also flash to confirm this.
11. Now press the [SET/EJECT/PARK] button. The paper will be fed and adjusted past the print head to a position ready for printing.
12. If you want to set the paper to a different position, set the printer off-line by press the [ON LINE] button, then set the paper by using the micro-feed function.
13. Replace the rear cover, and mount the paper guide in the horizontal position, so that it will separate the printed from the unprinted paper.
Loading fanfold paper (bottom feed)
1. Remove the top cover and the roller unit.
2. Open the rear cover using the two grips at the side, and push backwards.
3. Grip the positioning levers on both sides of the tractor unit, and pull the unit upwards.
4. Place a stack of fanfold paper below the printer.
5. With the tractor covers open, mount the paper from the bottom of the printer, by aligning holes with the pins on the tractor unit.
6. Adjust the spacing of the
tractor units by sliding them along the bar, using the clamp
lever at the back of each unit to release and lock them in
position. When the lever is up, the unit is released, and when it
is down, the unit is locked.
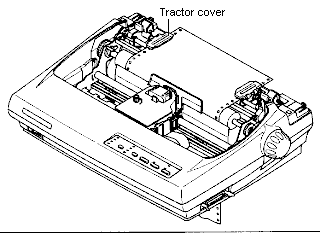
7. Now close the tractor covers, again making sure that the paper holes are aligned with the pins on the tractor units. If they are not aligned properly, you will have problems with paper feeding, possibly resulting in tearing and jamming of the paper.
8. Remount the roller unit and replace the rear cover and the top cover.
Manual Feeding
Automatic loading
1. Place the paper guide in position by inserting the tabs, located on the bottom of the assembly, into the slots on the rear cover of the printer.
2. Adjust the paper guides to match the size of the paper you will be using. Remember that printing will start some distance from the left-hand edge of the carriage.
3. Turn on the power using the switch located at the front of the printer. The printer will beep, indicting that there is no paper in position for printing. The orange POWER indicator will also flash to confirm this.
4. Make sure that the release lever is back.
If fanfold paper is already mounted in the printer, press the [SET/EJECT/PARK] button to park the paper in the off-line state, then move the release lever backwards.
5. Place a single sheet
between the guides, placing the side on which you want to print
towards the back of the printer. Gently push the paper down in
the guides until you feel it stop.
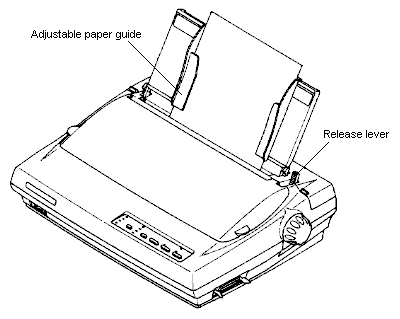
6. Now press the [SET/EJECT/PARK] button. The paper will be fed into the printer and adjusted past the print head to a position ready for printing.
7. If you want to set the paper to a different position, set the printer off-line by pressing the [ON LINE] button, then set the paper by using the micro-feed function.
Manual loading
1. Place the paper guide in position by inserting the tabs, located on the bottom of the assembly, into the slots on the rear cover of the printer.
2. Check that printer power is off and the release lever is back.
3. Adjust the paper guides to match the size of paper you will be using. remember that printing will start some distance from the left-hand edge of the carriage.
4. Place a single sheet between the guides, placing the side on which you want to print towards the back of the printer. Gently push the paper down in the guides until you feel it stop.
5. Turn the platen knob clockwise until the front edge of the paper comes out from under the top cover.
6. If the paper is not straight, move the release lever forward, then straighten the paper by hand and move the release lever back.

Most printers use a bank of DIP switches inside the printer to achieve various functions. However, this printer can change the power-up default settings by using the Electronic DIP Switch (EDS) mode.
How to Set the EDS Mode
The EDS mode has 16 kinds of functions you can set as the power-on default.
To enter the EDS mode, turn the printer one while simultaneously holding the [SET/EJECT/PARK], [PAPER FEED] and [ON LINE] buttons.
In EDS mode, the indicators and the buttons on the control panel are used in the following way:
· Use the [FONT] button to select the Bank Number. One of the FONT indicators will illuminate to show the selected Bank Number.
· Use the [PITCH] button to select the Switch Number. One of the PITCH indicators will illuminate to show the selected Switch Number.
· The QUIET indicator shows the current setting.
If you want to set it ON, press the [SET/EJECT/PARK] button.
· Press the [PAPER FEED] button to print out the current settings.
· Press the [ON LINE] button to save the new settings and to exit the EDS mode.
The printer is factory-set with all EDS switches in the ON position.
| Number | Function | ON | OFF |
| A-1 | Emulation | STANDARD | IBM |
| A-2 | RAM Usage | Input Buffer | Download |
| A-3 | Auto-LF | Disabled | Enabled |
| A-4 | ASF Setting | Disabled | Enabled |
| B-1 | Multi-part mode | Disabled | Enabled |
| B-2 | Paper-out Detector | Enabled | Disabled |
| B-3 | Tear off | Disabled | Enabled |
| B-4 | (Reserved) | Leave ON | |
| -------------
C-1 |
------------------------------
Print Mode |
--------------------
(See Below) |
-------------- |
| C-2 ------------- |
------------------------------ | -------------------- | -------------- |
| C-3 | Page Length | (See Below) | |
| C-4 ------------- |
------------------------------ | -------------------- | -------------- |
| D-1 | Character
Table (Standard Mode) (IBM mode) |
Graphics
Set #2 |
Italics
Set #1 |
| D-2 | IBM Code Page or | ||
| D-3 | International Character | (See Below) | |
| D-4 | Set |
These switches select the default print pitch and the fonts as shown below.
| Print Mode | C-1 | C-2 |
| 10CPI DRAFT | ON | ON |
| 10CPI HS DRAFT | ON | OFF |
| 17CPI DRAFT | OFF | ON |
| 10CPI COURIER | OFF | OFF |
Leave these switches ON if you will be using 11-inch forms.
| Page Length | C-3 | C-4 |
| 11 inches | ON | ON |
| A4 sized paper | ON | OFF |
| 8 inches | OFF | ON |
| 12 inches | OFF | OFF |
Switch D-1: The action of this switch
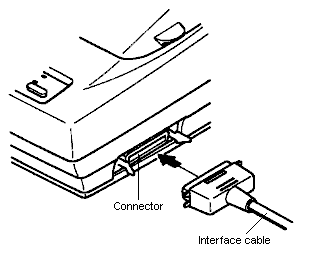
The interface connector is
located on the right side towards the front of the printer.
Parallel
Availability: Standard
Connection: Centronics
Activation: Default
Serial
Availability: Optional
Connection: RS-232C Interface