 Phaser 550 Phaser 550
  |
Languages:
Adobe PostScript Level 2, HP PCL5 (optional), HP-GL Method: Color Solid Ink Speed: 4 PPM color, 7 PPM monochrome Graphics: 600dpi Standard, 1200 x 1200 dpi Optional Memory: 8MB Standard, 72MB Maximum Autorotation: Yes Duplex: Not Available RET: Not Available |


Internal Fonts: 17 Standard, 39 with Extended Features
Optional Fonts may be downloaded to optional SCSI Hard drive
Standard PostScript Fonts:
Courier, Courier Bold,
Courier Oblique, Courier Bold Oblique
Helvetica, Helvetica Bold, Helvetica Oblique, Helvetica Bold
Oblique
Helvetica Narrow, Helvetica Narrow Bold, Helvetica Narrow
Oblique, Helvetica Narrow Bold Oblique
Times Roman, Times Bold, Times Italic, Times Bold Italic
Symbol
Additonal Postscript Fonts with Extended Features Option:
ITC Avant Garde Gothic Book,
ITC Avant Garde Gothic Book Oblique, ITC Avant Garde Gothic Demi,
ITC Avant Garde Gothic Demi Oblique
ITC Bookman Light, ITC Bookman Light Italic, ITC Bookman Demi,
ITC Bookman Demi Italic
Helvetica Condensed, Helvetica Condensed Bold, Helvetica
Condensed Oblique, Helvetica Condensed Bold Oblique
New Century Schoolbook, New Century Schoolbook Bold, New Century
Schoolbook Italic, New Century Schoolbook Bold Italic
Paltino, Palatino Italic, Palatino Bold, Palatino Bold Italic
ITC Zapf Chancery Medium Italic
ITC Zapf Dingbats
Scalable PCL fonts with HP PCL5 Option:
Courier, Courier Bold,
Courier Italic, Courier Bold Italic
Times Roman, Times Bold, Times Italic, Times Bold Italic
Universe, Universe Bold, Universe Italic, Universe Bold Italic
The interfaces are located
on the back side of the printer.
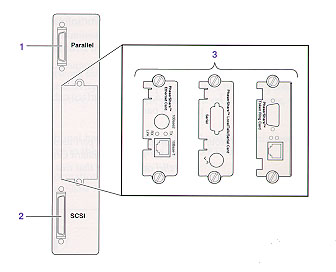
Parallel
Availability: Standard
Connection: mini Centronics (high-density), IEEE 1284-C (Adpater for standard centronics included with printer)
Activation: Automatic
LocalTalk / Serial
Availability: Optional Card
Connection: LocalTalk /Serial
Activation: Refer to Network Utilities Guide
Ethernet
Availability: Optional Card
Connection:
Activation: Refer to Network Utilities Guide
Token Ring
Availability: Optional Card
Connection:
Activation: Refer to Network Utilities Guide
SCSI
Availability: standard
Connection: used to attach hard drive or copystation
Continuous Feeding
Standard Trays : A/Letter Paper
Optional: A/Letter
Transparency Tray, A4 Paper Tray, A4 Transparency Tray, Legal
Paper Tray, 500-sheet Lower Tray assembly, Phaser CopyStation
(turns the Phaser 550 into a color copier)
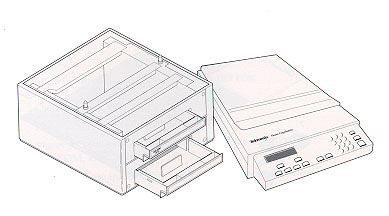
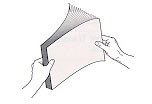
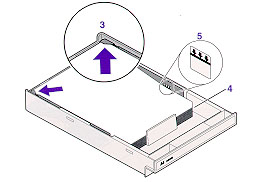
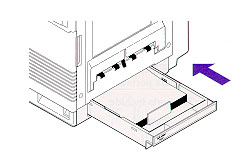
Using the Media Trays
Make sure that you load the correct media. Each tray is designed and labeled for only paper or transparency. If you load the wrong media type in a tray, you will get an error message when you attempt to print.
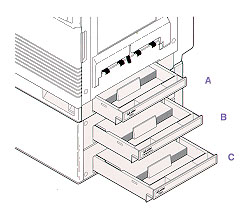
If you have the Lower Tray Assembly installed and you wish to use the automatic tray-switching feature (for example, for a large print job), make sure that all trays in the printer at any one time are the same media type and size.
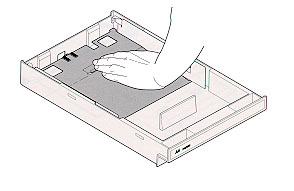
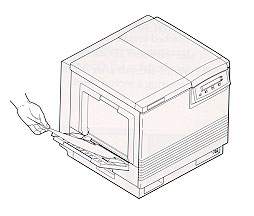
Using Manual Feed
Use manual feed for printing on a media other than what is installed in the media tray. When the printer sense media in the manual feed tray, it picks that media. You can also select manual feed in the front panel; when you do, the front panel reads Manual Feed: Paper or Manual Feed: Transparency. The message remains in the front panel until you feed media at the manual feed slot or make another selection. (The front panel selection is overridden by a driver selection.) If no media is loaded in the manual feed tray when manual feed is selected, the printer waits 60 seconds before it cancels the job (the default timeout is 60 seconds).

| Symptom | Possible Cause(s) | Solution |
| Power indicator is blinking | The printer is
receiving, processing or printing a job. or You have entered the menu in the front panel. |
Wait for the job to
be completed or cancel the job. or Exit the menu. |
| Power indicator is off | The printer is not ready, is disabled, or has detected an error. | Read the front panel message to determine the printer's status. |
| Error indicator is on | Attention is required, but not immediately. For example, when the front panel reads <color>:low. | Correct the condition reported by the front panel. |
| Error indicator is blinking | The printer is
stopped because it detected a user-correctable error such
as an open door or a media jam. or Error occurred that is not user-correctable. |
Correct the
condition reported by the front panel. or Turn the printer off and back on again. If the indicator is still on after the power-up sequence, the printer requires service. |
| The front panel menu exits and returns to Ready without anyone pressing the button. | Front panel timeout: if no activity occurs in 5 minutes, the front panel returns to Ready. | Press Menu to enter the front panel menu. |
| Front panel
reports: Jam at <Location>: See inside front door |
Media jam. or Too much media is loaded in the media tray. or Wrong media is installed in the tray. or Media is wrinkled or curled. or Media is too thick or too thin. |
|
| Front panel
reports: Wrong media in tray |
Paper is installed in the transparency tray or transparencies are installed in the paper tray. |
|
| Front panel
reports: Waiting for <media> |
The media installed is not what the printer is expecting. |
|
| Front panel
reports: <color>:low |
Indicated color toner cartridge is low. | Replace the indicated color toner cartridge within 100 pages or when the print quality becomes unacceptable. If you don't already have a new one, order a new toner cartridge. |
| Front panel
reports: Stopped: replace <color> |
Indicated color toner cartridge is empty. | Replace the indicated color toner cartridge now. |
| Test print shows a
single color that is not uniform or has a mottled
appearance or Test print shows a single color with many vertical streaks of slightly different density and non-uniform color. |
The toner cartridge is nearly empty. | Replace the color toner cartridge. |
| Test print appears faded in a single color. | The color density
is set incorrectly in the front panel. or The toner cartridge is wearing out. |
Check the density
setting by printing the Color Calibration Page in the
Calibrate Colors menu in the front panel. Compare the
settings to the color samples on the Quick Reference Card
and, if necessary, adjust the density in the front panel.
or Replace the color toner cartridge soon. |
| A single color has a sharp, dark or light vertical streak. | The cartridge is wearing out; a mechanism inside the cartridge is not properly applying toner. | Replace the color toner cartridge. |
| Service Print 1 shows small, repeating light or dark spots in a single color. | The color toner cartridge is damaged. | Replace the color toner cartridge. |
| A single color shows a light, repeating horizontal line. | The roller in the toner cartridge has a slight impression after long storage. | Run 20-30 prints. The impression will disappear with continued time and use. |
| A single color on the test print is cut off with a jagged edge either on the left or right side of the print. | The cartridges are
installed in the printer in this order from top to
bottom: black, yellow, magenta, cyan. The toner cartridge that is positioned in the printer above the cartridge that displays this symptom has a defect; it prevents the lower cartridge from fully opening during printing. |
Replace the
cartridge that is positioned in the printer above
the cartridge showing the symptom.
|
| Front panel
reports: Imaging unit:replace |
The imaging unit is wearing out. | Replace the imaging unit soon. |
| Test print shows dark, uneven vertical streaks or smudges on the whole page; most prominent in the middle of the page; most visible in the yellow band on the test print. | The imaging unit is wearing out. | Replace the imaging unit. |
| Prints are missing fine line detail. | The imaging unit is worn out. | Replace the imaging unit. |
| Dark color spots and dark or light streaks appear in all colors. | The imaging unit is worn out. | Replace the imaging unit. |
| Test print shows a straight, thin and even, light vertical line in all colors. | The photosensitive belt inside the imaging unit is scratched. | Replace the imaging unit. |
| On the test print, each color "bleds: into the color band below it (the most visible is magenta in the yellow band). | The cleaning blade inside the imaging unit is not cleaning an internal belt. | Replace the imaging unit. |
| A single white spot appears in approximately the same vertical place on the page. | The imaging unit is damaged. | Replace the imaging unit. |
| A single, wide, light horizontal band appears in one place on the page (near the top) OR all colors are faded. | The imaging unit was exposed too long to light. | Wait overnight and print the test print. If print quality hasn't changed, replace the imaging unit. |
| Large light spot(s) appear randomly in the test print, approximately on the same horizontal and vertical place or they move vertically from one print to another. | Fingerprint(s): someone has touched the underside of the imaging unit. | Print several pages until the artifacts fade. |
| Dark and light repeating horizontal lines at 1.5 mm intervals. | Gears in the imaging unit are not meshing smoothly. | Replace the imaging unit. |
| One or more vertical, dark and enven fine lines appear on the print through all colors. | The imaging unit is
scratched. or The fuser is damaged. |
Replace the imaging
unit; make sure that the old imaging unit is not exposed
to light for more than 45 seconds. If a new imaging unit does not correct the problem:
|
| Front panel
reports: Fuser: replace |
The fuser is wearing out. | Replace the fuser soon. |
| Front panel
reports: Stopped: Replace fuser! |
The fuser is worn out. | Replace the fuser now. |
| The surface of the
printed image appears to have vertical scratches (visible
by holding the print at an angle and observing the
"shine"). At first the scratches appear only on the printed image; eventually, dark vertical scratches appear on the unprinted portion of the page. |
The fuser is wearing out. | Replace the fuser. |
| A piece of the printed image is missing and reappears out of place, approximately 129mm (5 in.) down on the page. | The fuser is worn out. | Replace the fuser. |
| Dark and wavy vertical streaks appear in all colors, most visible in yellow. | The main charge grid is dirty. | Replace the main charge grid. |
| The entire page prints in black including the borders. | The cause is one of
the following:
|
The solution is one
of the following:
|
| Front panel
reports: Transfer kit:replace |
The transfer kit is worn out. | Replace the transfer kit. |
| Toner spots appear on the back of the media. | The transfer kit is worn out. | Replace the transfer kit. |
| The page prints in black in teh image area only (the borders are clear). | Either the image processor board or engine control board is not functioning properly. | Turn the printer off and back on again. If the problem persists, call service. |
| The page is completely blank. | The problem could
be with one of the following:
|
Turn the printer off and back on again. If the problem persists, call service. |
| Front panel
reports: Printer Error ## |
An error occurred that is not user-correctable. | Turn the printer off and back on again. If the problem persists, call the Customer Support Hotline. |
| Thin horizontal stripes or a "weave" pattern appears in a complex image. | The printer has insufficient memory for an image of this complexity. | Increase the amount
of memory or Print the image at a lower resolution. |