|
Language:
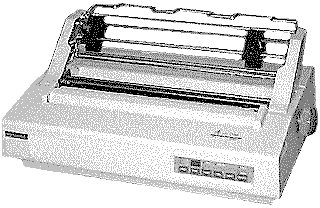
Qume Sprint 11 Graphics: 180, 360 DPI No. of Pins: 24 |


Internal Fonts
| Typeface | Quality | Pitches |
| High-Speed | Draft | 5, 6, 10, 12, 16.7, proportional |
| High-Quality | Letter | 5, 6, 10, 12, 16.7, proportional |
Tractor Feed method:
Friction feed
Optional Feeders:
Bi-directional Tractor
Automatic Sheet Feeder
Continuous Feeding (with optional bi-directional tractor)
Loading fanfold paper
1. Turn the power switch off.
2. Open the top cover and check that copy control lever is set for the paper thickness required. Close cover.
3. Move the paper release lever to the middle position.
4. Position the paper behind or underneath the printer so that it travels throughout the printer without binding.
5. Release the lock levers at each end of the tractor feed.
6. Set the tractor paper width by sliding the clack plastic sprockets left and right into position. You may need to leave the lock levers released until paper is installed.
7. Feed the paper between the upper and lower bars of paper separator.
8. Rotate the feed unit up so that the bottom sprockets face up.
9. Lift the paper clamps on each sprocket.
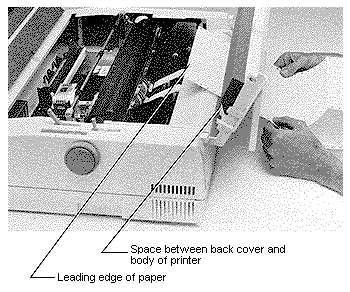
10. Thread the first 3-4 inches of the fanfold paper over the left hand sprocket feeding pins as shown in the photograph.
11. Close the paper clamp on that side.
12. Thread the fanfold paper over the right hand sprocket feeding pins making sure the paper is horizontally even and that the right paper holes correspond to the left holes you already clamped down.
13. Snap the paper clamp down to hold paper in position.
14. If you have not already done so, tighten the sprocket lock levers.
15. Pull the tension bar lever forward which will cause the tension control bar to rotate back. The feed unit can now rotate down completely.
16. Rotate the feed unit down. The paper should rest over the tension control bar.
17. Feed the paper into the paper insertion slot simultaneously rotating the left platen knob until one sheet of paper winds all the way around the platen and comes out the other side over the sprockets.
18. Lift the paper clamps on the top side of the sprockets. Clamping one side at a time makes it easy to horizontally line up the paper in the right holes.
19. Thread the fanfold paper over the sprocket feeding pins through the paper holes evenly as you did for the bottom side of the sprockets. Clamping one side at a time makes it easy to horizontally line up the paper in the right holes.
20. Snap the paper clamps down to hold the paper in position
21. Pull the paper release lever all the way forward to loosen the friction rollers under the platen.
22. Check the position of the tractors to ensure that the paper lays flat. Be sure it is not stretched tight or so loose that it has buckled.
23. If you need to, adjust the position of the paper around the platen by releasing the sprocket's lock levers. Use the scale on the paper bail or on the top of main cover to find a suitable position for the paper.
24. Adjust the tension control bar with the tension bar lever.
25. Close the tractor dust cover and turn the printer ON.
26. Before printing you need
to set the top of page both internally in the printer and
physically by aligning the paper. Follow these steps:
Deselect the printer.
Press the top of page switch on the front panel. This causes the
paper to advance to where the printer "thinks" the top
of page is located.
Using the platen knobs and/or the paper feed button on the front
panel, physically align the paper so the print head is just below
the perforation at the top of a page.
Manual Feeding
Feeding single sheets and envelopes using friction feed
1. Be sure that the power switch is on.
2. Open the top cover and locate the copy control lever on the right hand side,
3. Adjust the copy control lever according to the number of copies you will be printing.
4. Adjust the paper bail
rollers to accommodate the width of the paper you are using. The
paper bail has three rollers that hold the paper to the platen
for correct paper advancement.
For narrow paper (such as A4 or letter size), use only the left
and middle rollers. Position the left roller on the left side of
the paper; position the middle roller on the right side of the
paper.
For wide paper (such as A3 or computer width paper), use all
three rollers, positioned left, middle and right of the paper.
5. Move the paper release lever back towards the rear of the printer.
6. Insert paper into the paper insertion opening. Make sure you insert it far enough to the left so that when it comes around for printing it will cover the paper out switch This small switch is located in the printer body behind the platen.
7. Pull the paper release lever gently into the middle position. The paper automatically advances far enough for alignment.
8. Align the paper as you would on a standard typewriter by pulling the paper release lever forward. This disengages platen pressure so you can line the paper up for printing.
9. Re-engage the platen by pushing the lever into its rear position.
10. Turn the platen knobs to position the paper.
11. Return the platen dust cover to its closed position.
Bank 1 Interface and Protocol Selection
Interface and protocol Parallel
![]()
![]()
![]()
![]()
![]()
![]()
![]()
![]()
![]()
Serial (X-ON/X-OFF) ![]()
![]()
![]()
![]()
![]()
![]()
![]()
![]()
![]()
Serial (Ready/Busy) ![]()
![]()
![]()
![]()
![]()
![]()
![]()
![]()
![]()
Serial (ETX/ACK) ![]()
![]()
![]()
![]()
![]()
![]()
![]()
![]()
![]()
Baud Rate Selection 110 BPS ![]()
![]()
![]()
![]()
![]()
![]()
![]()
![]()
![]()
300 BPS ![]()
![]()
![]()
![]()
![]()
![]()
![]()
![]()
![]()
600 BPS ![]()
![]()
![]()
![]()
![]()
![]()
![]()
![]()
![]()
1200 BPS ![]()
![]()
![]()
![]()
![]()
![]()
![]()
![]()
![]()
2400 BPS ![]()
![]()
![]()
![]()
![]()
![]()
![]()
![]()
![]()
4800 BPS ![]()
![]()
![]()
![]()
![]()
![]()
![]()
![]()
![]()
9600 BPS ![]()
![]()
![]()
![]()
![]()
![]()
![]()
![]()
![]()
19200 BPS ![]()
![]()
![]()
![]()
![]()
![]()
![]()
![]()
![]()
Parity Selection Even
Parity ![]()
![]()
![]()
![]()
![]()
![]()
![]()
![]()
![]()
Odd Parity ![]()
![]()
![]()
![]()
![]()
![]()
![]()
![]()
![]()
Ignore Parity ![]()
![]()
![]()
![]()
![]()
![]()
![]()
![]()
![]()
No Parity ![]()
![]()
![]()
![]()
![]()
![]()
![]()
![]()
![]()
Stop Bit Selection One
Stop Bit ![]()
![]()
![]()
![]()
![]()
![]()
![]()
![]()
![]()
Two Stop Bit ![]()
![]()
![]()
![]()
![]()
![]()
![]()
![]()
![]()
Bank 2 Font and Character Pitch Selection
Data Bit Selection Eight
Data Bit ![]()
![]()
![]()
![]()
![]()
![]()
![]()
![]()
![]()
![]()
![]()
Seven Data Bit ![]()
![]()
![]()
![]()
![]()
![]()
![]()
![]()
![]()
![]()
![]()
Code Sequence Selection USA
![]()
![]()
![]()
![]()
![]()
![]()
![]()
![]()
![]()
![]()
![]()
UK ![]()
![]()
![]()
![]()
![]()
![]()
![]()
![]()
![]()
![]()
![]()
France ![]()
![]()
![]()
![]()
![]()
![]()
![]()
![]()
![]()
![]()
![]()
Germany ![]()
![]()
![]()
![]()
![]()
![]()
![]()
![]()
![]()
![]()
![]()
Sweden ![]()
![]()
![]()
![]()
![]()
![]()
![]()
![]()
![]()
![]()
![]()
Norway ![]()
![]()
![]()
![]()
![]()
![]()
![]()
![]()
![]()
![]()
![]()
Spain ![]()
![]()
![]()
![]()
![]()
![]()
![]()
![]()
![]()
![]()
![]()
IBM character set ![]()
![]()
![]()
![]()
![]()
![]()
![]()
![]()
![]()
![]()
![]()
Character Pitch Selection 10
CPI ![]()
![]()
![]()
![]()
![]()
![]()
![]()
![]()
![]()
![]()
![]()
12 CPI ![]()
![]()
![]()
![]()
![]()
![]()
![]()
![]()
![]()
![]()
![]()
Proportional Spacing ![]()
![]()
![]()
![]()
![]()
![]()
![]()
![]()
![]()
![]()
![]()
16.7 CPI ![]()
![]()
![]()
![]()
![]()
![]()
![]()
![]()
![]()
![]()
![]()
Not used ![]()
![]()
![]()
![]()
![]()
![]()
![]()
![]()
![]()
![]()
![]()
Font Selection High Speed ![]()
![]()
![]()
![]()
![]()
![]()
![]()
![]()
![]()
![]()
![]()
Prestige Elite ![]()
![]()
![]()
![]()
![]()
![]()
![]()
![]()
![]()
![]()
![]()
Courier ![]()
![]()
![]()
![]()
![]()
![]()
![]()
![]()
![]()
![]()
![]()
Cartridge 1 ![]()
![]()
![]()
![]()
![]()
![]()
![]()
![]()
![]()
![]()
![]()
Cartridge 2 ![]()
![]()
![]()
![]()
![]()
![]()
![]()
![]()
![]()
![]()
![]()
Reserved ![]()
![]()
![]()
![]()
![]()
![]()
![]()
![]()
![]()
![]()
![]()
Reserved ![]()
![]()
![]()
![]()
![]()
![]()
![]()
![]()
![]()
![]()
![]()
Reserved ![]()
![]()
![]()
![]()
![]()
![]()
![]()
![]()
![]()
![]()
![]()
Bank 3 Print Control
Form Length Selection 11"
(66 lines) ![]()
![]()
![]()
![]()
![]()
![]()
![]()
![]()
![]()
12" (72 lines) ![]()
![]()
![]()
![]()
![]()
![]()
![]()
![]()
![]()
Bi-directional/Unidirectional
Bi-directional ![]()
![]()
![]()
![]()
![]()
![]()
![]()
![]()
![]()
Unidirectional ![]()
![]()
![]()
![]()
![]()
![]()
![]()
![]()
![]()
CR and LF handling CR
Only ![]()
![]()
![]()
![]()
![]()
![]()
![]()
![]()
![]()
CR and LF ![]()
![]()
![]()
![]()
![]()
![]()
![]()
![]()
![]()
Automatic CR OFF ![]()
![]()
![]()
![]()
![]()
![]()
![]()
![]()
![]()
ON ![]()
![]()
![]()
![]()
![]()
![]()
![]()
![]()
![]()
Automatic wraparound OFF
![]()
![]()
![]()
![]()
![]()
![]()
![]()
![]()
![]()
ON ![]()
![]()
![]()
![]()
![]()
![]()
![]()
![]()
![]()
Not Used ![]()
![]()
![]()
![]()
![]()
![]()
![]()
![]()
![]()
Select/Deselect at Power On
OFF ![]()
![]()
![]()
![]()
![]()
![]()
![]()
![]()
![]()
ON ![]()
![]()
![]()
![]()
![]()
![]()
![]()
![]()
![]()
Line Buffer Size Selection 4K
bytes line buffer ![]()
![]()
![]()
![]()
![]()
![]()
![]()
![]()
![]()
256 bytes line buffer ![]()
![]()
![]()
![]()
![]()
![]()
![]()
![]()
![]()
The interface connector is located on the back of the printer towards the left side.
Parallel
Availability: Standard
Connection: Centronics
Activation: Default
Serial
Availability: standard
Connection: RS-232C Interface
Activation: standard
