 LaserJet 4000/4000N/4000NT/4000TLaserJet 4000/4000N/4000NT/4000T
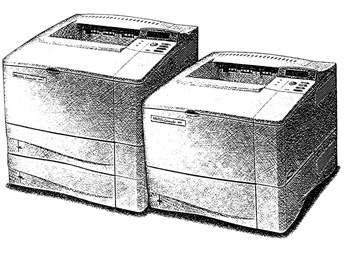 |
Language: PCL Level 6 and
5e, PostScript Level 2 Speed: 17ppm Memory: 4MB, 8 MB for 4000N/4000TN Graphics: up to 1200 dpi Autorotate: Yes Duplex: Yes RET: Yes |


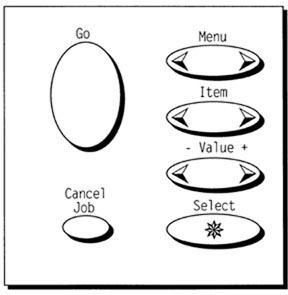
To check fonts available in the printer, press the Menu key until Information Menu appears. Press Item until Print PCL Font List or Print PS Font List appears. Press Select.
Unprintable Regions
Left: .25"
Right: .25"
Top: .22"
Bottom: .22"
Continuous Feeding
Standard Trays: The 4000 and 4000N comes with one 500 sheet tray. The 4000T and 4000NT comes with two 250-sheet trays.
Optional Trays: Envelope Feeder, 500-sheet paper tray.
Manual Feeding - Tray 1

| Message | Problem | Solution |
| Access Denied, Menus Locked |
The printer control panel function you are trying to access has been locked to prevent unauthorized access. | See your network administrator. |
| Bad Duplexer Connection | The duplexer is not connected properly. | Re-install the duplexer. |
| Bad OPT Tray Connection | The optional tray is not connected properly. | Re-install the optional tray. |
| Cannot Duplex Rear Bin Open | The printer cannot duplex because the rear output bin is open. | Close the rear output bin. |
| Check Input Device Paper Path Open Please Close it |
The option input tray cannot feed to the printer because a door or paper guide is open. | Check the doors and paper guides. |
| Chosen Language Not Available |
A print job requested a printer language that does not exist in the printer. The job will not print and will be cleared from memory. | Print the job using a driver for a different printer language, or add the requested language to the printer. Press [GO] to continue. |
| Disk Device Failure | The EIO disk had a critical failure and can no longer be used. | Remove the EIO disk and replace it with a new one. |
| Disk File Operation Failed |
The requested operation could not be performed. | You might have attempted an illegal operation, such as trying to download a file to a non-existent directly. |
| Disk File System is Full |
Delete files from the EIO disk and then try again, or add a flash disk DIMM. Download or delete files from HP JetAdmin, and download or delete fonts from HP FontSmart. | See the software help for more information. |
| Disk is Write Protected | The EIO disk is protected, and no new files can be written to it. | Disable the write protection through HP JetAdmin. |
| Env Feeder Load [Type] [Size] |
Load the requested envelope type and size into the envelope feeder. Make sure the envelope size and type are set correctly from the Paper Handling Menu in the printer's control panel. | Press [Go] if the desired envelope is already loaded in the feeder. Press [-Value+] to scroll through the available types and sizes. press [Select] to accept the alternate type or size. |
| Flash Device Failure | The flash disk DIMM had a critical failure and no longer can be used. | Remove the flash disk DIMM and replace it with a new one. |
| Flash File Operation Failed | The requested operation could not be performed. | You might have attempted an illegal operation, such as trying to download a file to a non-existent directory. |
| Flash File System is Full |
Delete files from the flash disk DIMM or add another one. Download or delete files from HP JetAdmin, and download or delete fonts from HP FontSmart. | See the software help for more information. |
| Flash is Write Protected | The flash disk DIMM is protected, and no new files can be written to it. | Disable the write protection through HP JetAdmin. |
| Install Tray X | The printer is unable to print the current job, because the specified tray (x) is open or not inserted correctly. | Re-insert the specified tray. |
| Loading Program <number> Do Not Power Off | Programs and fonts can be stored on the printer's file system. At boot up time these entities are loaded into RAM. | The <number> specifies a sequence number indicating the current program being loaded. |
| Manually Feed [Type] [Size] |
Load the requested paper into Tray 1. | Press [Go] if the desired paper is already loaded in Tray 1. Press [-Value+] to scroll through the available types and sizes. Press [Select] to accept the alternate type or size. |
| Memory Full Stored Data Lost | There is no available memory in the printer. The current job might not print correctly and some resources (download fonts, macros) might have been deleted. | You might want to add more memory to the printer. |
| Memory Settings Changed | The printer changed its memory settings because it did not have enough memory to use the previous settings for I/o Buffering and Resource Saving. This usually occurs after removing memory from the printer, adding a duplexer or adding a printer language. | You might want to change memory settings for I/O Buffering and Resource Saving or add more memory to the printer. |
| Memory Shortage Job Cleared | The printer did not have enough free memory to print the entire job. The remainder of the job will not print and will be cleared from memory. | Press [Go] to continue. |
| Memory Shortage Page Simplified | The printer had to compress the job in order to fit it in the available memory. Some data loss might have occurred. | Press [Go] to continue. |
| Offline | Press [Go] to place the printer online. | |
| Perform Printer Maintenance | The ensure optimum printer quality, the printer prompts you to have routine maintenance performed every 150,000 pages. | Contact an HP-authorized service or support provider to perform routine printer maintenance. |
| RAM Disk Device Failure | The RAM disk had a critical failure and can no longer be used. | Turn the printer off, and then turn the printer on to clear the message. |
| RAM Disk File Operation Failed | The requested operation could not be performed. | You might have attempted an illegal operation, such as trying to download a file to a non-existent directory. |
| RAM Disk File System is Full | Delete files and then try again, or turn the printer off, and then turn the printer on to delete all files on the device. | Increase the size of the RAM disk. Change the RAM disk size from the Configuration Menu in the printer's control panel. |
| RAM Disk is Write Protected | The RAM disk is protected and no new files can be written to it. | Disable the write protection through HP JetAdmin. |
| Tray x Empty | Load the empty tray (x) to clear the message. | If you do not load the specified tray, the printer will continue printing from the next available tray, and the message will continue to display. |
| Tray x Load [Type] [Size] |
Load the requested paper into the specified tray (x). | |
| Unsupported Size in Tray [YY] | An external paper handling device detected an unsupported paper size. | The printer will go offline until the condition is corrected. |
| Use [Type] [Size] instead? | If the requested paper size or type is not available, the printer asks if it should use another paper size or type instead. | Press [-Value+] to scroll though the available types and sizes. Press [Select] to accept the alternate type or size. |
| Wait for Printer To Reinitialize | The RAM disk setting has been changed from the printer's control panel . | This change will not take effect until the printer reinitializes. |
| Wrong Envelope Feeder Installed | The envelope feeder you are trying to install will not work for this printer. | |
| 13.x Paper Jam [Location] | Remove jammed paper from the specified location. | Open and close the opt cover to clear the message. |
| 20 Insufficient Memory | The printer received more data than can fit in its available memory. | You might have tried to transfer too many macros, sot fonts, or complex graphics. Press |
| 21 Page Too Complex | The data (dense text, rules, raster or vector graphics) sent to the printer was too complex. | To print the job without losing data, from the Configuration Menu in the printer control panel, set PAGE PROTECT=ON print the job, and then return PAGE PROTECT=AUTO. Do not leave Page Protect on, it might degrade performance. |
| 22 EIO x Buffer Overflow | Too much data was sent to the EIO card in the specific slot (x). | An improper communications protocol may be in use. Press [Go] to continue, data will be lost. Check the host configuration. If this message persists, contact an HP-authorized service or support provider. |
| 22 Parallel I/O Buffer overflow | Too much data was sent to the parallel port. | Check for a loose able connection and be sure to use a high-quality cable. Some non-HP parallel cables might be missing pin connections or might otherwise not confirm to the IEEE-1284b specification). This error can occur if the driver you are using is not IEEE-1284 compliant. For best results, use an HP driver that came with the printer. |
| 22 Serial I/O Buffer Over flow | Too much data was sent to the serial port. | Make sure the correct serial pacing option is selected from the I/0 menu in the printer's control panel. Print a menu map and verify that the serial pacing item (from the I/0 menu in the printer control panel) matches the setting on the computer. Press [Go] to clear the error message, data will be lost. If this message persists, contact an HP-authorized service or support provider. |
| 40 Bad Serial Transmission | The printer encountered an error while transferring data from the computer. | The error might have occurred for several
reasons: - the computer was powered on or off while the printer was online. - There was a network problem. - The printer's baud rate or parity was not the sama the computer's . The baud rate tells the printer how fast information will be transferred from the computer to the printer.). Make sure the printer is set for the same baud rate as the computer . The serial baud rate settings can be access from the I/0 menu in the printer's control panel. Press [Go] to clear the error message and continue printing. |
| 40 EIO x Bad Transmission | The connection on has been broken between the printer and the EIO card in the specified slot. | Press [Go] to clear the error message and continue printing. |
| 41.3 Unexpected Paper Size | The paper size you are trying to print is not the same as the settings for the tray. Make sure all trays are correctly adjusted for size. If you are trying to print from Tray 1, make sure the printer's control panel settings for paper size is correctly configured. If you are trying to print from the optional 500-sheep tray, be sure to set the paper size dial to match the paper size loaded in the tray. After performing the actions above, press [Go]. | The page containing the error will automatically be reprinted. Or you might want to press [Cancel Job] to clear the job from the printer's memory. |
| 41.x Printer Error | A temporary printing error occurred. | Press [Go]. The page containing the error will automatically be reprinted. If the message will not clear, turn the printer off, and then turn the printer on. If this message persists, contact an HP-authorized service or support provider. |
| 50.x Fuser Error | An internal error has occurred. | Turn the printer off and then turn the printer on. The message might clear, and then reappear when the nest print job is sent . If this message persists, contact an HP-authorized service or support provider. |
| 51.x or 52.x Printer Error | A temporary printing error occurred. | Press [Go]. The page containing the error will automatically be reprinted. If the message will not clear, turn the printer off, and then turn the printer on. If this message persists, contact an HP-authorized service or support provider. |
| 53.xy.zz | There is a problem with the printer's memory. The DIMM that caused the error will not be used . | Values of x, y. and zz are as follows: x=DIMM type, 0=ROM, 1=RAM y = device location, 0=internal memory (ROM or RAM), 1 to 3 = DIMM slots 1, 2, or 3. zz = error number You might need to replace the specific DIMM. Turn the printer off, and then replace the DIMM that caused the error. If the message will not clear, turn the printer off, and then turn the printer on. If this message persists, contact an HP-authorized service or support provider. |
| 55 Printer Error | A temporary printer error occurred. | Press [Go]. The page containing the error will automatically be reprinted. If the message will not clear, turn the printer off, and then turn the printer on. If this message persists, contact an HP-authorized service or support provider. |
| 56.x, 57.x, 58.x, or 59.x Printer Error | A temporary printing error occurred. | If the message will not clear, turn the printer off, and then turn the printer on. If this message persists, contact an HP-authorized service or support provider. |
| 62.x Printer Error | There is a problem with the printer's memory. The X value refers to the location of the problem: 0 = Internal memory 1 to 3 = DIMM slots 1, 2, or 3. | You might need to replace the specific DIMM. If the message will not clear, turn the printer off, and then turn the printer on. If this message persists, contact an HP-authorized service or support provider. |
| 64.x Printer Error | A temporary printing error occurred. | If the message will not clear, turn the printer off, and then turn the printer on. If this message persists, contact an HP-authorized service or support provider. |
| 66.xy.zz Input Device Failure Check Cables and Cycle Power |
An error occurred in an external paper handling device. | Press [GO] to clear the message. If the message will not clear, turn the printer off, and then turn the printer on. If this message persists, contact an HP-authorized service or support provider. |
| 68 NVRAM Full Check Settings |
The printer's nonvolatile memory NVRAM is full. Some settings might have been reset to the factory defaults. | Print a configuration page and check the printer settings to determine which values have changed. If this message persists, contact an HP-authorized service or support provider. |
| 69.x Printer Error |
A temporary printing error occurred. | Turn the printer off, and then turn the printer on. If this message persists, contact an HP-authorized service or support provider. |
| 79.xxxxx Printer Error |
The printer detected and error. The numbers (xxxxx) indicate the specific type of error. | Turn the printer off and then back on. Try printing a job from a different software application. If the job prints, go back to the first application and try printing a different file. If the message only appears with a certain software application or print job, contact the software vendor for assistance. If the message persists with different software applications and print jobs, record the numbers that appear and contact an HP-authorized service or support provider. |
The interface connections are located on the back of the printer on the right.
Parallel
Availability: Standard
Connection: Centronics Female
Menu Items: Parallel High Speed, Parallel Advanced Functions.
Parallel High Speed sets the speed at which data is transmitted to the printer. Default set to Yes.
Parallel Advanced Functions turns the bi-directional parallel communication on or off.
Serial
Availability: Standard
Connection: DB-25 Configured at factory for RS-232.
Menu Items: Serial Pacing, Serial Baud, Serial DTR.
Serial Pacing selects the type of handshaking used, XON/XOFF or DTR/DSR.
Select DTR/DSR if your computer requires hardward flow control. Select XON/XOFF if your computer requires software flow control (Unix workstation for example). Serial Robust sets the method for generating XON's. With Serial Robust=ON, the printer sends an XON when the printer is online and when sufficient buffer space is available at one second intervals until the host receives data. Serial Robust=OFF the printer sends one XON only.
Serial Baud Rate sets the printers speed at which information is tranfered.
Serial DTR Polarity determins if pin #8 (carrier detect) is high or low when the printer is ready.