 LaserJet
5Si/ 5Si MXLaserJet
5Si/ 5Si MX
LaserJet
5Si/ 5Si MXLaserJet
5Si/ 5Si MX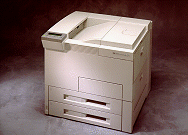 |
Language: PCL Level 5, Postscript
(optional SIMM/standard for 5MX)
Speed: 24 ppm Memory: 4MB Standard (12M standard on 5MX) Exp. to 128 MB Graphics: 600 x 600 dpi Auto rotate: Yes Duplex: Optional RET: Yes |


Fonts Per Page: Limited only by available printer memory. (Each attribute is a separate font)
Internal PCL Fonts
| Typeface | Size | Variations | Symbol Set |
| Line Printer | 8.5 pt. (16.67 pitch) | Medium Upright | * |
| Courier | Scalable | Medium Upright | + |
| Bold Upright | |||
| Medium Italic | |||
| Bold Italic | |||
| CG Times | Scalable | Medium Upright | + |
| Bold Upright | |||
| Medium Italic | |||
| Bold Italic | |||
| CG Omega | Scalable | Medium Upright | + |
| Bold Upright | |||
| Medium Italic | |||
| Bold Italic | |||
| Coronet | Scalable | Medium Italic | ** |
| Clarendon Condensed | Scalable | Bold Upright | ** |
| Univers | Scalable | Medium Upright | + |
| Bold Upright | |||
| Medium Italic | |||
| Bold Italic | |||
| Univers Condensed | Scalable | Medium Upright | ** |
| Bold Upright | |||
| Medium Italic | |||
| Bold Italic | |||
| Antique Olive | Scalable | Medium Upright | ** |
| Bold Upright | |||
| Medium Italic | |||
| Garamond Antiqua | Scalable | Medium Upright | ** |
| Garamond Halbfett | Scalable | Bold Upright | ** |
| Garamond Kursiv | Scalable | Medium Italic | ** |
| Garamond Kursiv Halbfett | Scalable | Bold Italic | ** |
| Marigold | Scalable | Medium Upright | ** |
| Albertus | Scalable | Medium Upright | ** |
| Albertus Extra Bold | Scalable | Bold Upright | ** |
| Arial | Scalable | Medium Upright | + |
| Bold Upright | |||
| Medium Italic | |||
| Bold Italic | |||
| Times New Roman | Scalable | Medium Upright | + |
| Bold Upright | |||
| Medium Italic | |||
| Bold Italic | |||
| Letter Gothic | Scalable | Medium Upright | + |
| Bold Upright | |||
| Medium Italic | |||
| Symbol | Scalable | Medium Upright | N/A |
| Wingdings | Scalable | Medium Upright | N/A |
*All Fonts are available in PC-8, Roman-8, ECMA-94, PC-850, PC-8, Danish/Norwegian, and Legal. All of these can be used with ISO sets 2, 4, 6, 10, 11, 14, 15, 16, 17, 21, 25, 57, 60, 61, 69, 84, 85, HP Spanish and HP German.
**Scalable Fonts are available in above listed symbol sets and in Windows 3.1 Latin 1 (ANSI), DeskTop, PS Text, Ventura International, Ventura US, Microsoft Publishing, Windows 3.0 Latin 1 (previously called Windows), and MC Text.
+Intellifonts also available in ISO 8859-2 Latin 2, ISO 8859-9 Latin 5, Windows 3.1 Latin 2, Windows 3.1 Latin 5, Math-8, PS Math, Ventura Math and PI Font.
Font Test
To check fonts available in printer, take printer off-line and press the [Menu] button repeatedly until the TEST MENU appears. Press the Item button repeatedly until the desired font list selection is displayed. Press the Enter button.
Unprintable Regions
Left: 1/6th inch
Right: 1/6th inch
Top: 1/6th inch
Bottom: 1/6th inch
Continuous Feeding
Standard : 2 Paper Cassette [capacity: 500 sheets
each].
Multi-Purpose Tray [capacity: 100 sheets paper (10 envelopes, 75
labels/transparencies)]
Optional : Envelope Feeder
Optional 2000-Sheet Lower Cassette
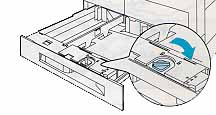
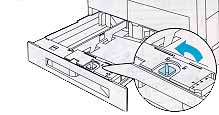
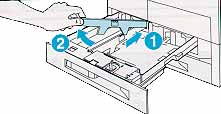
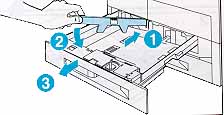
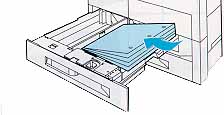
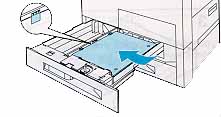
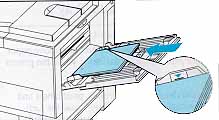
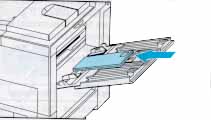
Loading the Paper Cassettes
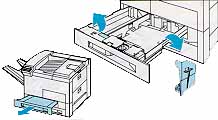
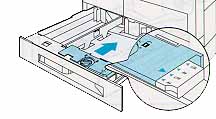
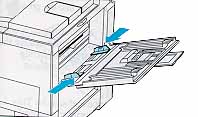
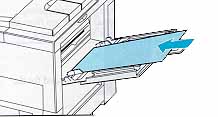
Loading Media into the Multi-purpose Tray
| Message | Meaning | Recommended Action |
| READY | The default ready message. The printer is ready to use. | No action required. |
| OFFLINE | The printer is offline and cannot print data. | Press [On Line]. |
| WARMING UP | The printer is warming up and is not ready to accept data. | Wait until the printer signals READY. If necessary, press [On Line]. |
| POWER SAVE ON | The printer is in Power Save mode. In Power Save mode all control panel keys operate normally. | No action required. The job prints when the fuser has warmed (about 45 seconds). |
| PERFORM USER MAINTENANCE | This message indicates that the printer requires routine maintenance. It will replace the READY message until it is cleared. | Purchase a maintenance kit and install the new parts. Then remove the message by turning SERVICE MESSAGE = OFF in the CONFIGURATION MENU. |
| PRINTING CONFIGURATION PAGE | The printer is printing a configuration page. | No action required. |
| PRINTING FONT LIST | The printer is printing a font list. | No action required. |
| PRINTING DEMO PAGE | The printer is printing a demonstration page. | No action required. |
| RESTORE FACTORY SETTINGS | The printer returns almost all defaults to their default configurations. | Reconfigure your printer and MIO.
When you install an MIO card(s), to reinitialize the printer's control panel you may need to perform a cold reset. (Note: In a shared environment, this task should only be performed by the system administrator.) To perform a cold reset, hold down [On Line] while switching the printer ON until RESTORING FACTORY SETTINGS appears in the display. |
| CLOSE PRINTER COVERS | One of the printer's covers or doors is not firmly closed, or your toner cartridge is not installed correctly. | Make sure your toner cartridge is fully seated and the printer top cover or doors (left, front, and right) are firmly closed. |
| ACCESS DENIED | Your network administrator has locked out access to the control panel menu system, except for the Test Menu and Tray 1 size. | See your network or printer administrator. |
| INSTALL TONER CARTRIDGE | The toner cartridge is not installed correctly or is not installed. | Insert a toner cartridge or make sure the cartridge is fully seated and the covers are fully closed, then press [On Line] to resume. |
| LOAD TRAY X
LOAD ENV FEEDER |
The printer received a request for a media type, or paper/envelope size not available in the printer. | Load the indicated tray with the correct media. |
| MANUAL FEED TRAY 1 | The printer received a request for a media of a certain type and size to b manually fed in Tray 1. | Load the correct media in the tray. If the correct media is already loaded, press [On Line] so the printer will use that media. |
| TONER LOW | The toner cartridge is running out of toner. | Shake the toner cartridge or replace it. Press [Select *] to override the stopped condition and continue printing. |
| HP MIO x INITIALIZING | The MIO card(s) are initializing. This is a status message; during initialization the MIO is not active, but since the printer supports I/O switching, the printer remains on line. | No action required. Display clears automatically (this may take up to five minutes depending on the card). However, if hte message remains after five minutes a problem does exist. Contact your network administrator or consult the network documentation that came with your MIO card. |
| FINISHER SUPPLY OUT <output device> | The output device listed is out of finishing material. For example, there are no more staples. | Refill the needed material. |
| FINISHER LIMIT REACHED <output device> | The output device listed has reached the maximum amount of media it is capable of processing. | Remove the media so the device may continue processing print jobs. |
| FINISHER ALIGN ERROR <output device> | The output device listed has misaligned the media to be bound. | Clear the media. |
| FINISHER MALFUNCTION <output device> | The output device listed is in an error condition. | Refer to the finisher's documentation for more information. |
| 13.X PAPER JAM CLEAR n PAGES or CLEAR THE PRINTER |
Paper is jammed in the printer. | Remove jammed paper from under the toner cartridge, the right door, the front door, and the left door. |
| 20 MEMORY OVERFLOW DATA LOST |
The printer received more data from the computer than can fit in its available user memory. | Press [Select *] to print the transferred data (data loss may result). Then make more memory available in the printer by removing some fonts, macros, or any other data from memory; simplify the page sent to the printer; or install additional memory. (Note: if AUTO CONTINUE = ON the printer will automatically continue printing when this error occurs.) |
| 21 PRINT OVERRUN DATA LOST |
The data (dense text, rules, raster or vector graphics) sent to the printer was too complex. | Press [Select *] to resume printing. (Note: if AUTO CONTINUE = ON the printer will automatically continue printing when this error occurs.) You may lose some data. Try to simplify your print job. |
| 22 PARALLEL IO ERROR CHECK SETUP 22 HP MIO x ERROR |
For bi-tronics parallel (PAR) configuration, the
computer and printer are not communicating because of
improper signal protocols. Check both computer and
printer I/O settings.
For the MIO error, this is an I/O buffer overrun error. |
Press [Select *] to clear the error message (data
will be lost). If the error continues, call your
authorized HP dealer or service representative.
For the parallel configuration, check for loose cable; use a high-quality cable (some cables may be missing pin connectors.) If you are using an I/O other than the bi-tronics parallel I/O, see the manual for that device or contact your dealer. If you are on a network, contact your network administrator. |
| 30.x.y DISK NOT INITIALIZED | The indicated disk not initialized. | Press [Select *] to continue. Use the Windows based HP JetAdmin utility or the Macintosh based Hp LaserJet Utility to initialize the disk. |
| 30.x.y DISK FAILURE | The indicated disk has failed self test. | Press [Select *] to continue. Turn power off and verify that the ribbon cable that connects the disk to the printer is securely fastened. If the control panel message continues to be displayed, the disk drive needs to be replaced. |
| 40.x HP MIO ERROR | An abnormal connection break occurred while transferring data from the computer. | Press [Select *] to clear the error message. I/O connections on that MIO card will not be used. |
| 41.1 GENERAL MISPRINT ERROR
41.2 BEAM DETECT MALFUNCTION 41.3 IMPROPER PAPER SIZE 41.4 NO VIDEO SYNC 41.5 NOISY VIDEO REQ SIGNAL |
A nonfatal error has occurred in the printed page. | Press [Select *] and attempt to continue.
If problem persists, power-cycle the printer. These error messages are saved in the Error Log. |
| 50.x FUSER ERROR CYCLE POWER | The printer identified an internal service error
(hardware problem with fuser).
50.1 Fuser low-temperature failure 50.2 Fuser warm-up failure (timed out) 50.3 Fuser over-temperature failure 50.4 Bad fuser |
Power cycle the printer.
These error messages are saved in the Error Log. |
| 51.x ERROR CYCLE POWER | The printer detected a laser sub-system problem.
51.1 Beam detection malfunction 51.2 Laser malfunction |
Power cycle the printer.
These error messages are saved in the Error Log. |
| 52.x ERROR CYCLE POWER | The printer detected a scanning sub-system problem.
52.1 Scanner startup failure 52.1 Scanner rotation failure |
Power cycle the printer.
These error messages are saved in the Error Log. |
| 53.xy.zz MEMORY ERR CYCLE POWER | An error occurred during configuration and validation
of SIMM memory:
x (Hardware type): y (Hardware device): zz (Error number): |
Make sure your SIMM board is installed correctly. Replace the SIMM that caused the error. [Select *] will allow you to continue but the SIMM that caused the error will not be configured. If the SIMM device has more than one bank of memory, the good banks will be configured. |
| 54 2-SIDED ERROR CHECK DUPLEXER | There is a Duplex Unit guide malfunction. | Remove and reinstall the Duplexer Unit. If error continues, call service. |
| 55.xx ERROR PRESS SELECT KEY | Printer command error; commands cannot be exchanged between the print engine and its formatter board. | Press [Select *] to resume operation. If necessary turn the printer off and then on. |
| 56.x ERROR PRESS SELECT KEY | An input source/destination output bin has been
requested
56.1 Invalid input source |
Press [Select *] to resume operation.
Correct invalid request(s). If necessary turn the printer off and then on. |
| 57.x FAN FAILURE CALL SERVICE | One of the cooling fans has failed. | Turn printer off and call service immediately. Do not operate with this condition. |
| 58.x PRINTER ERROR CYCLE POWER | One of the input paper tray lifters has failed. | Press [Select *] to resume operation. Note: the tray indicated by this error will be ignored until the next power cycle. |
| 59.X PRINTER ERROR CYCLE POWER | There is a problem with the main motor. | Cycle the printer's power. If this does not resolve the error, call service. |
| 61.X PRINTER ERROR CYCLE POWER | The printer encountered a parity error when accessing
internal RAM or some SIMM memory in slot x.
0: internal memory 1-4: SIMM slot |
Switch the printer off and the on (data stored in the printer will be lost). If the error is still present, first verify that the SIMM board is correctly installed. Switch the printer ON. If the error is still present, switch the printer off and remove the SIMM board. Switch the printer back on. If the error message does not appear, the problem is on the SIMM. |
| 62.x PRINTER ERROR CYCLE POWER | The printer identified a CRC error while checking its
memory. x refers to the memory the printer was checking
when it encountered the error.
0:internal memory 1-4: SIMM slot |
Switch the printer off and the on (data stored in the printer will be lost). If the error is still present, first verify that the SIMM board is correctly installed. Switch the printer ON. If the error is still present, switch the printer off and remove the SIMM board. Switch the printer back on. If the error message does not appear, the problem is on the SIMM. |
| 64 PRINTER ERROR CYCLE POWER | The printer identified a scan buffer error. | Cycle printer's power. If this does not resolve the error, call service. |
| 65 PRINTER ERROR CYCLE POWER | The printer identified a dynamic RAM controller error. | Cycle printer's power. If this does not resolve the error, call service. |
| 66.x.yy DEVICE ERROR CYCLE POWER | The printer identified a paper handling controller error. x identifies the device and yy is the error code. | Cycle the printer's power.
Try disconnecting paper handing devices to aid in isolating the problem. If this does not resolve the error, call service. |
| 67 PRINTER ERROR | The printer identified a miscellaneous interface hardware error. | Cycle printer's power. If this does not resolve the error, call service. |
| 68 ERROR CHECK CONFIGURATION | There is a checksum error in the printer's nonvolatile memory (NVRAM). Some or all of the menu items have been reset to the factory default values. | Check all menu settings; reset if necessary. Press [Select *] to continue. If you switch the printer off and then on, you may lose settings. If the error reappears, call service. |
| 68 NVRAM FULL CHECK CONFIGURATION | The printer's nonvolatile memory (NVRAM) is full. | Press [Select *] to continue. The system will automatically perform a cold reset and display RESTORING FACTORY SETTINGS. The system will complete initialization and return to online. |
| 70 ERROR
71 ERROR CHECK CONFIGURATION |
A firmware SIMM problem was identified (incompatibility between SIMM/hardware/BIOS). | Cycle printer's power. If this does not resolve the error, call service. |
| 79 SERVICE (xxxx) CALL SERVICE | An internal controller error occurred. xxxx indicates the error type. | Switch the power off and then back on again. If the error appears again, turn power off and remove any non-HP SIMM memory boards from the printer. Then switch the printer back on. If the error appears again, record the numbers following the error message and call service. |
| 80 SERVICE (xxxx) CALL SERVICE | The printer detected a problem in the MIO card. xxxx indicates the error type. | Switch the printer off and then back on again. If the error appears again, record the numbers following the error message and call service. |
The interface connections are located on the back right side
of the printer.
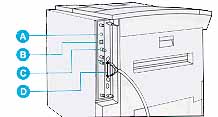
Bi-Tronics Parallel
Availability: Standard
Connection: Centronics Female
Activation: Through front panel menu
Serial
Availability: Standard
Connection: DB-25 Configured at factory for RS-232, RS-422 available.
Activation: Through front panel menu
AppleTalk
Availability: HP JetDirect Card (Standard on 5M)
Activation: Through front panel menu.
MIO
Availability: Optional (standard J2552A on 5M)
Connection: J2550A - HP JetDirect Multi-protocol Network Card with Ethernet/IEE802.3 10Base-T, J2552A - HP JetDirect Multi-protocol Network Card with LocalTalk and Ethernet/IEEE802.3 10Base-T, BNC, and DN8, J2555A - HP JetDirect Multi-protocol Network Card with Token Ring (DB9 and RJ45).
Activation: Through front panel menu.