 DeskJet 610C /
610CL / 612CDeskJet 610C /
610CL / 612C
DeskJet 610C /
610CL / 612CDeskJet 610C /
610CL / 612C |
Language:
PCL Level 3 Speed: 5 ppm (610C, 612C) 4 ppm (610CL) black, 2.5 mpp (610C, 612C) 1 ppm (610CL) color Memory: 512 KB, 32 KB receiver buffer Graphics: 600 X 600dpi black TrueType text, 600 X 300dpi photo and color Color: standard |
The 612C ships with the following software:
Printable Expressions - Create
one-of-a-kind greeting cards.
HP Instant Delivery (U.S. only) - Receive tailored, online publications and
Internet information delivered right to the printer.
Disney's Online Blast (TM) (U.S. only) - Each month, this interactive kids club
delivers new activities, games, and creative projects that expand young
horizons.
NOTE: Canadian shipments do not include Disney's Club Blast or Instant Delivery
with any printer.


Internal Fonts
| Typeface | Pitches | Point Size | Weight | Orientation |
| Courier | 5, 10, 16.67, 20 cpi | 6, 12, 24 pt | normal, bold | Portrait
Landscape |
| CG Times | Proportional | 5, 6, 7, 8, 10, 12, 14 pt | normal, bold | Portrait
Landscape |
| Letter Gothic | 6, 12, 24 cpi | 6, 12, 24 pt | normal, bold | Portrait
Landscape |
| Letter Gothic | 16.67 cpi | 4.75, 9.5, 19 pt | normal, bold | Portrait only |
| Univers | Proportional | 5, 6, 7, 8, 10, 12, 14 pt | normal, bold | Portrait
Landscape |
Unprintable Regions
Left: .25 inch
Right: .25 inch
Top: 0.04 inch
Bottom: 0.59 inch
Supported paper and paper sizes
| Paper Type | Size |
| Custom | Minimum: 5 x 5.83
inches
Maximum: 8.5 x 14 inches |
| U.S. letter | 215.9 x 279.4 mm (8.5 x 11.0 inches) |
| U.S. legal | 215.9 x 279.4 mm (8.5 x 14.0 inches) |
| Executive | 184.1 x 266.7 mm (7.25 x 10.50 inches) |
| European A4 | 210 x 297 mm (8.27 x 11.69 inches) |
| European A5 | 148 x 210 mm (5.85 x 8.27 inches) |
| B5-JIS | 182 x 257 mm (7.17 x 10.12 inches) |
| U.S. No. 10 Envelope | 104.8 x 241.3 mm (4.12 x 9.50 inches) |
| Invitation A2 Envelope | 111 x 146 mm (4.37 x 5.75 inches) |
| European DL Envelope | 110 x 220 mm (4.33 x 8.66 inches) |
| European C6 Envelope | 114 x 162 mm (4.49 x 6.38 inches) |
| Index | 101.6 x 152.4 mm (4 x 6 inches) |
| Index | 127.0 x 203.2 mm (5 x 8 inches) |
| European A6 | 105 x 148 mm (4.13 x 5.82 inches) |
| Japanese Hagaki Postcard | 100 x 148 mm (3.94 x 5.83 inches) |
Continuous Feeding
Standard Feeders: One Paper Tray [capacity: 1/2" stack]
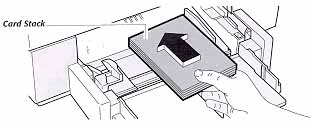
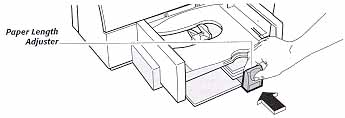
Using Index Cards and Postcards
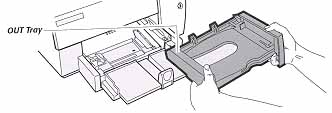
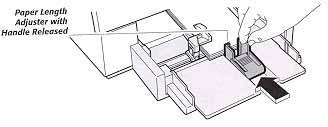
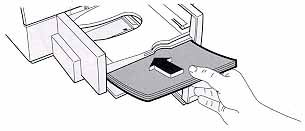
Using the Single Envelope Slot
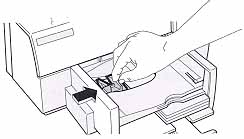
The printer allows you to load up to 20 envelopes at a time in the IN tray or to feed a single envelope through the printer without first removing the paper from the IN tray by using the single envelope slot. When using the single envelope slot, you can alternate printing on an envelope then on a piece of paper. This feature is useful when printing a series of letters and their corresponding envelopes.
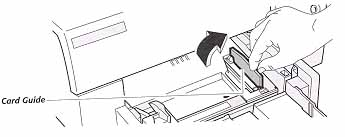
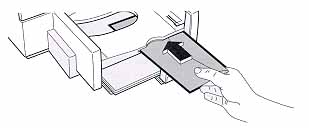
The single envelope slot allows you to print on either a No. 10 (COM-10) or a DL size envelope. Other envelope sizes are not supported with the single envelope slot.
NOTE: Do not remove the paper from the IN tray, and be sure the card guide is down before using the single envelope slot.
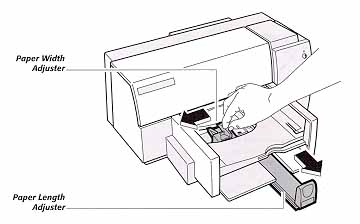
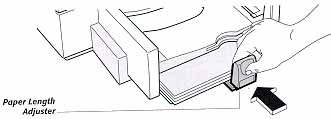
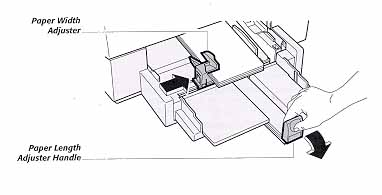
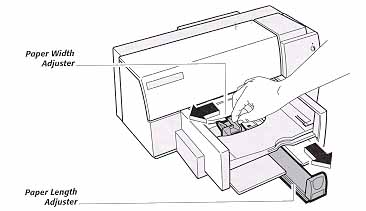
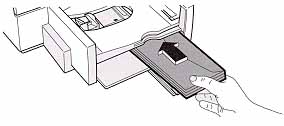
Loading Envelopes in the IN Tray
| Keypad Display | Cause | Solution |
| The resume light is blinking | The
printer is out of media (paper). The media (paper) is improperly loaded. The top cover of the printer is open. The print cartridge is improperly installed. |
Load
paper or media in the printer's input tray and press the RESUME
button on the printer control panel. Remove and reload the media, then press the RESUME button. Close the top cover and press the RESUME button. Make sure the print cartridge snaps into place with the green arrow aligned with the dot on the cradle top. Then push the RESUME button. |
| Both lights are on | The printer failed | Turn off the printer and turn it on again. If the lights stay on, contact a service person. |
| Both lights are off. | The printer is improperly connected to a power source. | Make sure the power module plug is firmly inserted into the printer's power socket, and the other end of the cord is plugged into an outlet. Turn the power on by pressing the POWER button. |
| The RESUME and POWER lights blink alternately. | The
printer is in an unknown state. An inappropriate printer driver is selected. The media is jammed in the printer. The print carriage is unable to move. The printer failed or the computer-to-printer connection failed. |
Turn
the printer off by pressing the POWER button.
Cancel the print job at the computer and turn the printer
back on. Select the HP DeskJet 6xx Printer Driver. Remove the jammed media. Turn off the printer, open the printer's top cover, and remove anything blocking the movement of the print carriage. Gently move the print carriage to the left and back again with your hand. Then, turn on the printer. Turn off the printer, disconnect the interface cable from the printer, and turn the printer back on. If the lights continue to blink, the printer has failed. Otherwise the problem my be with the interface cable. |
The interface connection is
located on the back of the printer.
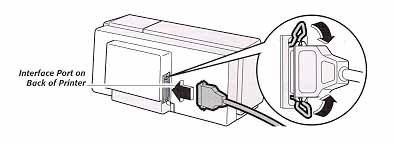
Parallel
Availability: Standard
Connection: Centronics Female
Activation: Automatic
USB for the IMac Only
Availability: Kit, part number C4033B
Activation: Automatic