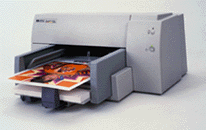
 DeskJet 690C/
692C/ 693C/ 694C
DeskJet 690C/
692C/ 693C/ 694C
 |
Language:
PCL Level 3 Speed: 3 ppm black,
0.8 mpp color
Memory: 512 KB, 32 KB receiver
buffer
Graphics: 600 X
600dpi black, 600 x 300 color
|
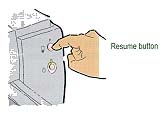
To run a self-test
1. Turn the printer on.
2. Press and hold the Resume button until
the printer starts printing. Release the Resume button.
To run a clean-test
1. Turn the printer on.
2. Press and hold the Power button, press
the Resume button seven times, and then release the Power button.
To run a diagnostic-test
Regular
1. Turn the printer on.
2. Press and hold the Power button, press
the Resume button five times, and then release the Power button.
Extended
1. Turn the printer on.
2. Press and hold the Power button, press
the Resume button twelve times, and then release the Power button.


Unprintable Regions
Left: .25 inch
Right: .25 inch
Top: 0.04 inch
Bottom: 0.46
Continuous Feeding
Standard Feeders: One
Paper Tray [capacity: 1/2" stack]
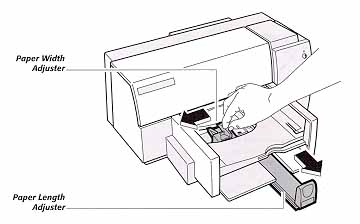
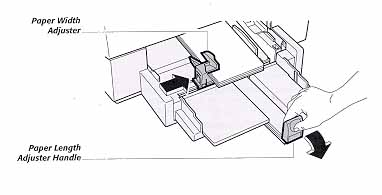
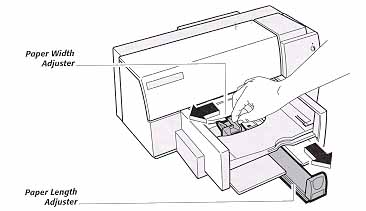
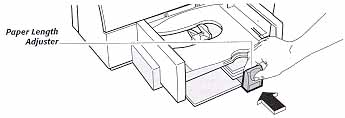
- Slide the paper width
adjuster to its leftmost position.
- Pull out the paper
length adjuster.
- Remove up to 1/2 inch
stack of paper from the packaging. Fan the edges of the
paper stack to separate the pages. Then tap the sort edge
of the stack on a flat surface to even the stack.
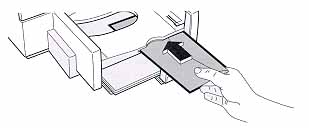
- Insert the paper evenly
into the IN tray, print side down, until it stops. Align
the right edge of the stack with the right edge of the IN
tray.
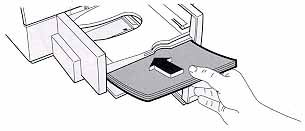
- Slide the paper width
adjuster to the right until it aligns with the left edge
of the paper stack.
- Push the paper length
adjuster in toward the paper until it stops
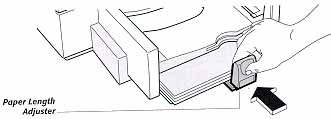
Make sure the paper does not bend in the IN tray.
- Set the software to
print on the size and orientation of the paper.
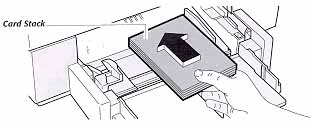
Using Index Cards
and Postcards
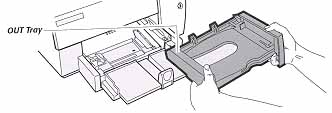
- Remove the OUT tray.
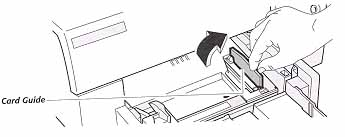
- Raise the card guide.
- Remove up to a 1/2 inch
stack of cards from their packaging and tap the short edge of the stack on a flat surface to even the stack.
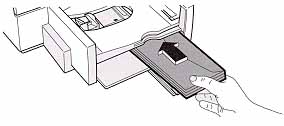
- Insert the cards into
the IN tray. Align the right edge of the card stack with
the card guide.
- Slide the paper width
adjuster to the right until it aligns with the left edge
of the card stack.
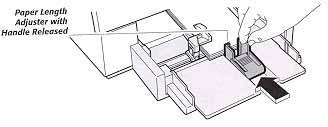
- Press the inside of the
paper length adjuster handle to release and lower it.
- Push the paper length
adjuster in toward the card stack until it stops.
- Replace the OUT tray.
If you encounter difficulty replacing the OUT tray, lift
the top cover, wait a few moments for the print cartridge
cradle to move to its center position, replace the OUT
tray, then lower the top cover.
Make sure the cards do no bend in the IN tray.
- Set the software to
print on the size and type of cards now in the printer.
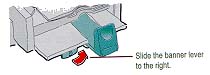
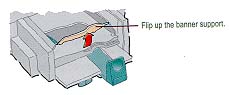
Printing Banners
- Set the paper type to
"Banner" in the HP DeskJet software.
- Slide the banner lever
to the right until it clicks into place.
- Remove all paper from
the lower (IN) tray and flip up the banner support in the
upper (OUT) tray.
- Get the banner paper
ready for the printer:
- From the stack of banner paper, tear off at least one
more sheet than you need to print the banner.
- Tear off the perforated strips, if there are any.
- Unfold and refold the stack so the pages don't stick
together in the printer.
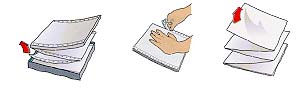
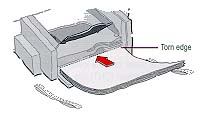
- Put the paper in the
lower (IN) tray so that the torn edge is at the top of
the stack facing into the printer.
- Slide the paper
adjusters in again so that they fit snugly against the
edges of the paper.
- Print the banner.
You'll notice that the printer and banner paper go
through some startup movements - don't worry, it's
normal. Also, banner printing takes a while; it may be
several minutes before you see the results.
- After the banner has
printed, press the Resume button as many times as needed
until all the banner paper is out of the printer.
Using the Single
Envelope Slot
The printer allows you to
load up to 20 envelopes at a time in the IN tray or to feed a
single envelope through the printer without first removing the
paper from the IN tray by using the single envelope slot. When
using the single envelope slot, you can alternate printing on an
envelope then on a piece of paper. This feature is useful when
printing a series of letters and their corresponding envelopes.
The single envelope slot
allows you to print on either a No. 10 (COM-10) or a DL size
envelope. Other envelope sizes are not supported with the single
envelope slot.
NOTE: Do not remove the
paper from the IN tray, and be sure the card guide is down before
using the single envelope slot.
- Remove either a No. 10
(COM-10 or a DL size envelope from its packaging.
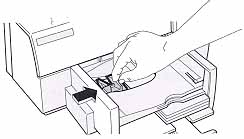
- Slide the envelope
evenly into the single envelope slot, address side down
(flap side up).
Make sure the creased flap side of the envelope aligns
with the right side of the single envelope slot.
- Slide the envelope
through the slot until it stops.
Make sure that the envelope is inserted all the way and
that it is not skewed or bent.
- Set the software to
print on the size and type of envelope now in the
printer.
- Be sure to reset the
software for the paper in the IN tray after printing on
the envelope is completed.
Loading Envelopes in
the IN Tray
- Slide the paper width
adjuster to its leftmost position.
- Pull out the paper
length adjuster and remove any paper from the IN tray.
Make sure the card guide is in the down position.
- Remove a stack of up to
20 envelopes from their packaging and tap the short edge
of the envelopes on a flat surface to even the stack.
- Slide the envelopes
evenly into the In tray, address side down (flap side
up).
- Make sure the creased
flap edge of the stack aligns with the right side of the
IN tray.
- Slide the paper width
adjuster to the right until it aligns with the left edge
of the envelope stack.
- For size
Invitation A2 and C6 envelopes, press the inside
of the paper length adjuster handle to release and lower
it.
Lowering the paper length adjuster handle reduces the
capacity of the IN tray to no more than 10 envelopes.
- For all sizes
of envelopes, push the paper length adjuster in
toward the envelopes until it stops.
Make sure the envelopes do not bend in the IN tray.
- Set the software to
print on the size and type of envelopes now in the
printer.
| Keypad
Display |
Cause |
Solution |
| |
|
|
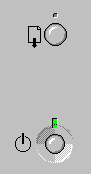
| The
resume light is blinking |
The
printer is out of media (paper). The media (paper) is
improperly loaded.
The top cover of the
printer is open.
The print cartridge
is improperly installed.
|
Load
paper or media in the printer's input tray and press the RESUME
button on the printer control panel. Remove and reload the media,
then press the RESUME button.
Close the top cover
and press the RESUME button.
Make sure the print
cartridge snaps into place with the green arrow aligned
with the dot on the cradle top. Then push the RESUME
button.
|
| |
|
|
| Both
lights are on |
The
printer failed |
Turn
off the printer and turn it on again. If the lights stay
on, contact a service person. |
| |
|
|
| Both
lights are off. |
The
printer is improperly connected to a power source. |
Make
sure the power module plug is firmly inserted into the
printer's power socket, and the other end of the cord is
plugged into an outlet. Turn the power on by pressing the
POWER button. |
| |
|
|
| The RESUME
and POWER lights blink alternately. |
The
printer is in an unknown state. An inappropriate printer
driver is selected.
The media is jammed
in the printer.
The print carriage
is unable to move.
The printer failed
or the computer-to-printer connection failed.
|
Turn
the printer off by pressing the POWER button.
Cancel the print job at the computer and turn the printer
back on. Select
the HP DeskJet 69x Printer Driver.
Remove the jammed
media.
Turn off the
printer, open the printer's top cover, and remove
anything blocking the movement of the print carriage.
Gently move the print carriage to the left and back again
with your hand. Then, turn on the printer.
Turn off the
printer, disconnect the interface cable from the printer,
and turn the printer back on. If the lights continue to
blink, the printer has failed. Otherwise the problem my
be with the interface cable.
|
The interface connection is
located on the back of the printer.
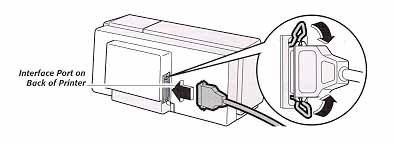
Parallel
Availability:
Standard
Connection:
Centronics Female
Activation: Automatic