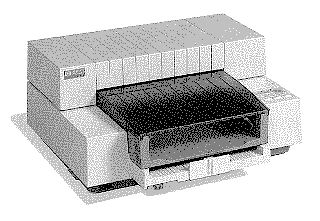
 DeskJet
DeskJet
DeskJet
|
Language:
PCL Level 3, Epson (with optional cartridge) Speed: 120 CPS - Letter, 240 CPS - Draft Memory: 512 KB, up to 2 optional RAM cartridges can be installed for soft fonts Graphics: 300dpi |


| Typeface | Heights | Pitches | Style | Weight | Sym. Set | Orientation |
| Courier | 6, 12 | 5, 10, 20 | Upright | Medium | PC-8 | Portrait |
| Courier | 6, 12 | 5, 10, 20 | Upright | Bold | PC-8 | Portrait |
| Courier | 6, 12 | 16.67 | Upright | Medium | PC-8 | Portrait |
| Courier | 6, 12 | 16.67 | Upright | Bold | PC-8 | Portrait |
Optional Fonts
Unprintable Regions
Left: 75 dots (¼ inch)
Right: 75 dots (¼ inch)
Top: 75 dots (¼ inch)
Bottom: 150 dots (½ inch)
Continuous Feeding
Standard Feeders: One
Paper Tray [capacity: 100 sheets]

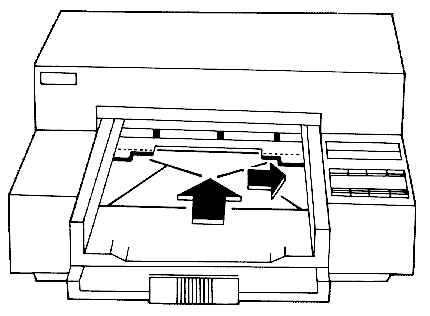
1. Slide the paper width adjustment lever to the left. The paper width adjustment lever is located below the left corner of the tray.
2. Pull out the paper tray extender. The paper tray extender is located at the center front edge of the tray.
3. Take out a ½ inch (approximately 1 cm) stack of paper (about 100 sheets) and tap the paper edge on a flat surface to even the stack.
4. Insert the stack of paper
squarely into the tray, print side down. Make sure the right edge
of the paper is aligned again the right wall of the tray.
5. Push the paper tray
extender in toward the printer, making sure the paper does not
buckle in the tray.
6. Slide the paper width adjustment lever to the right, making sure that the paper does not buckle in the tray. This will ensure that the right edge of the paper is aligned against the right wall of the tray and minimize skewed printing. If you are using US letter (8½ inch x 11 inch) or US legal (8½ inch x 14 inch) size paper, slide the lever back to the left.
Paper size is selected by DIP switches
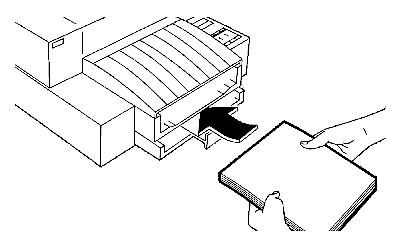
Envelope Feeding
Envelopes are manually loaded, one at a time, through the envelope guides located in the printer output tray. Be sure to use only No. 10 (US) or DL (European) size envelopes in your DeskJet printer.
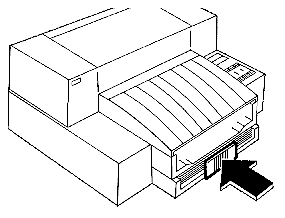
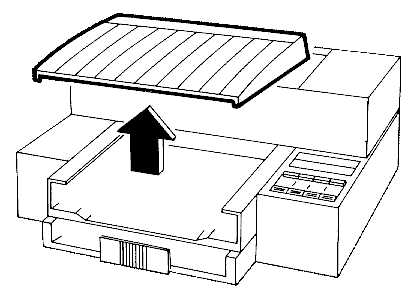
1. Remove the output tray
cover and set it aside.
2. Remove any paper from the output tray.
3. Hold the envelope with the flap side facing up.
4. Flex the envelope gently at the middle, slip it under the output tray wings, and set it, head first, into the output tray.
5. With the right side of
the envelope flush against the right side of the output tray,
push the envelope forwards, under the envelope guides and then
under the paper feed rollers until the envelope stops.
6. Press the [ENVELOPE] button.

| Keypad Display | Cause | Solution |
| All keypad lights are on. | It is possible that the printer was hung up when it was turned on. | Turn
off the printer. Make sure the computer is turned off. If the printer and computer are connected to a power strip, turn off the power strip. Turn on the computer, wait 30 seconds, and then turn on the printer. If the problem has been cleared, all keypad lights will flash on, then the ON LINE and COUR 10/20 lights will remain on, and the print carriage will "home." If nothing happens, call HP Personal Peripheral Assist. |
| BUSY and ON LINE lights are blinking | A paper jam has occurred. | Remove
the tray cover and open the top cover. Press the [UP] or [DOWN] arrow key to advance or retract the paper out of the printer. The paper jam should clear. If it doesn't, press the [UP] or [DOWN] arrow key with one hand while pulling the paper out with your other hand. |
| ON LINE light is blinking. | The printer is out of paper. | Reload paper into the input tray. |
| ON LINE light is blinking, paper is loaded. | Paper is not loaded completely. | Make
sure the paper was loaded in the input tray and not the
output tray. Make sure that the paper tray extender is holding the paper against the printer. Make sure that the paper loaded in your printer is 16 to 24 pound paper stock. |
The DeskJet printer has two
banks of mode function switches located on the printer's front
base, under the input tray. These switches define a number of
default printer settings, ranging from paper size to data
communications settings for an RS-232C serial interface
connection.
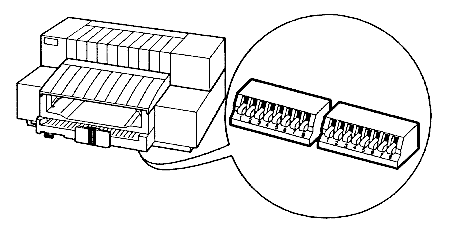
To change the mode function switch settings, use a pen or pencil to flip the switches to the desired (UP or DOWN) position.
Note: Settings that you select through your software or printer control panel will override mode function switch settings.
Settings in bold are default settings.
Bank A
Default Character Set PC-8
![]()
![]()
![]()
![]()
![]()
![]()
![]()
![]()
![]()
HP Roman 8 ![]()
![]()
![]()
![]()
![]()
![]()
![]()
![]()
![]()
PC-8 Danish/Norwegian ![]()
![]()
![]()
![]()
![]()
![]()
![]()
![]()
![]()
United Kingdom (ISO 4) ![]()
![]()
![]()
![]()
![]()
![]()
![]()
![]()
![]()
Germany (ISO 21) ![]()
![]()
![]()
![]()
![]()
![]()
![]()
![]()
![]()
French (ISO 69) ![]()
![]()
![]()
![]()
![]()
![]()
![]()
![]()
![]()
Italian (ISO 15) ![]()
![]()
![]()
![]()
![]()
![]()
![]()
![]()
![]()
Norwegian v.1 (ISO 60) ![]()
![]()
![]()
![]()
![]()
![]()
![]()
![]()
![]()
Swedish Names (ICO 11) ![]()
![]()
![]()
![]()
![]()
![]()
![]()
![]()
![]()
Spanish (ISO 17) ![]()
![]()
![]()
![]()
![]()
![]()
![]()
![]()
![]()
ASCII ![]()
![]()
![]()
![]()
![]()
![]()
![]()
![]()
![]()
Portuguese (ISO 16) ![]()
![]()
![]()
![]()
![]()
![]()
![]()
![]()
![]()
JIS ASCII ![]()
![]()
![]()
![]()
![]()
![]()
![]()
![]()
![]()
EMCA-94 Latin 1 ![]()
![]()
![]()
![]()
![]()
![]()
![]()
![]()
![]()
HP Legal ![]()
![]()
![]()
![]()
![]()
![]()
![]()
![]()
![]()
Default on Front Font
Cartridge ![]()
![]()
![]()
![]()
![]()
![]()
![]()
![]()
![]()
Paper/Envelope Size US
Letter (8½ inch x 11 inch) ![]()
![]()
![]()
![]()
![]()
![]()
![]()
![]()
![]()
European A4 (210 mm x 297
mm) ![]()
![]()
![]()
![]()
![]()
![]()
![]()
![]()
![]()
US Legal (8½ inch x 14
inch) ![]()
![]()
![]()
![]()
![]()
![]()
![]()
![]()
![]()
Envelope (US #10, European
DL) ![]()
![]()
![]()
![]()
![]()
![]()
![]()
![]()
![]()
Carriage Return Definition CR
only ![]()
![]()
![]()
![]()
![]()
![]()
![]()
![]()
![]()
CR and LF ![]()
![]()
![]()
![]()
![]()
![]()
![]()
![]()
![]()
Perforation Skip Mode On
![]()
![]()
![]()
![]()
![]()
![]()
![]()
![]()
![]()
Off ![]()
![]()
![]()
![]()
![]()
![]()
![]()
![]()
![]()
Bank B
Text Scale Mode 63
lines/page ![]()
![]()
![]()
![]()
![]()
![]()
![]()
![]()
![]()
66 lines/page* ![]()
![]()
![]()
![]()
![]()
![]()
![]()
![]()
![]()
Graphics Density 75 DPI
![]()
![]()
![]()
![]()
![]()
![]()
![]()
![]()
![]()
300 DPI ![]()
![]()
![]()
![]()
![]()
![]()
![]()
![]()
![]()
Terminal Mode Disabled
![]()
![]()
![]()
![]()
![]()
![]()
![]()
![]()
![]()
Enabled ![]()
![]()
![]()
![]()
![]()
![]()
![]()
![]()
![]()
RS-232C Baud Rate 9600
Baud ![]()
![]()
![]()
![]()
![]()
![]()
![]()
![]()
![]()
19200 Baud ![]()
![]()
![]()
![]()
![]()
![]()
![]()
![]()
![]()
2400 Baud ![]()
![]()
![]()
![]()
![]()
![]()
![]()
![]()
![]()
1200 Baud ![]()
![]()
![]()
![]()
![]()
![]()
![]()
![]()
![]()
RS-232C Parity and No
Parity, 8 Data Bits ![]()
![]()
![]()
![]()
![]()
![]()
![]()
![]()
![]()
Word Length Odd Parity, 7
Data Bits ![]()
![]()
![]()
![]()
![]()
![]()
![]()
![]()
![]()
Even Parity, 7 Data Bits ![]()
![]()
![]()
![]()
![]()
![]()
![]()
![]()
![]()
No Parity, 8 Data Bits ![]()
![]()
![]()
![]()
![]()
![]()
![]()
![]()
![]()
RS-232C Handshaking DTR
& XON/XOFF ![]()
![]()
![]()
![]()
![]()
![]()
![]()
![]()
![]()
DTR Only ![]()
![]()
![]()
![]()
![]()
![]()
![]()
![]()
![]()
*Changing the Text Scale Mode setting to 66 lines/page is ignored when Perforation Mode is on.
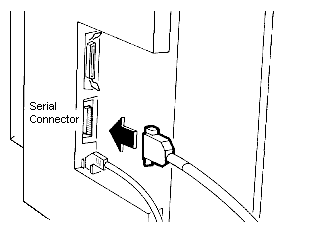
The interface connections
are located on the bottom of the printer.
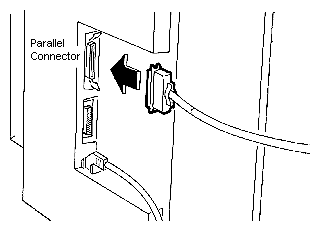
Parallel
Availability: Standard
Connection: Centronics Female
Activation: Automatic
Serial
Availability: Standard
Connection: DB-25 RS-232-C.
Activation: Automatic