 DeskWriter
550C DeskWriter
550C
DeskWriter
550C DeskWriter
550C 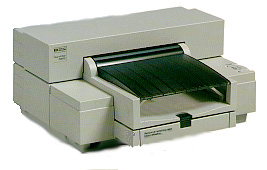 |
Language:
QuickDraw (Full-page Bitmap) Memory: 64KB Not Expandable Graphics: 300dpi & Color |


Internal Fonts
| Screen Typeface | Size | Printer Font | Symbol Set |
| Courier | Scalable | CS Courier | Adobe PS |
| Times | Scalable | CS Times | Adobe PS |
| Helvetica | Scalable | CS Triumvirate | Adobe PS |
| Symbol | Scalable | CS Symbol | Adobe PS |
Optional Fonts
| Screen Typeface | Size | Printer Font | Symbol Set |
| Palatino | Scalable | CS Palacio | Adobe PS |
| New Century Schoolbook | Scalable | CS Century Schoolbook | Adobe PS |
| ITC Bookman | Scalable | CS ITC Bookman | Adobe PS |
| New Helvetica Narrow | Scalable | CS Triumvirate Condensed | Adobe PS |
| ITC Zapf Dingbats | Scalable | CS ITC Zapf Dingbats | Dingbats PS |
| ITC Zapf Chancery | Scalable | CS ITC Zapf Chancery | Adobe PS |
| ITC Avant Garde Gothic | Scalable | CS ITC Avant Garde Gothic | Adobe PS |
In addition to the fonts available from Hewlett-Packard, you can obtain Macintosh fonts from numerous type vendors. You can choose from a wide variety of alphabet fonts, both Latin and non-Latin, symbol fonts for specialized purposes, and novelty fonts for display and decoration.
Continuous Feeding
Standard Feeders: One
Paper Tray [capacity: 100 sheets or 20 envelopes]
1. Slide the paper width adjustment lever to the left. The paper width adjustment lever is located below the left corner of the tray.
2. Pull out the paper tray
extender. The paper tray extender is located at the center front
edge of the tray.
3. Take out a ½ inch (approximately 1 cm) stack of paper (about 100 sheets) and tap the paper edge on a flat surface to even the stack.
4. Insert the stack of paper
squarely into the tray, print side down. Make sure the right edge
of the paper is aligned again the right wall of the tray.
5. Push the paper tray
extender in toward the printer, making sure the paper does not
buckle in the tray. 
6. Slide the paper width adjustment lever to the right, making sure that the paper does not buckle in the tray. This will ensure that the right edge of the paper is aligned against the right wall of the tray and minimize skewed printing. If you are using US letter (8½ inch x 11 inch) or US legal (8½ inch x 14 inch) size paper, slide the lever back to the left.
Paper size is selected by DIP switches
Envelope Feeding
Be sure to use only No. 10 (US) or DL (European) size envelopes in your DeskJet 550C printer.
1. Hold down the IN tray release button and pull the IN tray toward you until it stops. Make sure to remove any media from the IN tray
2. Open the OUT tray cover.
3. Slide the paper width adjustment lever to the appropriate envelope setting.
4. Remove up to 20 envelopes from their packaging and tap the short edge of the envelopes on a flat surface to even the stack.
5. Slide the envelopes
evenly into the IN tray, address side down (flap side up),
past the green envelope stop. Make sure the creased flap edge of
the stack aligns with the right side of the printer.
6. Raise the green envelope stop.
7. Push the IN tray into the printer until it stops.
8. Close the OUT tray cover.
Printable Region
| Letter:
Left: .25 in. Top: .26 in. Right: .25 in. Bottom: .59 in. Legal: Left: .25 in. Top: .26 in. Right: .25 in. Bottom: .59 in. Envelope: Left: .75 in. Top: .0 in. Right: .75 in. Bottom: .5 in. |
 |
Note: Actual imageable area may vary depending on the application program and/or printer driver.
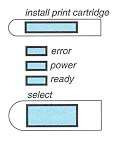
| Message | Meaning | Resolution |
| Error Light On | The printer is out of media. | Load
media in the printer's IN tray and press the select
button to resume printing. If media is loaded, push the IN tray drawer toward the pritner until it stops. Then press the select button on the printer to resume printing. |
| The Error light blinks | The media jammed. | Clear the media jam and press select to resume printing. |
| All printer control panel lights blink in unison | The power module
connection is loose or The print cartridge cradles are unable to move. |
Turn off the
printer and disconnect the power module from the printer.
Reinsert the power module plug firmly into the printer's
power socket and turn on the printer. or Turn off the printer. Open the printer's top cover and remove anything blocking the movement of the print cartridge cradles. Gently move the cartridge cradles to the left and back again with your hand. Turn on the printer. |
| The printer control panel lights blink sequentially | The printer's internal circuitry failed the printer self test. | Turn off the printer and turn it back on again. If the lights continue to blink, call service. |
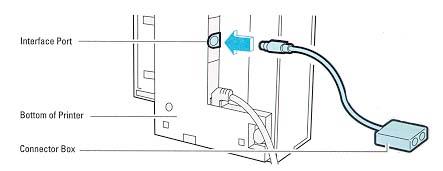
The DeskWriter 550C uses a
standard 8 pin port for its interface. It can be used on a
LocalTalk network or direct serial.

AppleTalk
Availability: Standard
Connection: Standard 8 Pin AppleTalk
Activation: Automatic
Serial
Availability: Standard (Uses same connection, differences are software driven)
Connection: RS-422-A Serial (57.6 Kbps)
Activation: Automatic