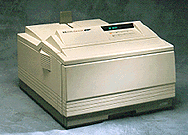
 LaserJet
4V / 4MV
LaserJet
4V / 4MVLaserJet
4V / 4MV
 |
Language: PCL Level 5, Postscript
(optional SIMM/standard for 4MV)
Speed: 16 ppm Memory: 4MB Standard (12MB MV) Exp. to 68MB Graphics: 600dpi Autorotate: Yes Duplex: Not Available RET: Yes |


Fonts Per Page: Limited only by available printer memory. (Each attribute is a separate font)
Internal PCL Fonts
| Typeface | Size | Variations | Symbol Set |
| Line Printer | 8.5 pt. (16.67 pitch) | Medium Upright | * |
| Courier | Scalable | Medium Upright | + |
| Bold Upright | |||
| Medium Italic | |||
| Bold Italic | |||
| CG Times | Scalable | Medium Upright | + |
| Bold Upright | |||
| Medium Italic | |||
| Bold Italic | |||
| CG Omega | Scalable | Medium Upright | + |
| Bold Upright | |||
| Medium Italic | |||
| Bold Italic | |||
| Coronet | Scalable | Medium Italic | ** |
| Clarendon Condensed | Scalable | Bold Upright | ** |
| Univers | Scalable | Medium Upright | + |
| Bold Upright | |||
| Medium Italic | |||
| Bold Italic | |||
| Univers Condensed | Scalable | Medium Upright | ** |
| Bold Upright | |||
| Medium Italic | |||
| Bold Italic | |||
| Antique Olive | Scalable | Medium Upright | ** |
| Bold Upright | |||
| Medium Italic | |||
| Garamond Antiqua | Scalable | Medium Upright | ** |
| Garamond Halbfett | Scalable | Bold Upright | ** |
| Garamond Kursiv | Scalable | Medium Italic | ** |
| Garamond Kursiv Halbfett | Scalable | Bold Italic | ** |
| Marigold | Scalable | Medium Upright | ** |
| Albertus | Scalable | Medium Upright | ** |
| Albertus Extra Bold | Scalable | Bold Upright | ** |
| Arial | Scalable | Medium Upright | + |
| Bold Upright | |||
| Medium Italic | |||
| Bold Italic | |||
| Times New Roman | Scalable | Medium Upright | + |
| Bold Upright | |||
| Medium Italic | |||
| Bold Italic | |||
| Letter Gothic | Scalable | Medium Upright | + |
| Bold Upright | |||
| Medium Italic | |||
| Symbol | Scalable | Medium Upright | N/A |
| Wingdings | Scalable | Medium Upright | N/A |
*All Fonts are available in PC-8, Roman-8, ECMA-94, PC-850, PC-8, Danish/Norwegian, and Legal. All of these can be used with ISO sets 2, 4, 6, 10, 11, 14, 15, 16, 17, 21, 25, 57, 60, 61, 69, 84, 85, HP Spanish and HP German.
**Scalable Fonts are available in above listed symbol sets and in Windows 3.1 Latin 1 (ANSI), DeskTop, PS Text, Ventura International, Ventura US, Microsoft Publishing, Windows 3.0 Latin 1 (previously called Windows), and MC Text.
+Intellifonts also available in ISO 8859-2 Latin 2, ISO 8859-9 Latin 5, Windows 3.1 Latin 2, Windows 3.1 Latin 5, Math-8, PS Math, Ventura Math and PI Font.
Optional Fonts
Font Test
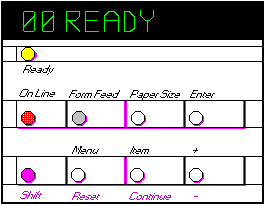
To check fonts available in printer, take printer off-line and press the [Menu] button repeatedly until the TEST MENU appears. Press the Item button repeatedly until the desired font list selection is displayed. Press the Enter button.
Unprintable Regions
Left: 1/6th inch
Right: 1/6th inch
Top: 1/6th inch
Bottom: 1/6th inch
Continuous Feeding
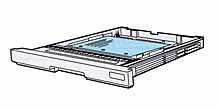
Standard : Letter/A4 Paper Cassette [capacity: 250
sheets] Interchangeable Tabloid (11x17) [250 sheets].
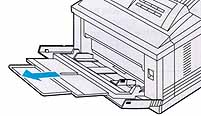
Multi-Purpose Tray [capacity: 100 sheets paper (10 envelopes, 75
labels/transparencies)]
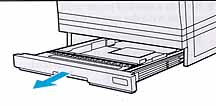
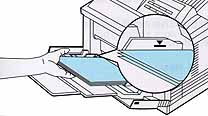
Loading Paper into the Letter or A4 Paper Cassette
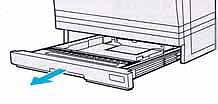

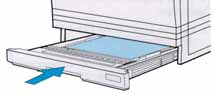
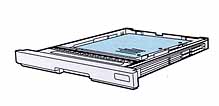
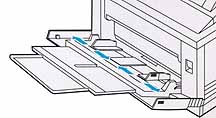
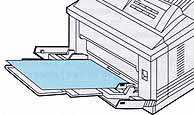
Loading Paper into the Tabloid or A3 Paper Cassette

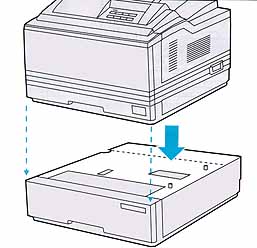
Optional : Optional 500-Sheet Lower Cassette
Manual Feeding
Because the printer uses the MP tray as both a manual feed tray and a paper cassette, manual feed works differently than for earlier LaserJets. If you place a piece of media in the MP tray, manual feed will not automatically be selected unless you are in the MP TRAY=FIRST mode.
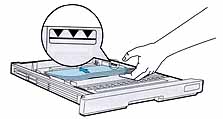
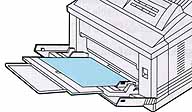
Configuring the Multi-Purpose Tray for Continuous Feeding
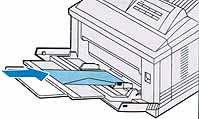
Loading Paper into the MP Tray
| Message | Meaning | Resolution |
| 00 Ready | The default ready message. The printer is ready to use. | No action required. If necessary, press On Line. |
| 02 Warming Up | The printer is warming up and is not ready to accept data. | Wait until the printer signals ready. If necessary, press On Line. |
| 04 Self Test | Printing continuous self test. | Press On Line of Continue to stop the test. Several more pages may print. |
| 05 Self Test | Printer self test in process (non-printing). | No action required. |
| 06 Printing Rest | Printing a self test. | No action required. |
| 06 Typeface List | printing a typeface list. (PCL/Postscript formats different.) | No action required. |
| 06 Demo Page | Printing a demonstration page. (PCL/Postscript formats different). | No action required, |
| 06 Config Page | Printing a configuration page. (PCL/Postscript formats different). | No action required. |
| 07 Reset | Follows a control panel Reset selection. The printer returns all Printing, PCL Job, Config, and installed personality (PS, etc.) Menu items to user-selected settings and erase buffered page data, temporary soft fonts and temporary macros. | No action required unless the printer is receiving data (you may have to press Reset several times to prevent printing unwanted pages.) |
| 08 Cold Reset | The printer returns all Printing, PCL, Job, Config, Parallel, Serial, Aux IO (if installed) and installed personality (PS, etc.) menu settings to their factory default configuration except for page count, MP tray size, envelope paper size, and display language. | No action required.When you install a MIO (Aux IO) card, to reinitialize the printer's control panel you may need to perform a cold reset. (Use with extreme caution. In a shared environment, it should only be performed by the system administrator.) To perform a cold reset, hold down On Line while switching the printer On until 08 Cold Rest appears in the display. |
| 09 Menu Reset | See Chapter 2 in the HP LaserJet 4/4M User's Manual., “Reset Menu” for more information. | No action required. |
| 09 Reset Active I/O | ||
| 09 Reset All I/O | See Chapter 2 in the HP LaserJet 4/4M User's Manual., “Reset Menu” for more information. | No action required. |
| 10 Reset to Save | The Printing, PCL, Job, Config, and installed personality (PS, etc.) menus were changed while data, temporary fonts, or temporary macros were present in printer memory, or while the printer was in t he middle of a job. | Press Continue or On Line and you changes will remain recorded in the menu (marked with an *) but will not become active until the printer is reset or the job boundary is detected. If you reset the printer (press Reset) to immediately activate your selections, you will delete temporary macros, temporary fonts, and buffered data. |
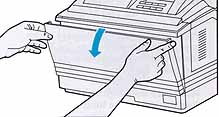
| 12 Printer Open | The printer's top cover is not correctly closed, or your toner cartridge is not installed correctly. | Close the cover firmly or make sure your toner cartridge is fully seated. |
| 13 Paper Jam | Paper Is jammed in the paper path or the paper jam sensor at the rear of the fusing assembly may be stuck causing a false paper jam warning.NOTE: Check that the packing piece has been removed from fusing assembly and that fuser levers are in the down position. | Remove jammed paper (see “Clearing Paper Jams” in the HP LaserJet 4/4M User's Manual). While clearing paper, the top cover or the rear cover must be opened and closed again before pressing Continue or On Line to resume. Check that the rear cover is closed; an open rear cover may cause a paper jam. |
| 14 No EP Cartridge | The toner cartridge is not installed correctly. | Insert a toner cartridge or make sure the cartridge is fully seated and the top cover us fully closed, then press Continue or, if necessary, On Line to resume. |
| 16 Toner Low | The toner cartridge is running out of toner. If TONER LOW=ON this message will remain in the display until the tone cartridge is replaced. If TONER LOW=OFF this message will disappear when you press Continue. | Shake the toner cartridge or replace it. If Toner LOW=OFF, press continue to allow printing to continue (print qualify will gradually degrade). |
| FE Cartridge | An accessory cartridge was removed while the printer was On Line. | Switch the printer OFF, then On again. (Ensure the printer is Off Line when you remove or reinsert the cartridge.) |
| FI Insert Carte | An accessory cartridge was removed while the printer was in an error state. | Insert the accessory cartridge, clear any pending error conditions, then remove the cartridge. |
| FR Remove Cart | An accessory cartridge was inserted while the printer was in an error state. | Remove the accessory cartridge, clear any pending error conditions, then re-insert the cartridge. |
| MF Feed [paper size] | The printer requested that media of [paper size] be manually fed. | Insert the appropriate media size into the MP tray and press On Line to printer, or press Continue to feed from the paper cassette. |
| ME Feed [envelope size] | The printer requested that an envelope of [envelope size] be manually fed. | Insert the appropriate envelope size into the MP tray and press On Line to print. |
| XX Load [media size] | The printer received a request for a paper or envelope size not available in the printer. The XX will be MP (multi-purpose, PC (paper cassette) or LC (lower cassette) | Load the correct paper tray and/or media size and select the size as necessary (use Paper Size button to configure MP tray) or press Continue to sue the media in t he installed tray. Use the paper selection knob on the 250 and 500-sheet universal paper trays. The printer will continue automatically. |
| EE Load [envelope size] | The printer received a request for an envelope size that is not currently loaded in the optional envelope feeder, or the feeder is empty. | Load the correct envelope size into the feeder, or press Continue to use the size of media installed in the feeder. |
| PC Install | The printer currently has the lower cassette selected as the paper source and has detected that the paper cassette, which serves as a paper guide for the lower cassette, is not installed. | Install or reseat the paper cassette. |
| 18 AUX IO INIT | The MIO (AUX IO) card is initializing. During initialization the MIO is not active, but since the printer supports I/O switching, the printer remains on line and this is a status message. | No action required. Display will clear automatically (this may take up to a minute depending upon the card.) |
| 18 AUX IO NT RDY | The MIO (AUX IO) card is not ready. | See the user's manual for the MIO card. The serial and bi-tronics parallel ports will continue to operate normally. to clear the display, remove the card and switch the printer OFF and then ON. Continue will not clear the display. |
| 20 MEM OVERFLOW | The printer received more data form the computer than can fit in its available user memory. You may have tried to transfer too many macros or soft fonts, or graphics that were too complex. This problem is also caused by printing too many typefaces at 600dpi. | Press Continue to print the transferred data, then simplify your print job or install additional memory. |
| 21 PRINT OVERRUN | The data (rules, dens text, raster or vector graphics) sent to the printer was too complex. | Press Continue to resume printing. You may lose some data. Reduce pager complexity to eliminate the problem or use the page protection feature. If this problem occurs frequently, install additional memory. |
| 22 ERROR | For serial/bi-tronics parallel configuration, the computer and printer are not communication because of improper signal protocols. This is an I/O buffer overrun error.Parallel configuration: may mean a loose cable connection. Serial configuration: wrong pacing option may have been selected. (If you are using an RS-232C serial connection, the HP LaserJet printer uses XON/XOFF and DTR/DSR signal protocols rather than ETX/ACK protocol.) | Press Continue to clear the error message (data will be lost). Refer to the printer's manual to verify the printer configuration. If the error continues, call your dealer or HP Service representative. Parallel configuration: check for loose cable. Serial configuration: check for correct serial pacing option.If you are using an I/O card other than the standard serial/bi-tronics parallel I/O card supplied with he printer, refer to the manual for that device or contact your dealer. If you are on a network, contact your network administrator. |
| 40 ERROR | The printer encountered an error while transferring data from he computer. For serial I/O configuration, the error may have occurred because you turned you computer on or off while the printer was on line or your printer's baud rate or parity was not the same as the computer's. For network MIO cards, this means there was an abnormal connection break. | Make sure the printer is set at the same baud rate as the computer. (If you are using an interface other than the serial/bi-tronics parallel I/O, refer to the user's manual for that product.) Press Continue to clear the error message. |
| 41.[X] ERROR | A temporary error occurred while printing. This error most commonly occurs when the paper size knob on the 250 or 500-sheet universal cassette does not match the installed paper, the wrong size media is loaded into a cassette, or the printer picks up two sheets of paper at once. | Ensure that the paper size knob is set
for the installed paper. Remove the page from the output
bin and press Continue. The page containing the error
will automatically be reprinted.
If this error persists, call your HP-authorized service provider. |
| 50, 57 or 58 SERVICE | The printer identified an internal service error. | If any of these errors appears, switch the printer off and then back on. If the error continues, call you dealer or HP service representative. NOTE: To clear the 50 SERVICE error the printer must be off for at least 10 minutes. |
| 51, 52 or 53 ERROR | The printer detected a temporary error. | If any of these error appears, press
Continue to resume operation.
If the error persists, call you HP service representative. |
| 53.XY.ZZ ERROR | An error occurred during configuration
and validation of SIMM memory:
X Hardware Type: 0: ROM 1: RAMY Hardware Device: 0: Internal Memory 1: SIMM Slot 1 2: SIMM Slot 2 3: SIMM Slot 3 4: SIMM Slot 4ZZ Error Number: 0: Unsupported Memory 1: Unrecognized Memory 2: Unsupported Memory Size 3: Failed RAM Test 4: Exceeded max. RAM size 5: Exceeded max. ROM size 6: Invalid SIMM speed 7: SIMM reporting information incorrectly 8: SIMM RAM parity error 9: SIMM ROM needs to be mapped to an unsupported address 10: SIMM address conflict |
Make sure you SIMM board is installed correctly. Replace the SIMM that caused the error. Continue will allow you to continue but the SIMM that caused the error will not be configured. If the SIMM device has more than one bank of memory, the good banks will be configured. |
| 61.[x] SERVICE | The printer encountered a parity error when accessing the RAM memory SIMM in slot “X”. IF X=0, the defective slot could not be determined. | Switch the printer off and then back on. If the error is still present, first verify that the SIMM board is correctly installed. Switch the printer ON. If the error is still present switch the printer off and remove the SIMM board, Switch the printer back on. If the error message does not appear, the problem is in the SIMM. |
| 62.[x] SERVICE | The printer identified a problem while
checking its memory. X refers to the device the printer
was checking when it encountered the error.
0: Internal Memory1-4: SIMM slot5: Cartridge |
If the printer contains a SIMM memory board, switch the printer off. Verify that the SIMM board is installed correctly and switch the printer back on. If the error is still present, switch the printer off and remove the SIMM board. Switch the printer back on. If the error message does not appear, the problem is in the SIMM board. |
| 63 SERVICE | The printer found a problem in its internal RAM memory | Switch the printer off, then back on. If the error appears again, call your dealer or HP service representative. |
| 64 SERVICE | The printer identified an internal service error. | If this error appears, switch the printer off, then back on. If the error continues, call your dealer or HP service representative. |
| 68 ERROR | The printer detected an error in the nonvolatile memory (NVRAM). | Press Continue, then check your control panel settings. |
| 68 SERVICE | The printer's nonvolatile memory is full. | Press Continue. If the error appears again, call your dealer or Hp service representative. |
| 79 SERVICE (XXXX) | An internal controller error has occurred. | Switch the printer off, then back on. If the error appears again, record the numbers following he error message and call you dealer or HP service representative, |
| 80 SERVICE (XXXX) | The printer detected a problem in the modular I/O card. The numbers following the error message indicate the specific type of error. | Switch the printer off and then back on again. If the error appears again, record the numbers following the error message and call you dealer or HP service representative. |
| 81 SERVICE (XXXX) | The printer detected a problem. | Press Continue to acknowledge the error. The printer should operate normally, but call your dealer or HP service representative. |
| W1 IMAGE ADAPT | The printer received a graphics print file that was too complex to print at the requested resolution. Check the printout for loss of data or print quality. | Press Continue to clear the error. |
| W2 INVALID PERS | The job was not printed because you requested a personality; such as Postscript, that had not been installed. | Install the language in which the files are sent, together with enough memory to support that language. |
| W3 JOB ABORTED | The print was forced to abort the print job because there was not enough installed memory to support the printer language used. For instance, a Postscript file may have been sent to the printer without enough installed memory to support Postscript. | Install more printer memory. |
| W4 JOB 300/OFF | The job was printed at 300 dpi with page protection off. | To print the job as requested, install more printer memory. |
| W5 JOB 300/LTR | The job was printed at 300DPI with page protection set to letter. | To print the job as requested, install more printer memory. |
| W6 JOB 300/A4 | The job was printed at 300 dpi with page protection set to A4. | To print the job as requested, install more printer memory. |
| W7 JOB 300/LGL | The job was printed at 300 dpi with page protection set to Legal. | To print the job as requested, install more printer memory. |
| W8 JOB 600/OFF | The job was printed at 600 dpi with page protection set to off. | To print the job as requested, install more printer memory. |
| W9 JOB 600/LTR | The job was printed at 600 dpi with page protection set to letter. | To print the job as requested, install more printer memory. |
| W0 JOB 600/A4 | The job was printed at 600 dpi with page protection set to A4. | To print the job as requested, install more printer memory. |
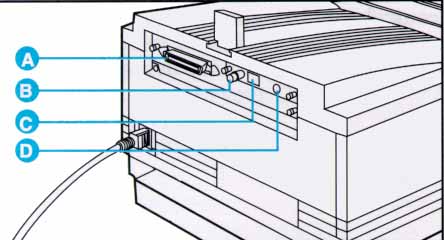
Parallel
Availability: Standard
Connection: Centronics Female
Activation: Through front panel menu
Serial
Availability: Standard
Connection: DB-25 Configured at factory for RS-232, RS-422 available.
Activation: Through front panel menu
AppleTalk
Availability: HP JetDirect Card (Standard on 4MV)
Connection: RS-422A Female.
Activation: Through front panel menu.
Ethernet
Availability: C2059A - Novell/Ethernet interface card. C2095B - 3Com 3+OPEN/Ethernet interface card. Token Ring interface cards for Novell and 3Com also available (C2059C and C2059D).
Connection: Optional interface card.
Activation: Through front panel menu.