 Color
LaserJet 5/5M
 Color
LaserJet 5/5M
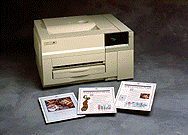 |
Language:
PCL Level 5, PostScript Level 2 (5M) Memory: 20 MB, exp. to 128 MB Graphics: 1200dpi & Color w/ RET |
Fonts Per Page: Limited only by available printer memory (Each attribute is a separate font)
Internal Fonts
| Typeface | Size | Variation | Symbol Set | |
| Courier | scalable | MediumBoldItalic
Bold Italic |
* | |
| Letter Gothic | Scalable | MediumBoldItalic | * | |
| Line Printer | 16.67cpi (8.5 pt) | Medium | - | |
| CG Times | Scalable | MediumBoldItalicBold Italic | * | |
| CG Omega | Scalable | MediumBoldItalicBold Italic | * | |
| Coronet | Scalable | Medium | * | |
| Clarendon Condensed | Scalable | Bold | * | |
| Univers | Scalable | MediumBoldItalicBold Italic | * | |
| UniversCd | Scalable | MediumBoldItalicBold Italic | * | |
| Garamond Antiqua | Scalable | Mediumbold (Halbfett) | * | |
| Garamond Kursiv | Scalable | MediumBold (Halbfett) | * | |
| Antique Olive | Scalable | MediumBoldItalic | * | |
| Albertus Medium | Scalable | MediumExtra Bold | * | |
| Arial | Scalable | MediumBoldItalicBold Italic | * | |
| Times New | Scalable | MediumBoldItalicBold Italic | * | |
| Symbol | Scalable | Medium | + | |
| ZapfDingbats | Scalable | Medium
Bold Italic Bold Italic |
+ |
*Available in Roman-8, PC-8, ECMA-94 PC-8 Danish/Norwegian, PC-850, Latin 1, and Legal. All of these can be used with ISO sets 2, 46, 10, 11 14, 15, 16, 17, 21, 25, 57, 60, 61, 69, 84, 85, HPSpanish and HP German and also VN Math; VN US; PI font; Windows VN Intl; PS Math; Math-8 MS Publ; PS Text; Desktop.
- LinePrinter only available in Roman-8, PC-8, ECMA-94 PC-8 Danish/Norwegian, PC-850, Latin 1, and Legal
ZapfDingbats and Symbol are symbol fonts and have their own respective symbol sets.
Optional Fonts (PCL)
Continuous Feeding
Standard Tray: Paper Tray holds 250 sheets cut-sheet paper, 50 sheets transparencies
Optional Trays: A4
(C3115A)
A3 (C3117A)
Legal (C3114A)
Tabloid (C3118A)
Executive (C3116A)
Optional Rear Feed Unit (C3119A) - includes 250-sheet rear input
tray and manual feed.
Note: Envelopes and Labels are not supported on this printer. Sizes larger than 11" x 14" are not supported in color.
Loading media in the front input tray
1. Firmly grip the center of the input tray and pull it outward from the printer. If the top of the input tray is pulled out, push the top in before removing the tray.
2. Remove the cover from the input tray, lift the warning flap, then press down on the media lift plate until it locks into place.
3. If you are loading
letter, A4, or executive size media, slide the media under the
metal tabs from the front of the tray with the long edge of the
media toward the back of the tray.
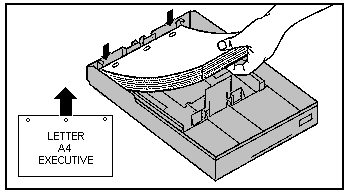
If you are loading legal,
A3, or tabloid size media, slide the media under the metal tabs
from the front of the tray with the short edge of the media
toward the back of the tray.
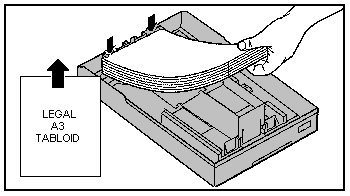
4. Adjust the width lever firmly against the side of the paper, then push the warning flap down.
5. Put the cover back on the input tray.
6. Slide the input tray into the printer and firmly push it into place,
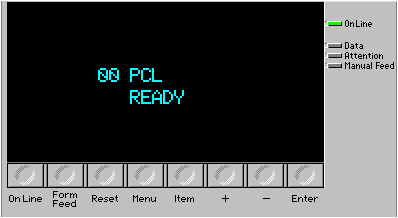
7 Make sure 00 PCL (or POSTSCRIPT) READY is displayed on the control panel and the On Line indicator is lit. If a 11.4 FRONT TRAY EMPTY message is displayed, remove the input tray and re-install it.
Loading media in the optional rear tray
1. Fully open the top cover on the input tray.
2. Remove any media and adjust the paper feed guides for the size of media you are loading.
3. Slide the media into the
input tray with the long edge of the media down.
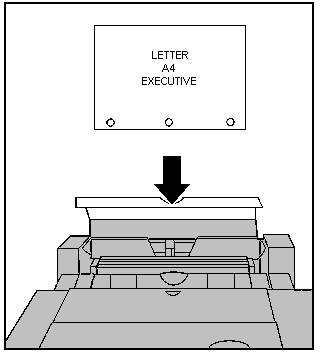
Make sure the stack is even across the top. If not, reload the
media. If you are adding paper to the rear input tray, remove the
old paper, combine the new paper with the old, then reload the
media.
The rear input tray holds up to 250 sheets (or 1 inch) of paper
or 50 transparencies. This tray supports letter, A4, and
executive-sized media.
4. Fine adjust the paper
feed guides with the paper size selection lever for the current
media size.
The printer automatically senses the size of media in the rear
input tray by the setting of the paper feed guides.
Legal, A3, and tabloid-size media are not supported from the rear
input tray, but they are supported from the manual feed input of
the rear feed unit.
5. Close the top cover on the rear input tray.
6. Make sure 00 PCL (or POSTSCRIPT) READY is displayed on the control panel and the On Line indicator is lit. If a 11.5 REAR TRAY EMPTY message is displayed, make sure the top cover of the rear input tray is closed.
Manual Feeding
Only with Optional Rear Feed Unit (C3119A)
1. Select the media type and size from your software application.
2. Select manual feed from your software application
3. Print your file from your software application.
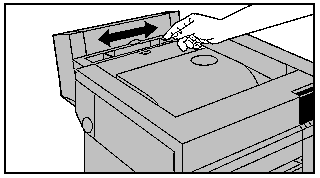
4. Adjust the manual feed
guides at the rear of the printer for the correct media size.
5. When the display prompts
you, slide a single sheet of media between the manual feed guides
until the media stops.
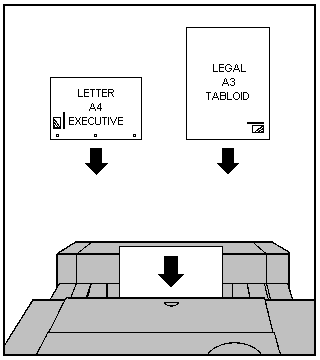
If you are using letter, A4, or executive size media, slide the
media between the manual feed guides with the long edge of the
media down and the print side facing the front of the printer and
to the left.
If you are using legal, A3, or tabloid size media, slide the
media between the manual feed guides with the short edge of the
media down and the print side facing down and to the front of the
printer.
| Message | Meaning |
| CONFIG LANGUAGE | Display Language configuration has been selected. Wait for the Display Language menu to appear on the printer display. Then select the local display language. |
| DEMO MODE | The printer is currently in the demonstration mode. A demonstration SIMM must e installed to enter this mode. |
| DEVELOPER TEST % COMPLETE=XXX | The printer is performing an internal engine test. XXX is a number between 0 and 100, with 100 indicating the test is complete. |
| ERROR LOG | The Error Log section of the menus is currently displayed. |
| EXTENDED DIAGNOSTICS MODE | The printer is currently in the extended diagnostics mode. |
| FE FONT CART ERR CYCLE POWER | The font cartridge was removed when the printer was On-Line. Turn the printer OFF, then back ON. |
| INITIALIZING NVRAM | The printer is initializing NVRAM with factory default values. |
| INSTALLING NEW DEVELOPER | The printer is going through a new develop installation sequence. This sequence lasts approximately 3 minutes for a new black developer and 9 minutes for a new color developer. |
| INSTALLING NEW DRUM | The printer is calibrating your new drum. This message is displayed for approximately 30 seconds after a new drum is installed and the drum number is entered. |
| CLJL DEMO MODE PRESS ANY KEY | A demonstration SIMM is installed in the printer and the printer is currently in the demonstration mode. Click and key on the printer control panel to print an demonstration page or turn the printer OFF, then back ON to exit the demonstration mode. |
| MIO CONFIG MENU | The MIO configuration menu is currently displayed. |
| NEW DRUM INST. DRUM NUMBER = 000 | The printer is prompting the user to enter the number for the new drum. Enter the drum number located on the upper right corner of the drum using the + and - keys, then click enter. |
| NO FONTS BOTH FONT CARTRIDGES | The printer cannot read either font cartridge. Reinsert both font cartridges, then click On Line to return the printer On-Line. If the problem persists, the cartridges are bad or incompatible with the printer. |
| NO FONTS BOTTOM CARTRIDGE | The printer cannot read the bottom font cartridge. Reinsert the bottom font cartridge, then click On Line to return the printer On-Line. If the problem persists, the cartridge is bad or incompatible with the printer. |
| NO FONTS TOP CARTRIDGE | The printer cannot read the top font cartridge. Reinsert the top font cartridge then click On Line to return the printer On-Line. If the problem persists, the cartridge is bad or incompatible with the printer. |
| PARALLEL MENU | The Parallel menu is currently displayed. |
| PCL CONFIG MENU | The PCL configuration menu is currently displayed. |
| PCL PRINT MENU | The PCL Print menu is currently displayed. |
| PCL TEST MENU | The PCL Test menu is currently displayed. |
| PLEASE VERIFY DRUM NUMBER = 000 | The printer is prompting the user to verify that the drum number previously entered is correct. Re-enter the correct number using the + and - keys, then click enter. |
| POWERSAVE MODE | The printer is currently in a reduced energy consumption mode. The printer will return to the ready state automatically when a print job is sent. |
| PRESS ON LINE TO CONTINUE | The printer is ready to start a new developer installation sequence. Click On Line to start the installation sequence. |
| PS CONFIG MENU | The PostScript Configuration menu is currently displayed |
| PS PRINT MENU | The PostScript Print menu is currently displayed. |
| PS TEST MENU | The Postscript Test menu is currently displayed. |
| REINSERT BOTH FONT CARTRIDGES | Both font cartridges were removed while the printer was off-line and contained buffered data. Reinsert both font cartridges, then click On Line to return On-Line. |
| REINSERT BOTTOM FONT CARTRIDGE | The bottom font cartridge was removed while the printer was off-line and contained buffered data. Reinsert the bottom font cartridge then click On Line to return on line. |
| REINSERT TOP FONT CARTRIDGE | The top font cartridge was removed while the printer was off-line and contained buffered data. Reinsert the top font cartridge then click On Line to return On-Line. |
| SERVICE MODE | The printer is currently in the service mode. Turn the printer off, then back on to return to the ready state. |
| SM CONFIG MENU | The Service Mode Configuration menu is currently displayed. Turn the printer off, then back on to return to the ready state. |
| SM TEST MENU | The Service Mode Test Menu is currently displayed. Turn the printer off, then back on to return to the ready state. |
| SWITCHING TO [personality] | The printer is in the process of switching between printer languages. |
| TONER LOW [KCMY] ADD [color] | The printer is running low on a specific toner color. Click On Line, add ONLY the toner color indicated on the display, then click On Line to return the printer back On-Line. |
| TONER LOW OFF LINE TO FILL | The printer detected a low toner condition for one or more colors of toner. Click On Line to take the printer off-line. |
| TONER LOW OPENING INTRLOCK | The printer is opening the interlock mechanism for the toner color that is low. |
| TONER OUT [KCMY] ADD [color] | The printer is out of a toner color. The printer will remain off line until the toner [color] is loaded. Load only the toner color indicated on the display. |
| 00 PCL READY | Printer is ready for use in PCL mode. |
| 00 POSTSCRIPT READY | Printer is ready for use in the PostScript mode. |
| 02 PCL WARMING UP | Printer engine is warming up. Wait until the printer displays 00 PCL READY. |
| 02 POSTSCRIPT WARMING UP | Printer engine is warming up. Wait until the printer displays 00 POSTSCRIPT READY. |
| 04 CONTINUOUS SELF TEST | Printer is in the continuous self test mode. Click On Line to stop the test. |
| 05 INTERNAL SELF TEST | Printer is performing the non-printing portion of the self test. |
| 06 PRINTING PCL DEMO PAGE | Printer is printing a PCL demonstration page. After the page is printed, the printer returns to the ready state, but remains off-line. Click On Line to return the printer On-Line. |
| 06 PRINTING PCL SELF TEST | Printer is printing a self test page. After the test is completed, the printer returns to the ready state, but remains off-line. Click On Line to return the printer On-Line. |
| 06 PRINTNG PCL TYPEFACES | Printer is printing a PCL typeface list. After the typeface list is printed, the printer returns to the ready state but remains off-line. Click On Line to return the printer On-Line. |
| 06 PRINTING PS DEMO PAGE | Printer is printing a PostScript demonstration page. After the page is printed, the printer returns to the ready On-Line state. |
| 06 PRINTING PS SELF TEST | Printer is printing a self test page. After the test is completed, the printer returns to the ready On-Line state. |
| 06 PRINTING PS TYPEFACES | Printer is printing a PostScript typeface list. After the typeface list is printed, the printer returns to the ready On-Line state. |
| 07 RESET | Printer is resetting all Print Menu items to user selected settings and clearing the page buffer, temporary soft fonts, and temporary macros. After the reset operation is complete, the printer returns to the ready state and automatically goes On-Line. |
| 08 COLD RESET | Printer is resetting all printing environment parameters, Print Menu defaults, and Confide Menu defaults to their factory defaults. After the reset is complete, the printer returns to the ready state and but remains off-line. Click On Line to return the printer On-Line.. |
| 09 MENU RESET | Printer is resetting all Print Menu items to the factory default settings. After reset operation is complete, the printer returns to the ready state and automatically goes On-Line. |
| 10 PRESS RESET TO ACTIVATE | Changes to the Print Menu were made while data, temporary fonts, or temporary macros were present in printer memory, or changes to the SYS personality items were made. Click Reset to activate the settings and delete any buffered data, temporary macros, and temporary fonts. Or Click On Line to ignore any changes to the Print Menu and the SYS setting for the current job. |
| 11.1 FRONT TRAY LOAD [paper] [TRN] | Printer received a request for a media size that is to currently loaded in the front input tray, or the front input tray is empty. Transparency (TRN) is only displayed when the Postscript personality is selected. Load the correct media size in the front input tray or install a tray with the correct media size. |
| 11.2 REAR TRAY LOAD [paper] [TRN] | Printer received a request for a media size that is not currently loaded in the rear input tray, or the rear input tray is empty. Transparency (TRN) is only displayed when the Postscript personality is selected. Load the correct media size in the rear input tray. |
| 11.3 MANUAL FEED [paper] [TRN] | Printer received a request to manually feed media. Transparency (TRN) is only displayed when the postscript personality is selected. Load a single sheet of the correct size media in the manual feed input located at the rear of the printer. |
| 11.4 FRONT TRAY EMPTY [TRN] | Front input tray is empty of not installed. Transparency (TRN) is only displayed when the Postscript personality is selected. Load the correct size media in the front input tray or install the correct size input tray. |
| 11.5 REAR TRAY EMPTY [TRN] | Rear input tray is empty, not installed, or its top cover is open. Transparency (TRN) is only displayed when the PostScript personality is selected. Load the correct size media in the rear input tray, then close its top cover. |
| 12 CLOSE TOP OR SIZE DOOOR | The printer top cover or side door is not closed properly. close the top cover or side door firmly, making sure that it is properly latched. If the top cover will not latch, make sure the black protective cover on the drum has been removed. If the side door will not close, make sure the developers and toner collection box are correctly installed. |
| 13.1 CLEAR DRUM WINDING JAM | Media is jammed in the printer paper path. Remove media from the paper path. Open and close the top cover to reset the printer, then click On Line to resume printing. |
| 13.2 CLEAR OUTPUT JAM | Media is jammed in the output paper path. Remove media from the output paper path. Open and close the top cover to reset the printer, then click On Line to resume printing. |
| 13.3 CLEAR MANUL JAM | Media is jammed in the manual feed paper path. Remove media from the output paper path. Open and close the top cover to reset the printer, then click On Line to resume printing. |
| 13.4 CLEAR FRONT TRAY INPUT JAM | Media is jammed in the input paper path. Remove the media from the input paper path. Open and close the top cover to reset the printer, then click On Line to resume printing. |
| 13.5 FUSER JAM [scrolling messages] | Media is jammed in the printer paper path. Remove the media from the paper path. Open and close the top cover to reset the printer, then click On Line to resume printing. |
| 13.6 CLEAR REAR TRAY INPUT JAM | Media is jammed in the rear input paper path. Remove media from rear input paper path. Open and close the top over to reset the printer, then click On Line to resume printing. |
| 13.7 CLEAR REAR TRAY PAPER JAM | Media is jammed in the rear paper path. Remove media from the rear paper path. then close the top cover and click On Line to resume printing. |
| 13.8 CLEAR PAPER JAM | Media is jammed in the printer paper path. Remove media from the paper path. Open and close the top cover to reset the printer, then click On Line to resume printing. |
| 14.5 REPLACE COLLECTION KIT | The toner collection box is full. The printer will remain off-line until the collection box is replaced. Replace the toner collection box. |
| 14.5 REPLACE COATING PAD KIT | The coating pad and cleaning roller need to be replaced. Replace the coating pad and cleaning roller. |
| 15 PRINTING ENGINE TEST | Engine self test and printout are being performed. After the engine test is completed, the printer returns to the ready state, but remains off-line. Click On Line to return the printer On-Line. |
| 16.5 REPLACE COLLECTION KIT | Toner collection box is almost full. Replace the toner collection box and filter soon. |
| 17.1 INSTALL BLACK DEVELOPER | The black develop is either not installed or not correctly installed in the printer. Install a black developer or make sure the installed black developer is properly seated. |
| 17.2 INSTALL COLOR DEVELOPER | The color developer is either not installed or not correctly installed in the printer. Install a color developer or make sure the installed color developer is properly seated. |
| 17.3 REINSTALL FUSER | The fuser is not installed correctly. Remove and reinstall the fuser. |
| 17.4 INSTALL FUSER | The fuser is either not installed or not correctly installed in the printer. Install a fuser or make sue the installed fuser is properly seared and both screws are tight. |
| 17.6 INSTALL COLLECTION BOX | The toner collection box or drum is not installed or not correctly installed in the printer. Install a drum or toner collection box, or make sure the installed toner collection box is properly seated. |
| 17.7 REMOVE DRUM COVER | The protective cover shipped with the new drum is still on the drum. Remove the black protective drum cover from the drum. |
| 17.8 REINSTALL DRUM | The drum is not installed correctly or the drum winding sensor is damaged. Remove and re-install the drum. If the error persists, service is required. |
| 17.9 REINSTALL FUSER | The fuser is not installed correctly. Remove and reinstall the fuser. |
| 18.1 CLEAN TRANS CORONA WIRE | The transfer corona wire needs to be cleaned. Open the printer and clean the transfer corona wire. |
| 18.2 REINSTALL DRUM | The drum is not installed correctly or the drum winding sensor is damaged. Remove and reinstall the drum. If the error persists, service is required. |
| 18.3 REINSERT DEVELOPERS | The printer received and error in the developer area. Open the top and side covers, remove and reinsert both developers, then close the covers. |
| 18.4 CLEAN TRANS CORONA WIRE | The transfer corona wire needs to be cleaned. Open the printer and clean the transfer corona wire. |
| 18.5 REINSERT DEVELOPERS | The printer received an error in the developer area. Open the top and side covers, remove and reinsert both developers, then close the covers. |
| 18.6 REINSERT DEVELOPERS | The printer received an error in the developer area. Open the top and side covers, remove and reinsert both developers, then close the covers. |
| 19.1 BLACK DEVEL USER MAINTENANCE | Black developer needs to be replaced. Replace the black developer or click On Line to continue printing. |
| 19.2 COLOR DEVEL USER MAINTENANCE | Color developer needs to be replaced. Replace the color developer or click On Line to continue printing. |
| 19.3 DRUM USER MAINTENANCE | Drum needs to be replaced. Replace the print drum or click On Line to continue printing. |
| 19.4 FUSER USER MAINTENANCE | Fuser needs to be replaced. Replace the fuser or click On Line to continue printing. |
| 19.5 TRANS BELT SUER MAINTENANCE | Transfer belt needs to be replaced. Replace the transfer belt or click On Line to continue printing. |
| 20 MEMORY OVERFLOW | The printer received more data from the computer than can fit in the printer internal memory. To continue printing, click On Line. Only the amount of data that fits in the printer internal memory is printed. |
| 21 MEMORY OUT | The printer ran out of memory. Click On Line to clear memory and abort the current print job. If this error occurs frequently, add additional memory to the printer. |
| 21 MIO INITIALIZING | The MIO card is in the process of initializing and cannot accept data. |
| 22 I.O CONFIG ERROR | The computer is not obeying the pacing mechanism of the MIO link, causing the printer receiving buffer to overflow during a busy state. Click On Line to resume printing. This results in a loss of data. |
| 23 MIO NOT READY | The MIO card cannot accept data. For more information, run a self-test page. |
| 24 BUSY MOVING TONER | The printer is moving toner from the hoppers to the developers. |
| 30 POSTSCRIPT ERROR XX | The printer encountered a PostScript error indicated by XX. Click On Line to continue. The current job will be canceled. |
| 40 I/O DATA ERROR | The printer encountered an error while receiving data from the computer. Click On Line to continue. |
| 48 INVALID JOB ABORTING JOB | The printer received invalid language switching information. Click On Line to continue. |
| 50.X ERROR CLEAR CYCLE POWER | The printer engine is clearing a fatal fuser error. Turn the printer off, then back on. If the error persists, service is required. |
| 50.X FUSER SERVICE ERROR | A fuser error occurred. Turn the printer OFF, then back ON. If the error persists, service is required. |
| 52.X ENG NVRAM SERVICE ERROR | The printer engine reported a NVRAM failure. Turn the printer off, then back on. If the error persists, service is required. |
| 53 LASER ERROR | The printer engine reported a laser/scanner error. Click On Line to continue printing. If the printer remains in the error condition, turn the printer off, the back on. If the error persists, service is required. |
| 53 LASER SERVICE ERROR | The printer engine reported a laser/scanner error. Turn the printer off, then back on. If the error persists, service is required. |
| 54.X ENGINE ERROR | The printer engine reported an error of failure. Click On Line to continue printing. If the printer remains in the error condition, turn the printer off, then back on. The error persists, service is required. |
| 54.X ENGINE SERVICE ERROR | The printer engine reported an error or failure. Turn the printer off, then back on. If the error persists, service is required. |
| 55.X ENGINE CMD SERVICE ERROR | A bad command was received from the printer engine. Turn the printer off, then back on. If the error persists, service is required. |
| 56 LASER INDEX SERVICE ERROR | Toner has accumulated on the scanner lens, resulting in the shut down of the main driver motor. Service is required to clean the scanner lens. |
| 57 FAN MOTOR SERVICE ERROR | A cooling fan is either unplugged or not operating. . Turn the printer off, then back on. If the error persists, service is required. |
| 59 MANUAL FEED SERVICE ERROR | The rear paper source options were changed while the printer was turned on. . Turn the printer off, then back on. If the error persists, service is required. |
| 60.X SIMM ERROR | The firmware has detected a bad Cyclic Redundancy Check (CRC) in the stated SIMM. Click On Line to continue printing with reduced printer memory, or replace the faulty SIMM. |
| 60.X SIMM SERVICE ERROR | The firmware had detected a bad Cyclic Redundancy Check (CRC) in the stated SIMM. . Turn the printer off, then back on. If the error persists, service is required. |
| 61.X SIMM COMPAT ERROR | Faulty size or incompatible speed (timing) in the expansion RAM. Click On Line to continue printing. If the printer remains in the error condition, obtain the correct size or compatible speed extension RAM. |
| 62.X INTERNL ROM SERVICE ERROR | A checksum error occurred in the internal ROM fonts. . Turn the printer off, then back on. If the error persists, service is required. |
| 63.0 DRAM SERVICE ERROR | Faulty onboard DRAM. . Turn the printer off, then back on. If the error persists, service is required. |
| 63.X SIMM ERROR | Faulty SIMM expansion card. If this error occurs at power-up, the printer uses the base memory plus all of the memory other than the faulty location. Click On Line to continue printing. If this error occurs after power-up, the faulty SIMM expansion card should be removed or replaced. |
| 63.X SIMM SERVICE ERROR | Faulty SIMM expansion card. If this error occurs at power-up, the printer uses the base memory plus all of the memory other than the faulty location. Click On Line to continue printing. If this error occurs after power-up, the faulty SIMM expansion card should be removed or replaced. |
| 64.X DMA TIMEOUT SERVICE ERROR | The printer engine has detected a video direct memory access error. Turn the printer off, then back on. If the error persists, service is required. |
| 66.X JAM SENSOR SERVICE ERROR | The drum winding sensor has malfunctioned or the drum is not calibrated correctly. Turn the printer off, remove and reinstall the developers, then turn the printer on. If the error persists, service is required. |
| 68 NVRAM ERROR | A recoverable error was detected in NVRAM. Click On Line to continue. Then verify the control panel settings. One or more fields have been reset to their factory defaults during error recovery. |
| 68 NVRAM SERVICE | All printer control panel values have been reset to their factory defaults. Turn the printer off, then back on. If the error persists, service is required. |
| 68 NVRAM SERVICE ERROR | An NVRAM failure occurred. Turn the printer off, then back on. If the error persists, service is required. |
| 79 SERVICE (XXXX) | Turn the printer off, then back on. If the error persists, service is required. |
| 80 SERVICE (XXXX) | Turn the printer off, then back on. If the error persists, service is required. |
| 89 SERVICE (XXXX) | Turn the printer off, then back on. If the error persists, service is required. |
Parallel
Availability: Standard
Connection: Centronics Female
Activation: Automatic.
AppleTalk
Availability: Optional
Connection: RS-422A Female interface.
Activation: Automatic for AppleTalk/RS-422 and Centronics I/O
Ethernet
Availability: C2059A
- Novell/Ethernet interface card.
C2059C - Token Ring interface card also available.
Connection: Optional interface card.
Activation: Through rear panel dip switches.